
Install Instructions


4
Model TLC
All-Fuel Chimney - 5" to 8" Installation Instructions
Hart & Cooley, Inc.
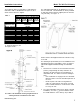
Slide the trim ring onto the ceiling support, and slide the
assembly into the framed opening from below. Ensure
that the finishing ring is flush with the underside of the
ceiling and the assembly is level and plumb. Secure the
ceiling support in place, using at least three 8-penny
(2½") nails through each of the four straps or through the
twelve prepunched holes in the support. You may
substitute, in lieu of nails, twelve #8 x 2" wood screws.
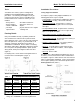
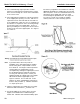
Stovepipe Adapter Installation
The stovepipe adapter is installed by twisting-locking it to
the bottom end of the chimney section that enters the
ceiling support. Lower the assembly down into the ceiling
support so that the stovepipe adapter sleeve is protruding
through the support and into the living space.
The crimped end (stub) of the stovepipe adapter is
intended to fit inside the flue pipe from a solid-fuel
appliance, thus preventing condensate drips at the
chimney connection. Install interconnecting flue pipe by
following the appliance manufacturer’s installation
instructions and appropriate building code requirements,
keeping in mind that the flue pipe run should be as short
and straight as practical. Generally, for a wood-burning
appliance installation, an 18-inch minimum clearance to
combustibles must be maintained for a single-wall flue
pipe.
Install additional chimney sections and lock together by
turning clockwise until the two sections lock together
tightly. Install required locking bands. Continue adding
chimney lengths until a height of about 2 feet below the
next ceiling level is achieved.
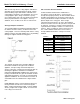
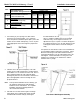
Attic Insulation Shield Installation
An attic insulation shield must be installed where
the chimney enters an attic space. (It also acts as a
firestop when properly framed.) An attic insulation shield
should keep insulation from coming into contact with the
chimney and will allow a depth of insulation of 10 inches
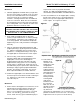
plus the depth of the ceiling joist. Where height
restrictions will not permit the use of the attic insulation
shield, an enclosure from the attic joist to the roof joist will
be sufficient. All chimney enclosures must maintain the
required minimum airspace clearance of 2 inches to the
chimney. When enclosing the chimney below the roof
line, a rafter radiation shield at the roof level and a
firestop radiation shield at the ceiling level must be
installed.
Table 2
Framing Dimensions
for Attic Insulation Shield
Chimney Flue
Diameter
inches
5" 11 x 11
6" 12 x 12
7" 13 x 13
8" 14 x 14