
Install Instructions


7
Hart & Cooley, Inc.
Installation Instructions Model TLC All-Fuel Chimney
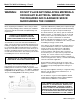
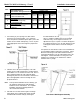
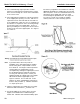
The maximum chimney height above a wall support is
indicated in Table 3 and illustrated in Figure 10, all of
which must be above the support.
See Table 3 for maximum chimney heights based on
chimney diameter and distance from wall.
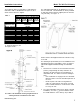
The wall support will allow for an adjustment of 2" to 6"
from a vertical wall. Threaded studs are factory-installed
on both side brackets and the support plate for fast and
easy assembly. See Figure 11.
Ensure that the wall support brackets are bolted securely
to the wall.
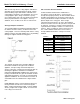
The following steps will assist you in the installation of the
wall thimble and of the wall support. Figure 10 shows a
typical wall support installation through a combustible
wall.
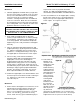
1. Determine the centerline of the horizontal connection
(chimney length through the wall), and frame an
opening to the dimensions for the wall thimble in a
combustible wall. See Table 4 Section A and Figure
12(A).
- Use a stud finder to roughly locate the wall studs.
Mark the outline of the hole and drill a pilot hole in
its center.
- Break out part of the wall covering within the
outline to confirm that the hole will be centered
between studs and that no electrical wires could
be cut by the saw.
2. For a noncombustible wall (concrete block or poured
foundation), cut a hole
3
/
16
" greater in diameter than
the outside diameter of the chimney as per Table 4.
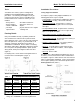
Table 3
5" ID
Chimney
6" ID
Chimney
7" ID
Chimney
8" ID
Chimney
D (inches)
Distance from
Wall to Chimney
2 74635649
2.5 73625548
3 71605347
3.5 69595146
4 66564944
4.5 62534642
5 58504339
5.5 52453835
6 45393430
H (feet)
Maximum
Height
Wall Support Chimney Height Chart
D - Distance from wall to the chimney
H - Height of chimney in feet
See Figure 10 also