
Install Instructions

Hart & Cooley, Inc.
2
Model TLC - Insulated Tee, Wall Support, Insulated Elbow Installation Instructions
Follow these simple steps for a wall-supported chimney
installation.
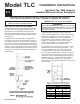
1. Assemble braces and pads to the plate, using
5
/16 x
3
/4”
bolts and nuts with braces down.
2. Nail pads and plate to framing temporarily, making sure
that plate is level and in proper position.
3. Mark and drill
5
/32” pilot holes in framing for lag screws
location.
4. Remove nails, install lag screws in all holes, and tighten all
bolts.
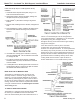
5. Place insulated tee on plate. Install tee cap tightly into tee
and secure with retainers and wings nuts, as shown in
Figure 3.
6. Use Model TLC chimney pipe for extension of chimney
through combustible wall. The tee extension must extend
4½” through the wall.
7. For support of chimney above supports, a wall band
should be used every 8 feet, and at least one wall band
must be installed.
8. In earthquake zones, drill through the lower end of the tee
and through the flange or coupler on the plate for at least
two stainless steel sheet metal screws.
INSULATED TEE ON MASONRY PIER
The Model TLC insulated tee may be used to start
chimneys indoors or outdoors, using a masonry pier
(Figure 4). The pier should be adequate for the weight
of the chimney and designed to permit a clear access to
the tee cap for cleanout purposes. Observe all indicated
framing, clearance and enclosure requirements indicated
on Figure 4 and discussed in the Wall Support Insulated
Tee Framing section.
15° AND 30° INSULATED ELBOWS
The Model TLC 15-degree and 30-degree elbows adapt
the chimney for installations where the termination
cannot be located directly above the initial vertical run of
the chimney. The maximum offset is 30 degrees from
vertical. The inclined length must be resupported at
4-foot spans (maximum). Adjustment of 0 to 30 degrees
is possible by using two 15-degree elbows.
Resupport chimney at first section above upper offset by
using interior resupport .
If the offset sections of chimney are in an interior
occupied area, they must be fully enclosed with a
minimum of 2” airspace clearance. In nonoccupied areas,
the chimney may be fully enclosed, or an attic insulation
shield may be used. See the appropriate instructions for
firestops and attic insulation shields (Sheet S-2) and the
general instructions for installing chimney above offset.
Locking bands must be used to couple an elbow to
another elbow/offset or to a threaded chimney section.