User Guide X1D User Guide 2016-12-14 Version v1.
USER GUIDE Content 1 Introduction 1.1 1.2 Update X1D Camera Firmware X1D Features X1D Camera and Lenses Features 1.3 1.4 1.5 1.6 2 3.4 3.5 3.6 3.7 3.8 3.9 X1D 8 9 10 10 Search Tools 10 Format and Printing the X1D User Guide 10 Safety and Warnings Cautions Disposal FCC ISED Certification Information The X1D Interaction Displays Touch Display Navigation Zoom in and out on the Touch Display 3.3 7 10 Functions 3.1 3.2 7 7 Interactive PDF Safety 2.1 2.2 2.3 2.4 2.5 2.
USER GUIDE 3.10 3.11 3.12 3.13 3.14 3.
USER GUIDE 3.21 Stop Down Button Stop Down / Depth-of-Field Preview 3.22 3.23 3.24 3.25 3.26 Change Settings on the Grip 3.28 3.29 4 4.3 4.4 4.5 4.
USER GUIDE 4.7 Video Settings Menu Video Settings 4.8 4.9 4.10 4.11 4.12 4.13 4.14 4.15 General General General General General Settings Settings Settings Settings Settings 96 Menu Wi-Fi Display Custom Modes Storage 4.19 4.20 5 100 Image and Video Destination 101 General Settings Date and Time General Settings Power and Timeouts General Settings Spirit Level General Settings Language General Settings Service Update X1D Camera Firmware 5.2 6 6.
1 INTRODUCTION
USER GUIDE Introduction 1.1 UPDATE X1D CAMERA FIRMWARE The X1D Camera system can be updated with improvements and new functions. Before you start to use your new X1D Camera, please visit www.hasselblad.com and download the latest X1D Camera firmware and update the Camera system to make sure you get the latest functionality. See specific section in this User Guide for an in depth description on how to download the X1D Camera firmware and update your X1D Camera. 1.
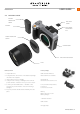
USER GUIDE Introduction 1.3 DELIVERY CHECK BATTERY PROTECTION COVER HOT SHOE COVER BATTERY ELECTRONIC VIEWFINDER EVF FRONT PROTECTIVE COVER CAMERA BODY LENS RELEASE BUTTON LENS Delivery Check In the package 1 Unpack all items. 2 Verify that all the items listed on the attached package information are supplied. 3 Inspect all the items for damage. 4 If any items are missing or damaged, write down the product number of that item. If not, proceed to step 6.
USER GUIDE Introduction 1.4 X1D TECHNICAL SPECIFICATIONS Camera Type Medium Format Mirrorless Digital camera with Autofocus, Auto exposure, interchangeable Lenses. Construction Machined aluminium. Tripod socket 1/4” Sensor Type CMOS, 50 mega pixels (8272 × 6200 pixels, 5.3 × 5.3 µm) Sensor Dimensions 43.8 × 32.9mm Image Size Stills: RAW 3FR capture 65MB on average. TIFF 8 bit: 154MB; Video: HD (1920 x 1080p) File Format Stills: Hasselblad 3FR Video: H.
Introduction 1.5 USER GUIDE SYSTEM REQUIREMENTS Storage and editing of images requires certain minimum computer capabilities. Large images require a reasonably high performance computer with sufficient memory, advanced graphics capabilities and a recent operating system. It is recommended that the computer has a USB 3 connector, which will allow you to load images more quickly from the camera. A USB SD card reader can also be used for image transfer from the SD cards. 1.
2 SAFETY
Safety 2.1 SAFETY AND WARNINGS Warning! Do not place cables between camera and computer so that there is a risk for people to trip and fall. This can cause personal injury and/or damage to the equipment. Warning! If you use spare battery packs, make sure to use protective caps on the contacts. The contacts can short circuit and catch fire, if not protected. This can cause personal injury and/or damage to the equipment.
USER GUIDE Safety Caution! Keep all equipment out of reach of small children. This will prevent damage to the equipment. Caution! When cleaning the camera, remove the batteries. This will prevent damage to the camera. Caution! If you leave the camera unused for a long period, remove the batteries. This will prevent damage to the equipment. Caution! Do not try to remove the glass IR filter from the front of the CMOS (due to dust or similar). This can cause damage to the equipment.
USER GUIDE Safety 2.4 FCC Federal Communication Commission Interference Statement: This equipment has been tested and found to comply with the limits for a Class B digital device, pursuant to Part 15 of the FCC Rules. These limits are designed to provide reasonable protection against harmful interference in a residential installation.
3 FUNCTIONS
USER GUIDE Functions 3.1 THE X1D INTERACTION DISPLAYS FRONT SCROLL WHEEL EVF - ELECTRONIC VIEWFINDER DISPLAY MODE DIAL TOUCH DISPLAY REAR SCROLL WHEEL Electronic Viewfinder Display, EVF Electronic Viewfinder Display, EVF The EVF on the Camera displays ISO, Focus action, Exposure compensation, Aperture, Shutter and Captures remaining. Press the MF/AF and the ISO/WB buttons to change settings. Use the Front Scroll Wheel or the Rear Scroll Wheel to select desired settings.
USER GUIDE Functions 3.2 TOUCH DISPLAY NAVIGATION The Touch Display on the X1D Camera is similar to a Phone or Tablet with touch sensitivity. The following gestures can be used to navigate and control the camera: MAIN MENU Action Function Swipe Right Move back / Move image right. Swipe Left Move image left. Only in Browse mode. Swipe Down Display Control Screen. Swipe Up Hide Control Screen. Tap / Press Select action / button / setting. Double Tap Zoom in to 100%.
USER GUIDE Functions ZOOM IN AND OUT ON THE TOUCH DISPLAY The following gestures can be used to Zoom in and out on the Touch Display: Zoomed View Function Action Zoom in Spread (move two fingers apart). Zoom out Pinch (move two fingers together). Action Function Double Tap Zoom in to 100%. Double Tap again to Zoom out to full View. Standard Preview 9 View Mode 9 View Mode displays an overview of up to 9 captures. Scroll down to display all Captures in the Folder.
USER GUIDE Functions 3.3 19 NAVIGATING THE MENUS DESCRIPTION OF THE TOUCH DISPLAY MENU ITEMS 1 The X1D Display Screen is Touch Sensitive and you can click with one finger to select and swipe in different directions to move up, down, forward and backward through the user interface.
USER GUIDE Functions OVERVIEW OF MENUS AND SETTINGS ON TOUCH DISPLAY The Touch Display can be controlled directly on the touch sensitive screen by pressing the menus and icons. You can scroll up, down and from left to right as described in previous chapters. You can also navigate the on screen menus by using the following buttons and scroll wheels: MAIN MENU Display 1 Control buttons next to the Touch Display for example Menu / Exit button. 2 Front Scroll Wheel. 3 Shutter Release. 4 Mode Dial.
USER GUIDE Functions 3.4 TOUCH DISPLAY MAIN MENU Main Menu MAIN MENU In the Main Menu there are 3 different Main Settings. Camera Settings (1), Video Settings (2) and General Settings (3). The placement of these 3 Settings are fixed and cannot be changed. Display Wi-Fi Power & Timeouts Quality Storage Service RAW JPG The icons on the left part of the Main Menu are Favourite Short links to Functions. In this example, they are: Display. Wi-Fi. Exposure (+/-). Power & Timeouts. Quality (RAW/JPG).
USER GUIDE Functions HOW TO ADD SHORT LINKS TO MAIN MENU 1 Select the + icon (A) on the Main Menu. 2 The Add Favourite Pop up screen displays the available options to add in a scroll list. 3 Select for example Self Timer (B). 4 The Self Timer icon is displayed on the Main Menu and the action is saved in the Camera Memory. Main Menu A HOW TO REMOVE SHORT LINKS ON THE MAIN MENU 1 Press and Hold on the icon you would like to remove from the Main Menu Favourites. Self Timer (C) in this example.
USER GUIDE Functions CONTROL SCREEN You can access the most common settings using the Control Screen. You can easily change these settings by tapping on any function and adjust directly. Control Screen Display Control Screen Swipe down from the top of the display on the Touch Display or press the soft button to the right of the display you can always display the Control Screen.
USER GUIDE Functions SETTINGS ON THE CONTROL SCREEN White Balance White Balance - Auto White Balance AWB. - Cloudy. - Shade. - Daylight. - Tungsten. - Flourescent. - Flash. - Manual WB. AF Focus AF Focus - MF Manual Focus. - AF-S Auto Focus Single. ISO - Select ISO value. Aperture - Select Aperture value. ISO This Chapter continues on the next page. Aperture X1D www.hasselblad.
USER GUIDE Functions Settings on the Control Screen Shutter Shutter - Select Shutter value. Exposure Adjust - Adjust Flash Exposure by sliding right (+) or left (-). - Adjust Exposure by sliding right (+) or left (-). Exposure Mode M Manual Mode. Mq Manual Quick Mode. A Aperture Priority Mode. S Shutter Priority Mode. P Program Mode. C1 Custom Program 1. C2 Custom Program 2. C3 Custom Program 3. Video Video Mode. Rectangle Automatic Mode (ISO are also automatically set).
USER GUIDE Functions Settings on the Control Screen Drive Mode - Single Drive Mode. - Continuous Drive Mode. Drive Mode Single Drive Mode selected. Remaining Captures - Displays the number of remaining Captures. Memory Card - 1 for SD 1 or 2 for SD 2 Card. Remaining Captures 256 Memory Card 1 - SD 1 Card. 2 - SD 2 Card. X1D www.hasselblad.
USER GUIDE Functions 3.5 PARTS, COMPONENTS, BUTTONS AND CONTROLS All parts listed in this Chapter, are described in detail in other specific sections.
USER GUIDE Functions 1 2 5 3 6 7 4 8 1 2 3 4 5 6 7 8 Flash Hot Shoe Dioptre Adjustment Dial Electronic Viewfinder EVF Touch Display Shutter Release Button Mode Dial On / Off Button Strap Lug 2 3 1 4 5 1 2 3 4 5 6 7 Microphone Right Microphone Left Strap Lug Image Plane Mark SD Cards Slot Lid Connectors Slot Lid Lens Release Button 6 7 X1D www.hasselblad.
USER GUIDE Functions 2 1 ADJUST DIOPTRE 1 Dioptre Adjustment Wheel. 2 Rotate the Dioptre Adjustment Wheel to adjust to desired setting. 1 Tripod Thread 1/4” 2 Battery Release Lever 3 Battery 1 2 3 X1D www.hasselblad.
USER GUIDE Functions 3.6 GRIP BUTTONS AND CONTROLS 3 1 2 4 5 6 7 1 AF/MF button The AF/MF button toggles between Autofocus and Manual Focus. 2 ISO/WB button This button provides direct access to the ISO and WB settings. Press one time to change ISO settings. Press again to change WB settings. 3 Front Scroll Wheel The front and Rear Scroll Wheels are used to make changes in exposure settings, navigate the Touch Display Menu as well as acting as browse controls.
USER GUIDE Functions 3.7 CAMERA BODY BUTTONS AND CONTROLS 1 1 AE-L Button This button activates AE-L that locks a light reading made in both automatic and manual exposure modes. It also acts as a Zoom out button when browsing or as Exit button when making a setting change on the Camera, according to mode. 2 2 AF-D Button The AF Drive button (AF-D) starts the Autofocus process. Press to start Autofocus and release to stop the Autofocus function.
USER GUIDE Functions 3.8 32 MODE DIAL 1 Mode Dial Selector The Mode Dial Selector (1) displays the Camera Mode in use. There are 10 different programs selectable on the Mode Dial. The Different Camera Modes Mq M A S P Rectangle Video C3 C2 C1 Manual Quick Mode. Manual Mode. Aperture Priority Mode. Shutter Priority Mode. Program Mode. Automatic Mode (ISO and WB are also automatically set). Video Mode. Custom Program 3. Custom Program 2. Custom Program 1.
USER GUIDE Functions 3.9 33 EXPOSURE PROGRAM MODES There are 7 different fixed programs and 3 Custom Programs, C3, C2 and C1. The Programs can be selected by turning the Mode Dial (1) or you can access the Control Screen on the Touch Display to select program M, A, S and P. 1 Programs Mq M A S P Rectangle Video C3 C2 C1 Manual Quick Mode. Manual Mode. Aperture Priority Mode. Shutter Priority Mode. Program Mode. Automatic Mode (ISO and WB are also automatically set). Video Mode.
USER GUIDE Functions MANUAL EXPOSURE MODE To change the Exposure mode Swipe Down to display the Control Screen. Exposure Modes Manual mode provides total user control of the shutter and aperture settings. In this mode the shutter speed and aperture settings are manually chosen by turning the front and rear scroll wheels. The standard exposure setting is obtained when the pointer over the exposure scale is positioned above the central index (in the viewfinder display).
Functions USER GUIDE MANUAL QUICK EXPOSURE MODE Mq mode is a Manual mode for quick photography. This mode works best when the X1D Camera is used on a fixed Tripod. 1 First set the Focus and Image Composition in another Program mode like Manual mode (M) for example. Mq mode does not support Live View. 2 Use the X1D Camera on a fixed stable Tripod. 3 Select Mq mode on the Mode Dial. MQ MODE FEATURES - Mq mode saves Power because the Live View is Off.
USER GUIDE Functions AUTOMATIC EXPOSURE MODE To change the Exposure mode Swipe Down to display the Control Screen. Automatic exposure provides a choice of two ways to control the shutter speed and aperture settings semi automatically and two ways fully automatically. Exposure Modes M, A, S, and P mode. Aperture priority A The aperture is manually chosen by turning the Front Scroll Wheel, and the shutter speed is automatically chosen by the camera.
Functions USER GUIDE 37 CUSTOM MODES The Custom Modes C3, C2 and C1 are three Modes that can be saved with your favourite settings. A HOW TO SET A CUSTOM MODE 1 Select a mode on the Mode Dial. M, A, S or P. M is selected in this case (A). 2 Make the changes to the program. Set desired ISO, AF/MF or WB. 3 Press the Menu Button to the right of the Touch Display to display the Main Menu. 4 Select General Settings. 5 Select Custom Modes. 6 Select Save to C1, C2 or C3.
Functions USER GUIDE AE-L BUTTON The AE-L button (1) has two main functions that can be incorporated in various working methods involving exposure locking. It also has an extra function for the flash measure capability (see AE-L section under Flash). The AE-L button can: 1 Lock an EV setting in manual and automatic modes When the button is pressed, the light metering facility is locked to the EV setting at that moment.
Functions USER GUIDE FIXED EXPOSURE COMPENSATION SETTING 1 Select the Exposure Adjust setting on the Control Screen. 2 Turn the Front Scroll Wheel (B) to change the Flash compensation and the Rear Scroll Wheel (C) on the grip to increase or decrease the amount of Exposure Compensation in 1/3 EV steps. 3 The amount is displayed as both an EV figure complete with a ‘minus’ or ‘plus’ prefix, and as a marker above a ‘minus’ to ‘plus’ scale, 4 Press AE-L Button (A) to reset any compensation back to zero.
USER GUIDE Functions EXPOSURE COMPENSATION / QUICK ADJUST The exposure compensation function, for both manual and automatic modes can be set from -5 to +5 EV, in 1/3, 1/2 or 1 EV increments and is visible above the scale in the viewfinder and as a ± symbol on the Touch Display Control Screen. The quickest way to make an adjustment in auto exposure mode is to use the Rear Scroll Wheel (B).
USER GUIDE Functions 3.10 LIGHT METER EXPOSURE MODE Metering Modes The Light Meter Mode can be changed on the Control Screen. Use the Rear Wheel to select Mode. Different Light Metering Modes There are three reflective metering modes available. Centre Weighted. Centre Spot. Spot Metering. Symbol Light Metering Modes Centre Weighted Used for light situations where there is no particular dominance of light or dark areas across the tonal range.
USER GUIDE Functions 3.11 VIDEO RECORDING A B To Record Video Video Control Screen First select Video Settings in the Video Settings Menu. 1 Select Video mode on the Mode Dial (B). 2 The Video Control Screen is displayed on the Touch Display. 3 Start the Live View Video by pressing the Live View Video icon. 4 The Video is displayed on the Touch Display. 5 Start Recording by pressing the Shutter Release Button (A) or by pressing the red recording icon on the Touch Display.
Functions USER GUIDE 3.12 CONNECTOR PORTS 1 SD Card Port 1 Port for the SD Card no 1. 2 SD Card Port 2 Port for the SD Card no 2. 3 HDMI Connector for Mini HDMI plug. 4 Audio in Connector for Audio In Microphone 3.5 mm stereo plug. 5 USB 3 Tethering plug Connector for USB 3 plug. 6 Audio Out Connector for external 3.5 mm Stereo Audio Out Plug. 1 2 3 4 5 6 X1D www.hasselblad.
Functions USER GUIDE 3.13 MEMORY CARDS The X1D camera uses SD cards only. There are two SD Card slots on the X1D Camera, slot no 1 and slot no 2. When using a SD card, the X1D is completely self contained. No additional wires or connectors need to be attached. 1 2 The recommended minimum write speed is 60 MB/sec (400x) or better. The X1D is shipped with a 16 GB SDHC SD card. This card is capable of holding approximately 75 − 150 captures (according to model).
Functions USER GUIDE INSERT A MEMORY CARD Insert SD card 1 Open the Memory Card Slot Cover by sliding it towards the back of the Camera and then rotate it counter clockwise. 2 When the card slot cover door is opened, mount the SD card in the SD card slot no 1 (A) or no 2 (B). 3 Close the slot cover by rotating it back and pushing it in place towards the front of the camera (C) to lock it into position. A B C X1D www.hasselblad.
USER GUIDE Functions REMOVE SD MEMORY CARDS Note! Do not remove a memory card from the Camera if the ‘ready’ light is blinking (placed in the lower right corner on the Touch Display), as this will corrupt the files on the card and result in data loss. The card will also need to be reformatted. A Remove SD card 1 Open the memory card slot cover on the Camera (A). 2 Press the SD card no 1 (B) or no 2 (C) a little way in and then release it. The SD card will then move out from the SD card slot.
USER GUIDE Functions FORMAT SD CARDS MAIN MENU > GENERAL SETTINGS > STORAGE > FORMAT The camera is only able to read and write to storage media that have been formatted correctly. New cards sometimes have no formatting, or you might want to convert a card that is currently using a format that the camera cannot read. In either case, you must reformat both SD cards within the X1D Camera to be able to use the SD Cards.
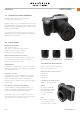
USER GUIDE Functions 48 3.14 XCD LENSES 1 2 3 1 2 3 4 Lens shade index for reverse mount Lens shade index Focusing ring Lens index 4 HASSELBLAD XCD 3,5/30MM LENS HASSELBLAD XCD 3,5/45MM LENS HASSELBLAD XCD 3,2/90MM LENS The XCD 30mm lens is the widest angle lens for the X1D. Its focal length provides a 24mm equivalent field of view, making it the perfect landscape, reportage and travel lens. The XCD 45mm lens is the ideal standard lens for the X1D.
USER GUIDE Functions 3.15 REMOVE AND ATTACH A LENS A REMOVE THE LENS Caution! Be careful when you attach/remove the components to/from the camera. This will help prevent damage to the data bus connections. Caution! Do not insert fingers into the camera body. This can cause damage to the equipment. B C 1 Hold the lens (C) with one hand and hold the camera body (A) still. 2 Push the lens removal button (B). 3 Rotate the lens counter clockwise. 4 Push the lens (C) away from the camera body.
USER GUIDE Functions ATTACH THE LENS Caution! Be careful when you attach/detach the components to/from the camera. This will help prevent damage to the data bus connections. Caution! Do not insert fingers into the camera body. This can cause damage to the equipment. 1 Push the lens removal button (A) and remove protection cover lid (B) from the camera body. 2 Rotate the lens so that the red mark on the lens (C) lines up with the red mark (D) on the camera body.
Functions USER GUIDE REMOVE THE LENS CAP 1 Insert thumb and index finger into the recesses (A). 2 Pinch the recesses (A) together. 3 Remove the front lens cap. A A ATTACH THE LENS CAP 1 Insert thumb and index finger into the recesses (A). 2 Pinch the recesses (A) together. 3 Attach the front lens cap on the lens until it snaps into place. A A X1D www.hasselblad.
USER GUIDE Functions REMOVE THE LENS SHADE All lenses are supplied with lens shades that additionally provides extra protection for transport and storage when mounted in reverse. 1 Turn the lens shade (A) counter-clockwise. 2 Remove the lens shade (A). A ATTACH THE LENS SHADE All lenses are supplied with lens shades that additionally provides extra protection for transport and storage when mounted in reverse. 1 Place the lens shade on the lens.
USER GUIDE Functions FILTERS The filters have a threaded fitting of 67 mm for both the XCD 45 mm and the XCD 90 mm lens, and are rotated clockwise into place. The XCD 30 mm Lens uses a 77 mm filter. As there is no rotation of the front section of the lens when the focus is changed, the filter do not rotate either. This is particularly useful when using polarizing or graduated filters where the orientation is critical.
USER GUIDE Functions 3.16 DISPLAY INFORMATION Viewfinder information ISO (100) Battery Status Exposure compensation EV Aperture setting (f/11) Shutter speed (1/1000) Remaining Capture counter (621) USB 3 Wi-Fi X1D PHOCUS / PHOCUS MOBILE INFORMATION Touch Display information Control Screen Metering method Aperture setting Shutter speed Exposure method ISO White Balance Flash indication Focus Drive EV Exposure (Daylight) ISO (100) Aperture (f/5.6) Shutter (1/125) EV (12.0) Exposure Compensation (+1.
USER GUIDE Functions 3.17 TOUCH DISPLAY AND CONTROLS When shooting, the X1D Touch Display with Live View displays the information most often required for a quick settings check. The Front and Rear Scroll Wheels and Camera Buttons together with the Touch Display are used to navigate the Main Menu and change settings. The Touch Display can show all saved captures on SD card 1 and 2. You can Browse and Zoom in the Captures for detailed inspection.
USER GUIDE Functions 3.18 ELECTRONIC VIEWFINDER DISPLAY EVF TYPICAL VIEWFINDER DISPLAY Touch Display Electronic Viewfinder Display EVF visual user interface Focus Area Indicator Exposure compensation setting (0.0 EV) X1D ISO Setting Aperture setting (f/11) Shutter speed setting (1/1000 sec) Battery indicator Remaining frames counter (621 left) www.hasselblad.
Functions USER GUIDE VIEWFINDER DISPLAY SETTINGS AF indicator The square AF indicator in the middle of the Electronic Viewfinder displays if the Autofocus is set properly or not. Start the Autofocus function by a soft half-press on the Shutter Release Button or by pressing the AF Drive button (AF-D). Black White Green Red - Normal mode. Autofocus is not analysing the subject. Autofocus is ongoing and analysing the subject. Autofocus performed and focus is set correct.
USER GUIDE Functions CAMERA LIVE VIEW The Camera features Live View on the Touch Display by default. Touch Display, Live View example with grid overlay In Camera mode Press once on the soft button marked with a star to the right of the Touch Display to Zoom in to 100%. This gives you a detailed view of the focus in the focus area. Rotate the Focus Ring on the Lens to adjust Focus. Press the star button again to exit Zoom.
USER GUIDE Functions 59 LIVE VIEW This feature is useful for accurate focusing, composition and depth of field preview. A 1 The Camera displays Live View when you half-press Shutter Release Button. 2 Press button B to step to next overlay. 3 Button A, or E, to Exit Live View.
USER GUIDE Functions 60 LIVE VIEW WITH HDMI EXTERNAL SCREEN MAIN MENU Display Wi-Fi RAW JPG Power & Timeouts Quality Storage Service Exposure AF Focus Connect an external Video Screen to the HDMI connector socket (1). On the Main Menu select LV Live View. Note! Live View demands higher power consumption than normal operation. Working with Live View will shorten the usage time of the Camera when on battery only power supply. 1 X1D www.hasselblad.
USER GUIDE Functions 3.19 FOCUS FOCUS ASSIST The X1D camera features automatic focus assist. A white rectangle marked green in the middle of the view provides confirmation of a precision focus setting and are a useful aid when making a setting with Auto Focus. Manual focus setting Manual focus can be used at any time even in Auto Focus Mode. You can also switch to Manual Focus Mode and only use the Focus Ring manually on the lens.
USER GUIDE Functions MANUAL FOCUS There is both a Manual focus mode setting and a manual override capability. A B In Manual focus mode, focusing is carried out by rotating the focus ring on the lens. The focus setting remains until changed as with a conventional non-autofocus lens. This means that pressing the shutter release button will not activate a focus setting change as it does in autofocus. To change back to autofocus, press the AF / MF button (B).
USER GUIDE Functions AUTOFOCUS A Autofocus modes Single Shot or Continuous are activated by pressing the shutter release to the half-press position. The operative range is from EV 1 to EV 19 at ISO 100. Focus is determined by maximizing the contrast within the central marked area. Alternatively, an attached flash unit that has a similar facility (a Nikon SB 600, for example) can also be used. This feature can be altered in settings.
USER GUIDE Functions SINGLE SHOT FOCUS At Single Shot setting (AF S), the shutter release will be blocked until the camera finds the optimum focus setting. This ensures that no captures are made that are not finely focused. However, this delay is normally only a fraction of a second in good lighting conditions with a clear focusing pattern. Note! In this mode the lens will focus at one distance and will remain focused at that distance while pressure remains on the Shutter Release button (A).
USER GUIDE Functions 3.20 MOVE AUTOFOCUS POINT A B C D The Autofocus point (A) can be moved, and selected manually, to any one of the 35 AF points (B). The AF point is a rectangle that measures 4 x 4 mm. How to move the Autofocus point on the Touch Display in Live View Mode or in the Electronic Viewfinder EVF 1 Start Live View Mode or use the EVF. 2 The single AF point is displayed in the centre position (A). 3 Press and hold the AF/MF button (E) for 1 second.
USER GUIDE Functions 3.21 STOP DOWN BUTTON STOP DOWN / DEPTH-OF-FIELD PREVIEW A visual depth-of-field preview can be made by pressing the STOP DOWN button (A). Depth-of-field is calculated as follows: 1 Focus the lens as required. 2 Make an exposure reading (auto or manual) and note the aperture setting. 3 Find the markings on either side of the central index that correspond to the chosen aperture. 4 From these two markings, read off on the required lens distance scale the two corresponding distances.
USER GUIDE Functions 3.22 CHANGE SETTINGS ON THE GRIP How to change AF/MF and ISO/WB settings AF / MF modes 1 Select AF/MF (D) on top of the Camera Grip. 2 Press the AF/MF button to toggle between AF and MF. A ISO / WB modes 1 Select ISO/WB (C) on top of the Camera Grip. 2 Press once on the ISO/WB button to select ISO. 3 Press twice to select WB. 4 Press a third time to exit.
Functions USER GUIDE TO ADJUST SHUTTER AND APERTURE ON GRIP Note! In manual mode both the shutter and aperture are electronically controlled and are adjusted by the Scroll Wheels on the grip. A Note! There are no separate manual setting rings on the lenses or camera body. The settings are displayed in the viewfinder display. How to adjust shutter and aperture Turn the Front Scroll wheel (A) to adjust shutter and aperture. Turn the Rear Scroll wheel (B) to adjust shutter and aperture.
USER GUIDE Functions ISO AND WHITE BALANCE ISO and White Balance are set either via the Camera Grip, the Touch Display or, when tethered, via Phocus. A B ●● On the Camera Grip, the ISO / WB Button (A) provides immediate access to ISO and White Balance settings. The front scroll wheel (B) and Rear Scroll Wheel (C) are used to make the desired changes. These appears on the Touch Display and in the Electronic Viewfinder (EVF).
USER GUIDE Functions 3.23 BROWSING, PREVIEW AND HISTOGRAM A BROWSE CAPTURES B To enter Browse mode, press the Play / Browse Button (C) next to the Touch Display. In Browse mode use the Front Scroll Wheel (A) on the Camera Grip to Browse captures in a folder. In Browse mode on the Main Menu, swipe right or left to Browse captures. Delete Capture with the Soft Button (D). Zoom out to Folder View to select another folder to Browse.
USER GUIDE Functions 71 STANDARD PREVIEW The Standard Preview is displayed when you first turn on the camera and is probably the view you will use most often. 1 2 3 It displays a preview of your most recent capture and basic information about the settings. 4 1 2 3 4 5 5 6 Card (1 or 2) Capture Date Capture Time Aperture (f/8) Shutter Speed (60) 7 8 6 ISO Setting (100) 7 +/- Exposure Adjust Indicator 8 Exposure Adjust (0.
USER GUIDE Functions HISTOGRAM TYPES HOW TO CHANGE HISTOGRAM OVERLAY The available Histograms are: Histogram Mode, Capture Details Mode, Luminance Histogram Mode and Separate Histogram RGB Mode. Touch the lower part of the image or use the rear scroll wheel to alter between the available Histogram representations. HISTOGRAM MODE LUMINANCE HISTOGRAM MODE Histogram mode displays RGB Histogram with separate RGB channels visible.
USER GUIDE Functions HISTOGRAM EXPOSURE MODE Low Exposure Underexposure High Exposure Even exposure Overexposure Histogram Exposure The Histogram provides a graph that indicates the total number of pixels at each brightness level, with brightness in range from black on the left to white on the right. It is a valuable tool for evaluating captures.
Functions USER GUIDE 3.24 PHOCUS OVERVIEW Phocus Phocus is a Capture Processing and File Management application aimed primarily at Hasselblad 3F file handling. Phocus is available for both Mac and Windows. Professional Image Quality Phocus combines Hasselblad Natural Colour Solution (HNCS) with Digital Auto Correction (DAC) to provide high digital image quality in the images you create.
Functions USER GUIDE 3.25 PHOCUS FEATURES IN PHOCUS Professional Image Quality ●● Hasselblad Natural Colour Solution (HNCS). ●● Lens corrections for X, H and V system lenses (DAC). The X1D Camera only supports X and H Lens systems. Specialized Tools ●● Advanced Tethered Camera Controls. ●● Phocus Mobile*. ●● Scene calibration & reproduction tools. ●● Leading edge Moiré removal. ●● Highlight recovery, shadow fill, clarity and dust spot removal tools. ●● Selective Adjustments. ●● Easy-to-use interface.
Functions USER GUIDE 3.26 CONNECT TO A COMPUTER 1 Connect a USB 3 cable to the USB port on the computer. 2 Open the hinged cover on the camera. 3 Connect the USB 3 cable to the USB port on the camera. When initiating a shot from Phocus, the Computer sends a signal to the X1D Camera, which triggers the shutter (and strobe/flash, if any).
Functions USER GUIDE PHOCUS AND HASSELBLAD CAPTURE FILES The X1D can capture files and store them as Hasselblad RAW format files or Hasselblad RAW + JPEG formats simultaneously. Hasselblad RAW files are initially stored in the 3FR format which is a proprietary Hasselblad format for the temporary storage of captures. A 3FR file contains the complete digitized raw image exactly as it was captured by the camera.
USER GUIDE Functions 3.27 BATTERY 2 1 Rechargeable Battery The environmentally approved Battery (Li-ion 3054752) is the standard Power Source for the X1D Camera (1 and 7. It is advisable to keep an extra fully recharged battery at hand. As is the case with most batteries, problems might be encountered when used in very low temperatures. In this situation it is advisable to keep the reserve battery inside a warm pocket, for example, to maintain it near body temperature.
USER GUIDE Functions BATTERY CHARGER The battery charger BCX-1 (3053573) is supplied with a number of plug attachments to suit various types of domestic electrical sockets available worldwide. Other types of sockets will require a domestic socket converter. Attach the appropriate plug by sliding it into position as in the illustration to the right. Reverse the procedure to remove the plug.
USER GUIDE Functions RECHARGEABLE BATTERY SPECIFICATION LI-ION/ BATTERY CHARGER 3053573 BCX-1 – PRECAUTIONS and GENERAL The battery should have a usable service life of around 400 recharge/discharge cycles. The battery should be charged for approximately 6 hours before first time use. Connect the battery to the camera correctly. The battery must be charged at room temperature. Maximum battery capacity is reached only after the battery has been charged and discharged several times.
Functions USER GUIDE BATTERY LIFE AND BATTERY WARNING Battery life is dependent on a number of variable factors and therefore cannot be exactly predicted. If the camera is left in the active state instead of Display Off or Sleep modes for long periods, for example, the battery will become exhausted much faster. A low camera battery level is indicated by a symbol on the display, as well as in the viewfinder. Low battery warning 3.
4 MAIN MENU Display Wi-Fi RAW JPG Power & Timeouts Quality Storage Service Exposure AF Focus SETTINGS
USER GUIDE Settings 4.
USER GUIDE Settings EXPOSURE ADJUST MAIN MENU > CAMERA SETTINGS > INCREMENT STEP SIZE > EXPOSURE ADJUST 1 2 3 4 Press the Camera icon on the Touch Display. The Camera Settings Menu appears. Press the Exposure Settings Menu. Select Exposure Adjust under Increment Step Size. Swipe right or press Menu / EXIT button to save and get back to Main Menu.
Settings USER GUIDE TRUE EXPOSURE MAIN MENU > CAMERA SETTINGS > EXPOSURE > EXPOSURE MODE 1 2 3 4 Press the Camera icon on the Touch Display. The Camera Settings Menu appears. Press the Exposure Settings Menu. Select Exposure Mode. Swipe right or press Menu / EXIT button to get back to Main Menu. True Exposure Settings Select On or Off. The check box will be marked with a √ when On and the check box is empty when True Exposure is Off.
USER GUIDE Settings True Exposure explained Light level at image plane T fully open Maximum aperture Stopped down one stop with True Exposure ON Stopped down one stop with True Exposure OFF Time T stopped down = T Fully open (using True Exposure) T stopped down > T Fully open (without True Exposure) True Exposure is an XCD and HC/HCD lens function that allows the shutter speed to remain unaffected when stopping down.
Settings USER GUIDE FLASH SETTINGS MAIN MENU > CAMERA SETTINGS > EXPOSURE > FLASH 1 2 3 4 Press the Camera icon on the Touch Display. The Camera Settings Menu appears. Press the Exposure Settings Menu. Select Flash. Swipe right or press Menu / EXIT button to get back to Main Menu.
Settings USER GUIDE FLASH AND STROBE SETTINGS The X1D Camera can be used together with the following Nikon Flashes in TTL mode: SB-300 SB-500 SB-700 SB-900 SB-910 General information When using the A or S setting together with flash, the exposure requirements of the camera will dominate which might produce slow shutter speeds indoors, for example, requiring the use of a tripod.
Settings USER GUIDE EXPOSURE LOCK MAIN MENU > CAMERA SETTINGS > EXPOSURE > EXPOSURE LOCK 1 2 3 4 Press the Camera icon on the Touch Display. The Camera Settings Menu appears. Press the Exposure Settings Menu. Scroll down to Exposure Lock. Swipe right or press Menu / EXIT button to get back to Main Menu.
Settings USER GUIDE AE-L (AE-LOCK) / QUICK ADJUST MAIN MENU > CAMERA SETTINGS > EXPOSURE > AE-L / QUICK ADJUST 1 2 3 4 Press the Camera icon on the Touch Display. The Camera Settings Menu appears. Press the Exposure Settings Menu. Scroll down to AE-L / Quick Adjust. Swipe right or press Menu / EXIT button to get back to Main Menu.
Settings USER GUIDE IMAGE ORIENTATION MAIN MENU > CAMERA SETTINGS > EXPOSURE > IMAGE ORIENTATION 1 2 3 4 Press the Camera icon on the Touch Display. The Camera Settings Menu appears. Press the Exposure Settings Menu. Select Image Orientation Settings. Swipe right or press Menu / EXIT button to get back to Main Menu.
USER GUIDE Settings 4.3 IMAGE QUALITY SETTINGS MAIN MENU > CAMERA SETTINGS > QUALITY 1 Select the Camera icon on the Touch Display. 2 The Camera Settings Menu appears. 3 Press the Quality Settings Menu. Swipe right or press Menu / EXIT button to get back to Main Menu.
USER GUIDE Settings 4.4 CAMERA FOCUS SETTINGS MAIN MENU > CAMERA SETTINGS > FOCUS 1 Select the Camera icon on the Touch Display. 2 The Camera Settings Menu appears. 3 Press the Focus Settings Menu. Swipe right or press Menu / EXIT button to get back to Main Menu.
USER GUIDE Settings 4.5 CAMERA SELF TIMER SETTINGS MAIN MENU > CAMERA SETTINGS > SELF TIMER 1 Press the Camera icon on the Touch Display. 2 The Camera Settings Menu appears. 3 Press the Self Timer Settings Menu. Swipe right or press Menu / EXIT button to get back to Main Menu. Camera Menu CAMERA SETTINGS Exposure RAW JPG Quality AF Focus Self Timer Settings Menu CAMERA SETTINGS: SELF TIMER Active: Time: 2 seconds Self Timer Configuration Self Timer Settings Menu Active On or Off.
USER GUIDE Settings 4.6 CAMERA CONFIGURATION SETTINGS MAIN MENU > CAMERA SETTINGS > CONFIGURATION 1 Press the Camera icon on the Touch Display. 2 The Camera Settings Menu appears. 3 Press the Configuration Settings Menu. Swipe right or press Menu / EXIT button to get back to Main Menu.
USER GUIDE Settings 4.7 VIDEO SETTINGS MENU Main Menu Video Settings Menu MAIN MENU Display VIDEO SETTINGS Wi-Fi Exposure RAW JPG AF Power & Timeouts Quality Storage Service 1080p Quality Video Quality Settings VIDEO SETTINGS: QUALITY Resolution: 1080p Focus Video icon MAIN MENU > VIDEO SETTINGS 1 Press the Video icon on the Touch Display. 2 The Video Settings Menu appears. 3 Select the Video Settings Menu. Swipe right or press Menu / EXIT button to get back to Main Menu.
USER GUIDE Settings 4.8 GENERAL SETTINGS MENU Main Menu General Settings Menu MAIN MENU Display GENERAL SETTINGS Wi-Fi Exposure RAW JPG AF Power & Timeouts Quality Storage Service Wi-Fi Settings Menu GENERAL SETTINGS: WI-FI Wi-Fi Display Focus Custom Modes Wi-Fi: Mode: 5 GHz Storage General Settings icon 8 MARCH Date & Time Power & Timeouts Spirit Level Language Service MAIN MENU > GENERAL SETTINGS About 1 Press the Settings icon on the Touch Display.
USER GUIDE Settings 4.10 GENERAL SETTINGS DISPLAY MAIN MENU > GENERAL SETTINGS > DISPLAY General Settings Menu GENERAL SETTINGS 1 Press the General Settings icon on the Touch Display. 2 The General Settings Menu appears. 3 Select Display. Wi-Fi Swipe right or press Menu / EXIT button to get back to Main Menu.
USER GUIDE Settings 4.11 GENERAL SETTINGS CUSTOM MODES MAIN MENU > GENERAL SETTINGS > CUSTOM MODES General Settings Menu GENERAL SETTINGS 1 Press the Settings icon on the Touch Display. 2 The General Settings Menu appears. 3 Select Custom Modes. Wi-Fi Swipe right or press Menu / EXIT button to get back to Main Menu. Storage 8 MARCH GENERAL SETTINGS: CUSTOM MODES Display Save to C1 Custom Modes Save to C2 Date & Time Custom Modes Menu Settings Power & Timeouts How to save to C1, C2 or C3.
USER GUIDE Settings 4.12 GENERAL SETTINGS STORAGE MAIN MENU > GENERAL SETTINGS > STORAGE General Settings Menu GENERAL SETTINGS 1 Press the Settings icon on the Touch Display. 2 The General Settings Menu appears. 3 Press the General Settings Storage icon. Swipe right or press Menu / EXIT button to get back to Main Menu.
USER GUIDE Settings IMAGE AND VIDEO DESTINATION MAIN MENU > GENERAL SETTINGS > STORAGE > IMAGE DESTINATION General Settings Menu GENERAL SETTINGS Destination Settings. 1 Press the Settings icon on the Touch Display. 2 The General Settings Menu appears. 3 Press the General Settings Storage icon. 4 Select Image Destination. Swipe right or press Menu / EXIT button to get back to Main Menu.
USER GUIDE Settings 4.13 GENERAL SETTINGS DATE AND TIME MAIN MENU > GENERAL SETTINGS > DATE AND TIME General Settings Menu GENERAL SETTINGS GENERAL SETTINGS: DATE & TIME Wi-Fi 1 Press the General Settings icon on the Touch Display. 2 The General Settings Menu appears. 3 Press the Date and Time icon. Swipe right or press Menu / EXIT button to get back to Main Menu.
USER GUIDE Settings 4.14 GENERAL SETTINGS POWER AND TIMEOUTS MAIN MENU > GENERAL SETTINGS > POWER AND TIMEOUTS General Settings Menu The X1D Camera can be set to automatically turn off the Touch Display or Power Off after a set amount of seconds to save battery for example. Wi-Fi Change Display or Power Off 1 Press the General Settings icon on the Touch Display. 2 The General Settings Menu appears. 3 Press the General Settings Power and Timeouts icon.
USER GUIDE Settings 4.15 GENERAL SETTINGS SPIRIT LEVEL MAIN MENU > GENERAL SETTINGS > SPIRIT LEVEL General Settings Menu GENERAL SETTINGS Wi-Fi The camera is equipped with an accelerometer. The accelerometer is used to measure the tilt of the camera relative to the horizontal axis (A) and vertical axis (B). How to align Camera with Spirit Level 1 Press the General Settings icon on the Touch Display. 2 The General Settings Menu appears. 3 Press the General Settings Spirit Level icon.
USER GUIDE Settings CALIBRATE SPIRIT LEVEL MAIN MENU > GENERAL SETTINGS > SPIRIT LEVEL General Settings Menu The Spirit Level can be set to Factory or User mode. In User mode, the Spirit Level can be calibrated by the user. In Factory mode, the calibration from the Factory is used. Wi-Fi Factory mode with Factory settings. Storage User mode with User settings.
USER GUIDE Settings 4.16 GENERAL SETTINGS LANGUAGE MAIN MENU > GENERAL SETTINGS > LANGUAGE General Settings Menu GENERAL SETTINGS Wi-Fi 1 Press the General Settings icon on the Touch Display. 2 The General Settings Menu appears. 3 Press the General Settings Language icon. Swipe right or press Menu / EXIT button to Save and get back to Main Menu.
USER GUIDE Settings 4.17 GENERAL SETTINGS SERVICE MAIN MENU > GENERAL SETTINGS > SERVICE General Settings Menu GENERAL SETTINGS Wi-Fi 1 Press the General Settings icon on the Touch Display. 2 The General Settings Menu appears. 3 Press the General Settings Service icon. Swipe right or press Menu / EXIT button to get back to Main Menu. Custom Modes Storage MARCH Date & Time Power & Timeouts Spirit Level Service Menu Settings Firmware Update Check For Update.
USER GUIDE Settings 4.18 UPDATE X1D CAMERA FIRMWARE MAIN MENU > GENERAL SETTINGS > CHECK FOR UPDATE 1 Press the Settings icon on the Touch Display. 2 The General Settings Menu appears. 3 Press the General Settings Check for Update button. 4 The camera will now check the inserted card/cards for update files.
USER GUIDE Settings 4.19 GENERAL SETTINGS ABOUT MAIN MENU > GENERAL SETTINGS > ABOUT General Settings Menu GENERAL SETTINGS Wi-Fi 1 Press the General Settings icon on the Touch Display. 2 The General Settings Menu appears. 3 Press the General Settings About icon. Swipe right or press Menu / EXIT button to get back to Main Menu. Display Custom Modes Storage 8 MARCH Date & Time About Menu GENERAL SETTINGS: ABOUT Firmware v1.
USER GUIDE Settings 4.20 GENERAL SETTINGS ABOUT CERTIFICATION MAIN MENU > GENERAL SETTINGS > ABOUT > CERTIFICATION 1 Press the General Settings icon on the Touch Display. 2 The General Settings Menu appears. 3 Press the General Settings About icon. 4 Press the Certification icon. General Settings Menu GENERAL SETTINGS Wi-Fi Display Custom Modes Storage 8 MARCH Swipe right or press Menu / EXIT button to get back to Main Menu. Date & Time About Menu GENERAL SETTINGS: ABOUT Firmware v1.
5 ACCESSORIES
Accessories 5.1 USER GUIDE XCD LENS RANGE XCD 30 LENS The XCD 30 is a fixed 30 mm Lens that has Autofocus and Manual Focus capabilities. Hasselblad XCD 30 Lens, 30 mm XCD 45 LENS The XCD 45 is a fixed 45 mm Lens that has Autofocus and Manual Focus capabilities. Hasselblad XCD 45 Lens, 45 mm XCD 90 LENS The XCD 90 is a fixed 90 mm Lens that has Autofocus and Manual Focus capabilities. Hasselblad XCD 90 Lens, 90 mm X1D www.hasselblad.
Accessories USER GUIDE XCD HC LENS ADAPTER (3025000) The XH Lens Adapter can be used to connect a HC or HCD Lens, for example HC 80 mm Lens. 5.2 OPTIONAL HC LENS ACCESSORIES H 13, 26 AND 52 EXTENSION TUBES (3053513, 3053526 and 3053542) The Extension tubes attach between the lens and the body to reduce the close focusing distance for close up photography. They are available in three sizes: 13 mm, 26 mm and 52 mm. As the X1D has a TTL light metering system, exposure compensation is automatic.
Accessories 5.3 USER GUIDE OPTIONAL ACCESSORIES PRO SHADE V/H 60 – 95 (3040740) An adjustable bellows lens shade that provides highly efficient protection against stray light. Its compact, flat folding design saves space in the equipment case. Also features a filter holder for glass, gelatin, or plastic filters. PRO SHADE ADAPTERS (3043415, 3043417, 3043419) 67mm, 77mm and 95mm adapters with bayonet mount for HC lenses. Features lock to provide positive and secure attachment. X1D www.hasselblad.
USER GUIDE Accessories X1D XCD LENS FILTER DIMENSIONS XCD 30 XCD 45 XCD 90 77 mm. 67 mm. 67 mm. UV-SKY FILTERS (3053470, 3053474 and 3053478) Absorbs UV radiation and reduces blue haze without affecting colours. Also protects the front lens surface. Particularly recommended when the camera is used in harsh conditions. Available in three sizes to suit various lenses: UV-sky 67mm (3053470), UV-sky 77mm (3053474) and UV-sky 95mm (3053478).
6 TROUBLESHOOTING
USER GUIDE Troubleshooting Problem Possible cause Suggested correction Camera is deactivated The camera can be affected by a discharge of electricity. This can happen when the area around the control buttons on the grip accidentally touches a conductive cord or material connected to earth. Remove and re-insert the battery, then press the ON - OFF button on the camera to turn on the camera. This can deactivate the camera and does not cause any damage.
Troubleshooting 6.1 USER GUIDE ERROR MESSAGES Caution! Be careful when you attach/remove the components to/from the camera. This will help prevent damage to the data bus connections. If any error message is displayed 1 Remove the components from the camera. 2 Attach the components to the camera again. If the error message is still displayed 1 Remove the battery. 2 Wait 10 seconds. 3 Attach the battery again. The Camera processor is now reset.
USER GUIDE Troubleshooting 6.2 CHANGE FROM UNKNOWN LANGUAGE MAIN MENU > GENERAL SETTINGS > LANGUAGE 1 Press the General Settings icon on the Touch Display. 2 The General Settings Menu appears. 3 Navigate to the menu item with a Globe icon (number 8 on the list from the top, Language). 4 Scroll down to select your Language. Swipe right or press Menu / EXIT button to get back to Main Menu.
Troubleshooting 6.3 USER GUIDE CLEAN THE LENS GLASS REMOVE DUST Caution! Do not touch the glass surface with your fingers. This can cause damage to the equipment. If there is dust on the lens glass, do as follows: 1 Remove the dust with an air blower. 2 If that does not solve the problem, try to remove dust with a very soft lens brush. REMOVE SMEAR Caution! Do not touch the glass surface with your fingers. This can cause damage to the equipment.
Troubleshooting 6.4 USER GUIDE CLEAN THE SENSOR FILTER Caution! Be careful when you attach/remove the components to/from the camera. This will help prevent damage to the data bus connections. Caution! When you remove the lens, keep foreign objects away from the camera opening. The camera opening is very sensitive. This will help prevent damage to the equipment. Remove the Lens and clean the Sensor 1 Remove USB 3 cable if connected. 2 Press and hold the Lens Release button.
Troubleshooting USER GUIDE User Guide for Hasselblad X1D The information in this User Guide is intended for informational use only, is subject to change without notice, and should not be construed as a commitment by Victor Hasselblad AB. The X1D Product Images in this User Guide were not taken with a Hasselblad X1D. They are produced in 3D as visualization. They are used for illustrative purposes only and are not intended to represent the image quality produced by a Hasselblad X1D.