22 MPix 39 MPix 22 MPix 39 MPix User Manual Language version: English Manual version: 2 / 2006 Camera firmware version: 9.1.
C O N T E N T S Introduction 4 Parts & Components 8 1 Quick Start 9 2 Function Control & Display 14 Grip LCD View f inder LCD 3 Camera Body Carr ying strap Rechargeable bat ter y grip − general Bat ter y charger Charging the bat ter y View f inder screen Accessor y connec tion PC-connec tor Base plate 4 View finder Par ts & Components At taching and removing the view f inder Eyepiece adjustment Eye cup 5 Lenses Par ts & Components At taching a lens Removing a lens Lens cap Filter s Lens shade
11 Over view of viewing, deleting and copying images 63 Basic image browsing Choosing the current batch Browsing by approval status Zooming in and out Zooming in for more detail Thumbnail views Preview modes Bat ter y saver mode Full-screen mode Overexposure indicator Deleting images Transferring images 63 63 63 64 64 64 65 67 67 67 68 68 12 MENU — ISO, White balance, Media, Browse 69 Menu over view Navigating the menu system Language ISO White balance Media Browse 69 69 71 71 72 72 73 13 MENU —Storage
Welcome to Hasselblad ! These three products represent the forefront of medium format photography - both digital and analogue. Their unrivalled position is based on an accumulation of experience spanning more than fifty years. By using Hasselblad equipment you share the decision made by of some of the world’s best and most famous photographers.
the largest digital files currently available for professional photography, making them ideal for the most demanding, high resolution printing applications and give the photographer increased flexibility and creative control when cropping or enlarging for printing. All images are the result of the superior performance of the H System camera and lenses and have been fine tuned with Hasselblad’s unique Digital APO Correction technique.
FlexColor workflow for the specialist commercial photographer FlexColor offers an image processing workflow with the highest degree of control for the studio photographer. In tethered operation, tools like live video and overlay masking help bring productivity to advanced set composition. The newest FlexColor version allows the photographer to manipulate colour temperature and compare image details across multiple images for precise image selection.
Manual information This manual covers most user aspects of the H2, H2D cameras and CFH digital backs. The information is loosely divided between the products but quite naturally there is a good deal of overlap. For example, the H2D sensor unit and the CFH digital back share the identical menu structure and so that aspect appears under the same heading. The logos on the first page of each chapter symbolize the content relevance in most cases.
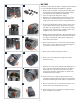
1. Flash unit hot-shoe 2. Rubber eyecup 3. Exposure mode and metering method selector button 4. Exposure compensation button 5. Eyepiece adjustment dial 6. Magazine LCD 7. Magazine LCD illumination button 8. Magazine control buttons 9. Magazine settings lock 10. AE-L button 11. Film wind-off button 12. User button 13. Rear control wheel 14. Grip LCD 15. Support strap lug 16. Camera control buttons 17. Magazine databus 18. Front control wheel 19. Shutter release button 20. Battery holder button 21.
1 Quick Start – H2 & H2D only This section is a quick start guide to assembling and preparing your new camera. From separate items, the assembly process should take no more than several minutes to complete and when the battery is charged you will be able to take simple and straightforward photographs immediately. All the information is repeated later on in the manual, as well as much more in-depth information, under the relevant sections and headings for easier search access.
H2 / H2D 2 1 The following is a simple ‘quick start guide’ to assembling your new H2 or H2D if necessary, together with a film magazine and a digital back, as appropriate. Remove the battery by depressing the battery holder button and simultaneously swinging the battery holder retaining lever down until it stops. Pull battery downwards. 2. Choose the appropriate plug for the charger. 3.
13 13. While holding the viewfinder at a slight angle, locate the front section into place on the front edge of the viewfinder screen recess in the camera body ensuring the central locating lug and databus interface are positioned correctly. Swing the viewfinder downwards and press firmly until it clicks into place. Ensure that both sides of the viewfinder are seated correctly. 14. Point the camera at a smooth toned area.
23 23. Pull 8–10 cm (3–4 in) of paper backing from the film roll and insert the tongue of the backing paper into the slot in the take-up spool. 24 24. Turn the take-up spool one complete turn to ensure the tongue is firmly held in place by the overlying paper backing. Check diagram for correct film travel direction. 25 25. Re-insert the film holder into the main body of the film magazine ensuring the correct orientation.
The camera is now complete and ready to use. If you press the ON.OFF button A for half a second, the camera will activate. If the camera enters STANDBY mode (the LCD screen on the grip will show the H2/D symbol only), reactivate it by pressing the shutter release button B halfway (or the ON.OFF button). You can now explore the menus, buttons, control wheels, etc observing the changes on the LCD on the grip as well as the LCD in the viewfinder. .................................................................
2 Function Control & Display (H2 / H2D camera body) ■ LCD display on camera ■ LED display on viewfinder ■ Upgradeable firmware ■ Rapidly accessible menu ■ Interactive display ■ Customizable functions All functions and settings on the H2/D are accessed and altered by the control buttons and wheels on and around the grip aided visually by the LCD userinterface. The information on the grip LCD is in menu format and has a great deal in common with those found in modern computers, cell phones, etc.
Below is an overview of the primary functions of the control wheels and buttons. Some controls have dual or triple functions according to the state of the menu or setting. A full description can be found further on in this manual. Shutter release button Activates camera and releases shutter. FLASH / (CONTROL LOCK) button Lock settings to avoid inadvertent change. Also accesses flash settings. AF button Accesses focus modes. DRIVE button Accesses the various drive modes. MENU button Accesses menu.
Grip LCD Typical camera grip display. (The information in brackets describes this particular example). Flash condition indication (No exposure compensation, normal flash synchronisation) Focus setting (Autofocus setting, single shot mode) Drive condition (Single setting) Shutter speed setting (1/400s) Aperture setting (f/5.6) ISO setting (50 ISO/ASA) Exposure Value display (EV 9.
The basic principle behind making changes is that the appropriate button is first pressed to access the menu and then settings altered by way of the control wheels. The appropriate control wheel is designated by arrowheads alongside the setting description. Some buttons have a toggle function, the ON.OFF button has a quick ‘click’ action as well as a longer (half-second) ‘press’ action and the shutter release has two positions: ‘half-press’ and ‘full-press’.
Viewfinder LCD Typical viewfinder display. Note the LEDs will only be visible when activated (by the camera or a setting). (The information in brackets describes this particular example). Exposure method indication (‘aperture priority’ mode) Aperture setting (f/5.6) Exposure compensation setting reminder symbol Flash LED Warning triangle LED Metering method setting (Centre weighted) Focus Aid LED Exposure compensation setting Shutter speed setting (1/30 second) (+0.
Menu charts – general Throughout this manual you will find charts to explain the steps and procedures required to alter the various settings. These charts are laid out to graphically illustrate in a simple manner how to navigate through the menus. While they include all the information that would be presented on the LCD relevant to that section, they cannot illustrate all the possible combinations of the various symbols seen on a screen at one time as that would be impractical and too confusing.
Shutter release button A A This button has half-press and full-press positions. By pressing half-way (or softly) the camera, auto focus function and exposure meter can be activated. By pressing all the way down (or more firmly) the shutter will be released (or the chosen exposure procedure will begin, as relevant. For example, the self timer is activated with this button) FLASH / (CONTROL LOCK) button / (EXIT) B This is a triple function button.
On the rear of the grip, as well as the rear control wheel, there are a further three control buttons: AE-L button J K L J This button can lock a light reading made in both automatic and manual exposure modes. It can also be used in Zone mode to take a new reading. Can be reassigned in Custom Settings to another function. See section on the AE-L button (chapter 8, Light Metering and Exposure Control) for full details. button K No function at present.
There are also two control buttons on the viewfinder, as well as the eyesight correction adjustment wheel: Eyesight correction adjustment wheel P The personal eyesight adjustment facility has a diopter range of -4 – +2.5, to suit most users. EV correction adjustment button Q Press this button to access the EV compensation screen. Settings are made with either the front or rear control wheels. An EV correction symbol appears on the grip and viewfinder LCD as confirmation.
3 Camera Body ■ Aluminium cast in one piece ■ Stainless steel shell ■ Integral Quick coupling plate ■ Digitally controlled ■ Upgradeable software ■ Modular design ■ Integral ergonomic grip ■ Pixel based LCD user interface The H2/D camera body is a robust construction of cast aluminium with a stainless steel shell for extreme durability. The workings of the camera are controlled by silicon technology that provides tremendous opportunities for sophisticated operation.
The H2/D camera body is a robust construction of cast aluminium with a stainless steel shell for extreme durability. The workings of the camera are controlled by silicon technology that provides tremendous opportunities for sophisticated operation. To take just two examples, the mirror return is slowed down at the last moment by controlling the motor to decrease vibrations and the current usage status of the camera body, lenses etc is recorded and freely accessible for service intervals, etc.
6 Please note the Battery charger BC-H Li-ion 7.2 VDC (3053568) is designed for use with Battery grip rechargeable 7.2V units only. 7 Charging the battery 7 With the battery grip removed from the camera, insert the jack plug from the battery charger into the socket (fig. 6) on the battery grip. Insert the battery charger into a standard (100–240V~ /50–60 Hz) domestic socket. Remember that it will take around 12 hours to load the battery properly the first time.
Rechargeable battery grip – precautions The following precautions should be adhered to: Battery grip rechargeable 7.2 V: • Connect the battery grip to the camera correctly. • Keep the protective cover in place when not in use. (Short-circuiting across keys in a pocket, for example, could cause a fire risk). • Do not use the battery grip for anything other than an H1/H1D/H2/H2D camera. • Do not immerse the battery grip in liquids. • Do not incinerate the battery grip.
14 Viewfinder screen 15 14, 15, 16 The H2/D is fitted with a Spherical Acute-Matte D viewfinder screen for extreme brightness, clarity and even illumination. An optional accessory screen with a grid pattern is also available. To change a viewfinder screen, remove the viewfinder to access the viewfinder screen. To remove the screen, place the tip of a ballpoint pen or similar in the viewfinder screen removal lug and pull upwards.
4 Viewfinder ■ Multi-mode light metering ■ Full exposure information ■ 100% image ■ 90° viewing angle for eye-line composition ■ Full image for spectacle wearers ■ Integral dioptre adjustment ■ Integral flash unit The 90° viewfinder provides a laterally corrected 100% image at eye-line level. It features a wide-range diopter adjustment to suit most users. The viewing distance is designed to provide full frame view even for eyeglass wearers.
A B C D E F G H Parts & Components A. B. C. D. Rubber eye cup Hot shoe Eyesight adjustment wheel Exposure compensation button E. F. G. H.
5 Lenses ■ Rapid and accurate automatic focusing capability ■ Central electronic shutter ■ Instant manual focus override with natural friction ■ Instant automatic-focus return capability ■ Non-rotation of filter or accessory when focusing ■ Non-rotation of lens barrel in automatic focusing mode ■ Shutter speeds 32 sec to 1/800 sec with flash sync ■ Reversed lens shade serves as protection ■ Automatic detection of extension rings and converters All HC lenses have been specially formulated for the H system to
1 Parts and components 2 A A. B. C. D. E. B C 2 D 1 E 3 1 Lens shade index Manual focus ring Focusing distance scales Depth-of-field scales Lens index Attaching a lens 2, 3 Remove the front protective cover on the camera body by depressing the lens release button and keeping it depressed while turning the cover counter-clockwise. Remove the rear lens cap by unscrewing it in a counter-clockwise direction.
Depth-of-field calculation 7 There are two distance scales (in feet and metres) visible through the focus distance window on the upper part of the lens barrel. There is also a central lens index mark and a depth-of-field scale. The focusing distance is read off the chosen scale from the central lens index. Depth-of-field can be calculated as follows: 1. Focus the lens as required. 2. Make an exposure reading (auto or manual) and note the aperture setting. 3.
Automatic focus setting Focus is correct when both arrowheads are visible together. Focus is incorrect if only one arrowhead is visible. If the focus cannot be established, then both arrowheads flash. CF Adapter The CF adapter is an optional accessory that allows virtually all C type lenses from the V-system to be used on H-system camera bodies. This automatically expands the potential lens range for H cameras by more than a dozen different focal lengths.
6 Film Magazine ■ Automatic 120/220 compatibility ■ Automatic wind on / wind off ■ Automatic film advance ■ LCD information panel ■ Integral darkslide ■ Customizable data imprinting ■ Illuminated LCD ■ Barcode recognition ■ Count-up or count-down film frame reminder choice The film magazine is a sophisticated semi-independent unit within the modular system. It has its own power supply for individual information storage, LCD panel, illumination, etc.
A F G H B J I K L C D E Parts and components A. B. C. D. E. F. LCD panel LCD illumination button Change up button Change down button Function selector Film plane index LCD panel A A B The LCD can be illuminated by pressing the display illumination button, which is accessible when the magazine is not attached to the camera. The LCD will remain illuminated all the time you keep the button depressed, up to a maximum of 10 seconds.
G a time-out of five seconds of non-activity, the display returns to the main screen. Changes can only be made when the settings lock switch is in the unlocked position. H Film plane index F Provides a measuring point for the actual position of the film plane in the magazine. Used for calculations in critical applications. Darkslide key I G Withdraws and replaces the darkslide.
Operation Battery The magazine uses a battery to retain information and settings when unattached from the camera. When attached to the camera body, the magazine takes its power requirements from the camera batteries. The magazine battery will normally be effective for 1-2 years depending on use (off camera illumination, for example). When the battery is in a very low condition, (approx... 1 month of use left), a low-battery symbol appears on the magazine LCD as a warning.
Magazine settings Press the function selector ( button ) repeatedly to successively access: A. Film speed (ISO / Bar Code) B. Film length (120/220/ Number of frames) C. Data (on/off ) D. Frame counter (count down / count up) E. Low-battery warning symbol C A B D Film speed setting / Barcode E 1 2 3 4 The film speed (ISO / ASA) can be set automatically or manually. Automatic setting uses a Barcode (only some films have this feature, notably Fujifilm). This is the default setting.
Data imprint setting Data imprinting can be activated or deactivated through the magazine menu. Manual film speed setting. To access data setting: 1) Ensure the magazine settings lock is in the unlocked position. 2) Press the button until the Data symbol appears. 3) Press either the or the button to reach On or Off. 4) The new setting will be saved automatically after a time out of five seconds. 5) Return the magazine settings lock to the locked position. 220 film length setting.
Film loading 1 The film magazine can be loaded either on or off the camera. Regularly check the interior of the magazine and remove dust, particles or any scraps of paper from previous rolls of film. Load and unload film magazines away from direct light sources. 1) Fold out the film holder key and turn it counter-clockwise 90°. Withdraw the film holder completely.
7 General overview of H2D sensor unit & CFH digital back ■ 3 operating and storage modes ■ Direct shooting to 3FR ■ FlexColor worklow efficiency ■ Instant Approval Architecture H system cameras were designed with digital photography in mind right from the outset so the H2D and CFH are natural developments within the world famous H system.
In very simple terms, a digital back holds a light sensitive sensor in place at the film plane. The electronic signals from the sensor are then processed and stored as a digital file. As an electronic colour image is made up of three components − red, green and blue which combine to form a so-called RGB image − the sensor’s task is to convert a multi spectrum light image into three digital files (red, green and blue) for combination later on.
A F B G C H D I E J K L M N O P Q R S Parts, components & control panel buttons The control panel with its bright OLED screen is the main graphical interface for image checking and sensor unit setting changes when not connected to a computer. However, the grip LCD is still the interface for focus and exposure settings. The buttons are used for browsing images and navigating the menu system.
available image batches, media (e.g., compact-flash, ImageBank, and value setting on the menu. Zoom-out button / SELECTION (– button) Safety catch Used when removing the digital back / sensor unit. G CCD and IR filter Zoom-out button (to make the view smaller) for the preview image. You can continue to zoom out to view several small images at once and finally to view and select batches and media. Also acts as a selection button for value setting on the menu.
Simple introductory overview of menu access, navigation and settings choice. The menu is structured in a manner similar to cell phones and similar electronic devices. Various branches within the tree system are accessed by pressing the navigation button until you reach the point where a choice has to be made. The OK (Approve) button or SELECTION (Zoom-in/Zoomout) buttons are then used to confirm choice. After pressing the MENU button, the main menu list appears.
By using the buttons on the control panel you can navigate down through the various levels in the menu. It provides the source of information about image files and also provides a way of making custom settings so the digital back suits your way of working. Below is a simple overview of what is available and where it is situated on the menu. MENU STORAGE ISO Sets the light sensitivity of the sensor. Equivalent to ‘film speed’. WHITE BALANCE Set to match the colour temperature of light used.
Don’t forget the menu shortcuts! To help you work faster, the digital back provides shortcuts to some of the most commonly used menu commands that do not otherwise have a dedicated button on the front panel. These are accessible by pressing and holding one of the front-panel buttons for a second or so. These are mentioned where appropriate elsewhere in this manual, but we summarize them here for your convenience.
8 CFH setup Setup overview Although the CFH is primarily designed for use with a Hasselblad H2 camera, it can also be used with a Hasselblad H1 camera or with nearly any camera that has been fitted with an adapter for mounting Hasselblad film magazines. However, not all CFH features are available with camera bodies other than the H2.
• Connect a FireWire hard disk. See ‘Working with a Standard FireWire Hard Disk’ for details. • Connect to a computer. See ‘Working Connected to a Computer’ for details. 1 Powering the CFH on an H2 When connected to an H2 camera body, the CFH takes its power from the H2 battery pack. The combination is turned on and off using the on/off switch on the camera body. Please see the H2 user manual for details about the on/off switch, standby times etc. Removing the CFH from an H2 2 1.
• • You must always work connected to a computer and shoot using FlexColor. This is necessary in order to power the CFH. You must furthermore use a computer that supplies power through its FireWire port; not all computers do this (especially laptops). Camera settings details are not communicated to the CFH, so these are not stored with each shot as they are with the H2.
Making exposure settings and taking shots Cameras other than the H2 are not able to communicate with the CFH. You must therefore make exposure settings as follows when you use a view camera: 1. Select an ISO rating for the CFH using the FlexColor software. 2. Take light-meter readings and set aperture and shutter speed as would be appropriate for exposing film of your selected ISO rating. 3.
9 Initial General Settings and Preparation Language 1 If you have not already done so, you may wish to change to your chosen language now. You can choose between: ENGLISH GERMAN FRENCH ITALIAN SPANISH JAPANESE CHINESE 2 Setting the menu language Proceed as follows: 3 1. Press the MENU/EXIT ( 4 ) button to open the menu. 2. Press the NAVIGATOR button ( and ) to select the SETTINGS sub-menu. 3. Press the NAVIGATOR button () to open the SETTINGS menu. 4.
Storage & Shooting Image storage modes / shooting The H2D / CFH can store captured images in three ways: 1. Untethered / Compact flash card mode In this mode the H2D/CFH acts independently of other connections. Images are stored on the internal, removable compact-flash card. • The main advantage with this mode is the freedom of cables and extra equipment. • The main disadvantages with this mode in the field are the battery power capacity and the size of the card’s holding capacity.
• See “Selecting the Current Storage Medium” for details. • Use the zoom-out button to zoom all the way up to the top level, which shows all connected media, and then zoom in on the appropriate medium and batch. See “Navigating Media and Batches” for more information about selecting media and batches in this way. 3.
Removing a card 1 2 3 4 1. Open the CF card slot cover on the sensor unit. Behind the cover, you can see the bottom edge of the card in its slot and a release button immediately below the card. 2. Press the release button a little way in to release it into the active position. 3. Press the now extended release button all the way into the sensor unit. Some force is required, so it is a good idea to use your thumb to push while you grasp the other side of the sensor unit with your fingers.
Tethered to a computer When tethered to a computer, you can control many camera functions using the FlexColor software. Even if you never shoot while connected, you will probably connect the camera to your computer each time you want to download your images, though you might instead use a compact-flash card reader and/or connect your Image Bank CF or FireWire disk directly.
10 Storage – Working with media and batches General Whichever way you choose to store your images, they should be filed in batches for efficient workflow. Organizing your work with batches Batches help you to organize your shots as you work. They function exactly as folders on a computer. Batches have the following properties: • When you create a new batch, you assign a name to it and it is created as a new folder.
Medium-type icon (Compact Flash) Medium name The MEDIA list. In this example a CF card and a FireWire disk are illustrated and therefore connected. The blue frame around the CF card symbol tells you that captured images will be saved to the CF card and not the FireWire disk.
1 2 3 4 5 6 7 8 To select the current medium and view batches using the browse controls: 1. Press the zoom-out ( ) button repeatedly until you are all the way at the top zoom level.
Using Instant Approval Architecture The Instant Approval Architecture system helps you to evaluate your images as quickly as you take them. It works by supplying immediate audio feedback, which tells you instantly whether each new picture is exposed correctly or likely to be over- or underexposed. Thereafter, the system enables you to assign each image one of three status levels.
Note that some shots may trigger the warning even though they are exposed accord- ing to your intentions. You should consider these warnings only as a guideline. This feature can be turned off. 3. If no problem is detected, then the image is saved with green status. If you set Approval to ‘Auto’, all images will be stored as Green if judged as correct and Yellow if judged as technically doubtful. No images are ever stored as Red automatically! 4.
Browsing by approval status You can set the camera to browse by approval status, which means, for example, that you will see only green-status images as you browse a batch (or both green and yellow, or only red, etc.). The current filter setting is indicated on-screen, as illustrated. Filtered images are still there, but they will not be shown until you change the filter setting. Also, if you change the status of an image, the image may ‘disappear’ if it no longer passes the filter.
11 Overview of viewing, deleting and copying images Basic image browsing The large, full-colour OLED display enables you to inspect your shots while you are still on-location. The display offers full-screen previews, high-magnification zoom, two levels of thumbnails and analysis tools including a full histogram and camera settings. When you first turn on the camera, the display opens in standard browse mode, showing the last image taken (if any) for the current medium and batch.
Zooming in for more detail The preview display has a much lower resolution than your images. You can therefore zoom very far into the images to inspect small details. To do this: 1 1. Browse to the image you wish to zoom into with the navigation button. 2. Press the zoom-in ( ) button to zoom in one step. The screen updates to show both a zoomed image and a thumbnail image that includes a red box outlining the portion of the images currently shown. 3.
You can cycle through all the available preview modes by pressing the View-Mode button. Preview Modes Choosing the Preview mode You can use the view-mode button to cycle through the available preview modes. The preview screen works in several different modes: • Standard preview: shows a preview image surrounded by a display of few important settings. • Histogram: shows a preview image overlaid with a histogram.
ISO setting White balance Current storage medium Approval status and browse filter setting Button label Image file name Storage capacity (Shots taken / shots remaining) The standard preview display is the one shown when you first turn on the camera and is probably the view you will use most often. It features a preview of your most recent shot and basic information about the settings and the image itself.
Battery-saver mode In this mode, the sensor unit is fully responsive, so you can take pictures but the screen is not lit up, thereby saving battery power. You can enter the menu system while shooting in this mode (which activates the screen until you exit the menu system again) but the approval, zoom and navigator buttons have no effect.
Deleting images − general Delete shortcut ! There is also a one-button shortcut for deleting single images. To use it, select a target image and then press and hold the until the confirm-delete dialog opens. The H2D/CFH enables you to delete images using any of the following techniques: • Delete the currently selected image only.
12 Menu: • ISO • White Balance • Media • Browse Menu system overview The main menu contains those settings that you will need to access most often as you work on an assignment. It also provides sub-menus that give you access to all other settings, most of which you will need less often. Entry name (in white) and current setting in yellow Selected entry (indicated by blue frame).
Menu structure Entries of the main menu 70
Language 1 2 1. Press the MENU button to open the menu. 2. Use and to select the SETTINGS sub-menu. 3. Press to open the SETTINGS menu. 4. Press to select the USER INTERFACE sub-menu. 3 5. Press either the or (in this case Spanish). 4 button to choose a new language 6. Press the MENU/EXIT button again to close the menu. ISO 5 6 1 2 You are able to set the light sensitivity of the digital back to match an equivalent ISO rating for standard film.
White balance Use this entry to set the white balance saved with the image and applied to the preview. To select a preset white balance: 1. Select the MAIN MENU > White Bal entry. The current setting is displayed here. (See also Navigating the Menu System for details about how to find this setting.) 2. Use the or button to step through the available white balance settings until the setting you want is shown. 3.
Browse 1 The browse filter complements the instant-approval system by enabling you to browse through images according to their approval status. You have the following choices: • All: browses all of the images in the current batch, regardless of their approval status. This is the default. 2 • Red: browses only red-status images from the current batch. These are images that you have marked for likely deletion.
13 Menu: Storage This section describes file storage, file transference, storage organization, file classification and related subjects.
1 MAIN MENU > STORAGE 2 The Storage menu provides entries for working with storage media. Here, you can format media, copy images from the camera to a hard disk or computer and create new batches on available media. You can also set the initial approval status (green or yellow) assigned to new pictures. The first item on the storage list is file deletion.
Menus for deleting several images from a batch. 1 Deleting several images from a batch 2 To delete several images from a selected batch: 1. Starting at the single-image preview display, Select MAIN MENU > STORAGE > Delete. (See also Navigating the Menu System for details about how to find this setting.) 3 2. Use to enter the Delete submenu. B. C. A. 3. Use the or button to select: A. This image - deletes the current image only B.
5. You now return to the main menu. Either move on to another setting by using the navigator button or 6 5 6. Press the menu (EXIT) button to exit the menu system. Deleting several images from a selected medium 1 To delete several images at once: 1. Starting at the single-image preview display, press the button until you reach the media list. 2. Use and to select the medium from which you wish to delete. You will be deleting from all batches stored on that item.
Menus for deleting several images from all batches from a selected storage medium. 5. You must now select the approval status that you wish to delete. All images from the selected medium that are also of the status that you select here will be deleted by the operation. Use and to select All Red, All Red & Yellow or All. 5 6. Then press to open the delete dialog for your selected status. You are now asked to confirm the delete. 6 7 7.
FORMAT The digital back is only able to read and write to media that have been formatted. However, new cards or disks sometimes arrive without any formatting, or you might want to convert media that are currently using a format that the camera cannot read. 1 Each time you get a new compact-flash card, we recommend 2 3 To format media: 1. If you have more than one type of medium connected (e.g.
COPY 1 Usually, you will copy images from a card by connecting the camera to a computer and using FlexColor. However, you might also want to load images from a card to a portable FireWire hard disk or Imagebank, allowing you to erase the card and keep shooting even when you do not have a computer with you. After the copy, the destination disk will have a folder named CARDXXX, where XXX is a number that increments with each new copy operation (e.g., CARD001 for the first copy, CARD002 for the next, etc.).
BATCH Batches help you to organize your work. They are very similar to folders on a computer hard disk. Use the Batch command of the STORAGE menu each time you want to create a new batch. For more information about batches, please see Working with Media and Batches . To create a new batch: 1. Press the MENU button. 2. Press to navigate down and select the Storage dialog. Press and then to navigate down and select Batch. 3 Press to open the Batch dialog.
DEFAULT APPR. LEVEL The Instant Approval Architecture system helps you to evaluate and mark each image based on how well it has come out. By default, the system assigns an initial approval status for each new shot based on an analysis of the distribution of exposure levels. In the factory configuration, the status of each new shot is assigned as follows: 1 • Green (approved): The new shot seems to have been exposed correctly.
14 Menu: Settings There are a number of settings grouped under the general ‘Settings’ heading which are: • User Interface • Camera • Miscellaneous • Default Navigating the USER INTERFACE settings 83
MAIN MENU > SETTINGS > User Interface By altering the User Interface settings, you can control the way the digital back interacts to suit you and your preferred way of working. It also includes date and time settings. Entries of the USER INTERFACE Menu The user interface menu includes both entries and sub-menus. The following entries are available here: • Language: The menu system can be displayed in any of seven languages. This menu entry enables you to select your preferred language for the menus.
1 2 3 4 5 6 Setting the options under the User Interface menu Each of the above entries can be set by similar menu navigation. Language, Power Down and Mark Overex can be set immediately by the or buttons while Sound, Date & Time and Display require another move to sub menu for final choice. Proceed as follows: 1. Press the menu (MENU) button to open the menu. 2. Use and to select the SETTINGS sub-menu. 3. Press to open the SETTINGS menu. 4. Press to select the USER INTERFACE sub-menu. 5.
Navigating the CAMERA settings Connectivity diagram – CFH only Hasselblad H2 Hasselblad CFH Any shutter with X sync Flash sync input cable View camera adapter for Hasselblad H1 (not available from Hasselblad) Any view camera with Hasselblad H1 adapter Horseman ISS electronic shutter with lens control 86 Rollei electronic shutter with lens control
1 Setting CAMERA model and options 2 Proceed as follows: 1. Press the menu (MENU) button to open the menu. 2. Use and to select the SETTINGS sub-menu. 3. Press to open the SETTINGS menu. 4. Use and to select CAMERA. 3 4 5. Press to open the CAMERA menu. 6. Press either the or button to select camera model. 7. Use and to select EXPOSURE TIME or CAPTURE SEQ. if required. 5 8. Press either the or button to make new settings if required. 9.
1 Setting EXPOSURE TIME and CAPTURE SEQUENCE 2 Proceed as follows: 1. Press the menu (MENU) button to open the menu. 2. Use and to select the SETTINGS sub-menu. 3 3. Press to open the SETTINGS menu. 4 4. Use and to select CAMERA. 5 6 5. Press to open the CAMERA menu. 6. Press either the 7 button to select PINHOLE. 7. Press or to select EXPOSURE TIME. 8 8. Press either 9 or 10 or to make an exposure time setting. 9. Press to select CAPTURE SEQUENCE. 10.
11 12 11. Press either the or button to make an INITIAL DELAY setting. This setting controls the amount of time that elapses before the first exposure in the sequence. 12. Press to select DELAY. 13 14 13. Press either or to make a DELAY setting. This setting controls the amount of time between each exposure in the sequence. 14. Press to select COUNT. 15 16 15. Press either or to make a COUNT setting. This setting controls the number of exposures in the sequence. 16.
Navigating the MISCELLANEOUS settings MAIN MENU > SETTINGS > Miscellaneous 1 The MISCELLANEOUS menu contains two settings: Selecting an interface The interface setting controls the way the camera will appear to you computer when you connect it. You have the following choices: • Camera: The camera will present itself to your computer as a camera.
The About box 1 Occasionally, Hasselblad may release updates to the internal software of the digital back (this is called “firmware”). These updates may fix small errors and/or add new features. You will probably receive additional assistance from Hasselblad technical support if and when a new update is available. In this case, it may be important to know the serial number and current firmware revision of your digital back. To find this out: 1. Select MAIN MENU > SETTINGS > MISCELLANEOUS > About.
MAIN MENU > SETTINGS > Default The DEFAULT setting will reset all custom settings you have made back to the original default / factory settings. To reset all settings: 1. Select the MAIN MENU > SETTINGS > DEFAULT entry. 2. Press the OK button and then the EXIT to return. 1 2 Don’t forget the menu shortcuts! To help you work faster, the digital back provides shortcuts to some of the most commonly used menu commands that do not otherwise have a dedicated button on the front panel.
15 Light Metering & Exposure Control ■ Three metering methods ■ Five exposure methods ■ Extremely accurate light metering The light metering system is capable of selective sensitivity producing three reflective metering methods: Average, Centre weighted and Spot. All methods are measured in increments of 1/12 EV. Information transfer is rapid and automatic ensuring consistently correct exposure settings even in difficult and changeable lighting situations.
Light metering and exposure control Two primary factors have to be considered when making exposure control choice, namely, metering method and exposure method: Metering method determines in which manner the light measurement is made and how much of the image is taken into account( Average, Centre Weighted and Spot). Exposure method involves the parameters and deciding factors about how the light measurement is translated into aperture and shutter speeds.
1 Selecting metering method 2 Proceed as follows with the camera in active mode: 1. Press the EXP button on the viewfinder. 2. Turn the rear control wheel (in either direction 2a) to successively access the three choices: Average, Centre Weighted, and Spot 2b. 3. Press Save (DRIVE button) to retain the setting. EXP � 3 Exposure method Exposure can be controlled either manually or by using one of four automatic modes.
A ‘+ 0.3’ above the scale in the display, as in illustration 4 for example, would indicate a ‘0.3 EV overexposure’ setting. Conversely, a ‘-2’ , for example, would indicate a ‘2EV underexposure’ setting. Note that the appearance of a +/- symbol on the grip and viewfinder LCDs in manual mode means that a change has been made to the exposure compensation setting. See later section on ‘Exposure compensation’.
AE- L button 1 1, 2, 3, 4, 5, 6 This button has two main functions that can be incorporated in various working methods involving exposure locking. It also has an extra function for the flash meter capability (see AE-L section under Flash). The AE-L button can: 2 a) lock an EV setting in manual and automatic modes. b) be used as a brightness range checking facility in standard terminology or Zone System terminology.
Alternatively, you can also pre-set the initial zone reading in order to save time and effort where there is no freely available ‘zone 5’ subject for light measuring. For example, you might be on a sandy beach where you know that sand is normally classified as zone 6. You can pre-programme the zone placement by holding down the AE-L button while choosing the new zone value and turning the front control wheel until zone 6 appears.
16 General Functions ■ Manual and autofocus modes ■ Two drive modes ■ Quick adjust wheel ■ Profiles This section describes the basic and general functions used in most situations. By understanding the capabilities of the H system you will be able to gain a great deal of control of how you work in the future. By taking advantage of the many features available, you might well find your normal practices changing for the better.
Power The camera can be set at two active power modes − ON or Standby − as well as OFF. In active modes, battery consumption is least in Standby mode and most in ON mode. The camera enters Standby mode automatically after 10 seconds (default) to preserve battery consumption but this interval can be changed in Custom Options. Also, after 10 seconds, the display on the OLED on the sensor unit is dimmed and after 30 seconds the display is turned off completely.
Manual focus mode 1 The Manual focus mode is set by the front control wheel on the grip in the following manner: In camera active mode: 1) Press the AF button on the grip. 2) Turn the front control wheel to: Manual 3) Press Save to store the setting. ����� AF ���� You can also use the shutter release button ‘half-press’ function to save a new setting and automatically return to the main screen.
Continuous At Continuous setting (AF C), the shutter can be released rapidly before the lens is focused in order to capture a split-second shot (in Single Shot, an exposure cannot be made until the camera has had time to focus). However, the camera will continue to focus if a moving subject is within the focusing zone or if you recompose, even though the shutter release button is half pressed.
Drive There are two drive modes, Single and Continuous, accessed by pressing the DRIVE button on the grip. Single In Single mode, an exposure is made when the shutter release button is pressed and the camera is made ready for the next exposure. To make the next exposure however, you must first release the shutter release button and then press again. In camera active mode: 1) Press the DRIVE button on the grip. 2) Turn the front control wheel to: Single 3) Press Save to store the setting.
1 Profiles 2 The profiles feature allows rapid access to pre-determined combinations of settings that increase the speed and security of workflow. One example might be in a social situation where there might be a need for formal outdoor portraiture followed by informal indoor handheld flash-assisted wide-angle shots, both situations requiring very different settings in a stressful environment.
To use a profile from the main screen, press the PROFILES button to reach the profiles screen again. Scroll down the list to the profile you want and then press the Load (AF) button. All the saved settings will then be automatically implemented. If you decided to change the settings but nevertheless keep the Profile name on the list, the new set of parameters will be retained under that name. That is to say, the settings will not be the same as listed here, despite the name.
17 Advanced Features ■ Programmable self timer ■ Programmable bracketing ■ Programmable interval setting ■ Up to 30 custom options ■ Data and text imprinting ■ Customizable button function This section describes the features that might not need to be used on every occasion but can be exploited wisely to obtain the optimum from the system. Some features are a little more special, bracketing for example.
General overview of camera menu Self timer options ���� Bracketing options Interval options Settings options Custom Settings This configuration of 30 options appears with the H2 model with a film magazine attached only. 28 options are available with an H2D or H2 with CFH attached. See later secton for more details.
There are a number of more advanced features that while not necessarily used every day still remain immediately accessible through the menu system. They provide the integral finesses that make the H2/D a powerful and sophisticated tool to satisfy a variety of professional demands. There are four main functions: 1. Self timer 2. Bracketing 3. Interval timer 4. Settings 5.
1 Self timer setting 2 The Self timer function is set in the following manner: � ���� 1) Press the MENU button on the grip. 2) Turn the front control wheel until Self Timer appears. 3) Press ENTER (DRIVE button) on the grip.
Bracketing options available 2 frames or 3 frames or 5 frames options available options available 1/3 EV or 1/2 EV or 1 EV 2 Bracketing The bracketing facility provides an automatic series of exposures; one at the standard exposure setting (Manual or Auto) and the others with pre-determined deviations in EV from the standard exposure. This is particularly useful for images containing a very wide tonal range, for example.
1 Bracketing setting 2 The Bracketing function is set in the following manner: � 1) 2) 3) 4) ���� Press the MENU button.
Interval options available 2 frames − 255 frames options available 1 second − 1 hour 1 3 2 Interval By using the interval setting, you can allow the camera to take a series of exposures automatically over a set period. This is often required for time and motion studies, security surveillance, nature study, etc. The exposure and focus settings (Manual or Auto) will be according to the camera settings at the time of exposure.
Settings / Custom Options options available CUSTOM OPTIONS 1 4 2 � From the Settings screen you can access three main sub-settings: Custom options, Image Info and System status by turning the front control wheel. From each of these three sub-settings you can access further screens. Custom options has more than 24 screens, Image info has two more screens each with more choices and System status has two more screens.
Sets which function will be immediately activated when the User button is pressed (you cannot alter the setting in this mode though, only use it). The button has a toggle function so that by pressing it again the new setting will be de-activated. Please Note As the H2 can accept a film magazine, it offers two extra Custom Options for film magazine use only.
Magazine exposure lock (H2 only) Focus aid in MF 10 • Yes • No • Half press • Always • Off Allows you to release the camera without a film loaded in the magazine. Yes blocks the shutter if there is no film in the magazine and also displays a message on the grip LCD: No film. No allows the shutter to be released with no film in the magazine. Lens exposure lock manual focus mode.
Beeper 18/20 Bracket param. in Manual 24/26 • On • Off • Shutter speed • Aperture Sets the audible beeper signal. Selects either the shutter speed or the aperture as the parameter which changes in a bracketing sequence when in Manual On enables the signal. Off disables the signal. exposure mode. Shutter speed selects changes in shutter speed. Aperture selects changes in aperture settings.
Image Info / Imprint type Applicable to an H2 with film magazine only ! 1 4.2 Image Info (film magazines only!) 2 � The Imprint facility controls the text that will appear along the edge of each frame on a film. It is possible to imprint approximately 40 characters at one time. ���� Imprint Type records technical information automatically created by the camera. Text records information created by the user. 4.2.1 4 3 ����� The following can be chosen as an option: � • Imp.
‘Image Info’ not applicable with an H2D or H2 /CFH 1 4.2.2 2 � Text In Image info you can compose your own combination of letters, words, symbols, etc to be included in the metadata. The same procedure is also used to change a Profile name. ���� Text setting / Profile name changing Press the MENU button on the grip. Turn the front control wheel until Settings appears. Press the Enter (DRIVE) button on the grip. Turn the front control wheel to access 4.2 Image info. Press the Enter (DRIVE) button to 4.
3 2 � � 4 � 5 AF ����� ����� ���� Sel. ���� 2) Find the character you want by scrolling with the rear control wheel until it appears on the screen. (The ‘space’ character is the ‘empty space’ to the left of the exclamation mark, top row furthest to the left). 3) Move the selector cursor with a combination of the front and rear control wheels until the desired character is highlighted. 4) Press the Sel.
Date & Time H2 with film magazine ‘Date & Time’ function not applicable with an H2D or H2/CFH. This setting is made on the digital back. 1 4.3 Date & Time (film magazines only!) 2 Adjust date and time settings by the following procedure: � 1) Press the MENU button on the grip. ���� 2) Turn the front control wheel until Settings appears. 4 3 ����� 3) Press the DRIVE (Enter) button on the grip. � ����� 4) Turn the front control wheel to access Date & Time.
System Status 4.4 System Status 2 1 � Check component usage for servicing reasons as follows: ���� 1) Press the MENU button on the grip. 2) Turn the front control wheel until Settings appears. 4 3 ����� 3) Press the DRIVE (Enter) button on the grip. � ����� 5 4) Turn the front control wheel to access Info. 6 5) Press the Enter (DRIVE) button ����� 6) Press the Enter (DRIVE) button.
Customizable button function list • The USER, AE-L, STOP DOWN and M.UP buttons can all be reassigned to different functions. • The USER button has no function until specifically assigned one (default is ‘None’). The AE-L, STOP DOWN and M.UP buttons, however, by default are assigned the function appropriate to the name, until assigned otherwise. The buttons can be assigned or reassigned to the following functions: None Mirror up The user button has no function.
18 Flash ■ Sync at all shutter speeds to 1/800s ■ Integral fill-flash ■ SCA 3002 compatible ■ Flash measure capability ■ Rear sync capability The H system meets professional demands for a variety of situations where flash is required. It includes an integral flash primarily intended for fill-flash use but strong enough for simple close work.
The H2/D can be used together with most flash units in manual mode. However, to make use of a TTL automatic function, you must ensure the flash unit is compatible with the SCA 3002 system. Connection is either by the PC socket or by the hot shoe (see warning note below). The viewfinder houses an integral fill-flash with a guide number of 12 and features OTF/TTL flash control.
To access the controls: 1) Activate the camera and press the FLASH button once. 2) Turn the front control wheel to set the amount of compensation required: • from +3EV through -3EV • press Clr (AF button) to clear the setting quickly if required.
Separate flash unit connection and use Separate flash units can be electrically connected either by way of the hot shoe accessory holder (see previous warnings) on the top of the viewfinder or via a cord to the PC connection port on the left hand side of the camera body. Slave unit switches/ transmitters can also be connected similarly dependant on unit (see specific user manuals for details). Keep the plastic safety cover in place in the hot shoe when not in use.
19 Optional Accessories ■ Converter ■ Extension tubes ■ Release cord ■ Filters ■ Tripod quick coupling ■ Support strap ■ Camera strap ■ Focusing screens ■ CF adapter ■ Proshade ■ Flash adapter Optional accessories provide the opportunity to extend the capabilities of your system or just to add extra convenience to suit your way of working.
There are a number of optional accessories available for the H2/D with more being developed to suit a variety of photographic situations and needs. Please see www. hasselblad.com for the latest information. The figures in brackets after the headings are the product codes. Converter H 1.7X Camera strap H (3053616) Extra wide camera strap with anti-slip backing. (3023717) The Converter attaches between the lens and the body to increase the focal length by a factor of 1.7.
20 Appendix ■ Glossary of Terms ■ P and Pv explanatory charts ■ Technical specifications ■ Equipment Care, Service & Guarantee This section provides an insight into the more technical aspects as well as some important reference information.
Glossary of Terms Half-press / Full press – Shutter release button For the sake of clarity, here are short and simple explanations of several terms, items and features mentioned in the manual that may be unfamiliar to some. Bracketing The practice of making extra exposures over or under (normally both) the ‘standard’ exposure to ensure the desired result. This is particularly useful in difficult, wide-ranging lighting conditions. Easily set and controlled with the H2/D.
OTF Tethered / Untethered Off The Film - the original literal description of the light measurement mechanics regarding flash exposure measurement that now applies to digital sensors too. When the H2D/CFH saves digital files to an external storage source - an Imagebank or a computer - it is described as tethered (connected by a cable). When files are saved to an internal CF card only it is described as untethered (no external cable connections). Profile You can allow the H2/D to be set according to ‘profiles’.
True exposure (H2 and H2D only) Shutter position T3 = T1 Open Exposure at max aperture (e.g. f/2,8) Exposure at aperture f/4 Exposure at aperture f/4 adjusted with true exposure Closed T1 T2 Time True exposure The effective shutter speed for a central lens shutter is defined as the length of time between the opening and closing when measured at the half height position when expressed in diagram form (see diagram).
Automatic exposure — P & Pv Mode (H2 and H2D only) P Mode -5 -4 50 50-110 @ 50 35 50 50-110 @ 50 80 120 50-110 @ 110 80 120 50-110 @ 110 210 150 210 150 -3 -2 -1 1 0 2 3 4 5 6 7 8 9 10 1.
Technical specifications (H2 and H2D only) Camera Type Auto-focus, auto-exposure digital SLR camera with interchangeable viewfinders and lenses. Construction One piece stainless steel shell. Die-cast aluminium internal structure. Tripod sockets (1/4 and 3/8”) and quick coupling tripod plate for rapid mounting. Lenses Hasselblad HC lenses with built-in electronically controlled shutter and aperture. Automatic or manual focusing with instant manual focus override.
User interface Both basic and advanced functions are set using buttons and control wheels on the camera body in conjunction with the grip and viewfinder graphic interface LED’s. Sensor unit menu visible and controllable from unit’s OLED and from FlexColor on a tethered computer. Battery grip rechargeable 7.2 V Li-ion type. 7.2 V / 1850 mAh output. Battery charger Li-ion 7.2 VDC Uses DV charge termination technique to prevent over-charging.100–240 VAC / 50–60 Hz input. 6.0–7.
H2 and H2D Default Settings (Standard Profile) Exp.mode LM mode Exp. adjust Focus mode Drive mode Flash sync Flash adjust Self timer Bracketing Interval timer Custom options Imprint A (Aperture priority) Centre weighted 0 AF-S S Normal (beginning of exp.
Care and maintenance of digital back /sensor unit Handling and storage • Always replace the protective CCD/filter cover when the sensor unit is not mounted on your camera. • Do not touch the exposed CCD/filter with your fingers. • Keep all foreign objects out of the CCD opening. • Store your sensor unit away from moisture and excessive heat. Please see “Technical Specifications” for complete operational and storage requirements. • Protect your sensor unit from impact—do not drop it.
4. Finally check if the IR filter has been properly cleaned either by visual inspection or by mounting the sensor unit to the camera and making a shot. If further cleaning is needed, repeat cleaning procedure. Cleaning with an E-Wipe E-wipes are individually packed wet tissues. 1. Tear at the notch to break seal. 2. Remove e-wipe from its packaging and continue without delay. 3. Fold the tissue to match the width of the IR filter. 4.
SERVICE Problems, Equipment Care, Service & Guarantee The H2/D is a very sophisticated camera that relies on much information being passed and processed to and from each modular unit to produce the correct behaviour. It is therefore essential that reasonable care is taken in attaching, detaching and storing the viewfinder, lenses, extension tubes, etc to ensure that the databus connections are not damaged or soiled in any way.
The information in this manual is furnished for informational use only, is subject to change without notice, and should not be construed as a commitment by Victor Hasselblad AB & Hasselblad A/S. Not all the images in this manual were taken with a Hasselblad H2/ H2D/CFH. They are used for illustrative purposes only and are not intended to represent the image quality produced by a Hasselblad H2/H2D/CFH.
Product numbers: 3013100 3013400 70360519 70360539 70360508 70360528 Victor Hasselblad AB Hasselblad A/S Box 220, Hejrevej 30, SE - 401 23 Göteborg, DK - 2400 Copenhagen, Sweden 0806 V2 141 Denmark