
User's Manual


10
1
6
7 8
9
10
11
12
5
2
1
4
2
3
1
1
2
3
H2 / H2D
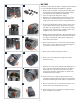
The following is a simple ‘quick start guide’ to assembling your new H2 or H2D if
necessary, together with a film magazine and a digital back, as appropriate.
1. Remove the battery by depressing the battery holder button
and simultaneously swinging the battery holder retaining
lever down until it stops. Pull battery downwards.
2. Choose the appropriate plug for the charger.
3. Attach the chosen plug by sliding it into position, ensuring
that the two electrical contact prongs on the charger cor
-
rectly enter the two contact sockets on the plug attachment.
4. Insert the jack plug from the battery charger into the socket
on the battery. Insert the battery charger into a standard
(100–240V~ /50–60 Hz) domestic socket. Charge the battery
for approx. twelve hours first time, regardless of the red sig
-
nal light (see later section for further details).
5. Holding the battery flat against the camera and aligning the
two upper lugs with the slot, slide it back into position as far
as it will go. Swing back the battery holder retaining lever
until it clicks back into place.
6. Remove the front protective cover from the camera body by
keeping the lens release button depressed and rotating the
cover counter-clockwise until it is released.
7. Remove the lens shade by turning it clockwise.
8. Remove the rear lens cap by unscrewing it in a counter-
clockwise direction.
9. Attach the lens to the camera body by firstly aligning the red
index on the lens mount with the red index on the camera
mount. Grip the lens by the metal barrel (not the rubber
focusing ring) and turn it approximately one quarter turn
clockwise until it clicks into place.
10. Remove the front lens cap by pinching together the two
retaining clips and attach the lens shade to lens by aligning
the indexes and turning the shade clockwise a quarter turn.
11. Remove the top protective cover from the viewfinder screen
location on the camera body by lifting a corner.
12. Remove the protective cover from the viewfinder by depress
-
ing the viewfinder release button.