
User's Manual


18
1
3
2
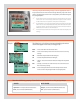
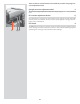
Carrying strap 1, 2
e carrying strap is attached by rstly withdrawing the safety
collar. e hook is then freed and attached to the strap lug (g. 1).
Slide back the safety collar (g. 2) to ensure the hook remains in
the locked position between the small protruding lugs. e collar
is purposely a tight t and might need some eort to slide.
When the ‘replace-battery’ icon appears, the camera automatically
enters a temporary power-saving mode. This is recognizable by a
slower pace for all the actions in an exposure sequence. The camera
actions also sound differently .
This mode is designed so that you can continue working for a while,
even though the batteries are too low for working in the normal
manner. Naturally, you should change the battery pack as soon as
possible to restore normal action again.
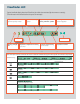
Battery life 7, 8
Battery life is dependent on a number of variable factors and
therefore cannot be exactly predicted.If the camera is le in the
active state instead of standby for long periods, for example, then
battery life will be reduced. A low-battery state is indicated as a
symbol on the grip LCD.
When the batteries are almost completely exhausted, a warning
message ‘Replace battery’ will appear on the grip LCD (g. 8). e
camera will not function at all when this message appears and
battery change is essential.
6
5
8
7
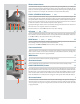
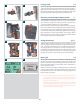
Removing and attaching the battery holder 3
e H2F requires batteries for all actions. ere is no mechanical
reserve facility so it advisable to always have a spare set of batteries.
As is normal, you might want to keep a reserve set of batteries in
a warm place when working in very cold conditions.
Remove the battery holder by depressing the the battery holder but-
ton (A) and simultaneously swinging the battery holder retaining
lever (B) down until it stops. Pull battery holder downwards (C).
To attach ensure the battery holder is at against the camera grip
and, aligning the two upper lugs with the slot in the grip, slide it
back into position as far as it will go. Swing back the battery holder
retaining lever until it clicks back into place.
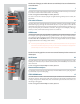
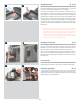
Fitting the batteries 4, 5, 6
With the battery holder removed, press the red battery cassette
retaining button inwards on the holder to release the battery cas-
sette . Load three CR-123 lithium (or equivalent) into the cassette,
ensuring the polarity of each battery is correctly oriented (see the ‘+’
markings on the batteries and the cassette). Re-insert the cassette
into the battery holder, ensuring that it is seated properly in place
and that the red button returns fully into the locked position.
1
A
B
C
4