
User's Manual


41
1
A
B
3
+/-
$2)6%
3 A V E
4
&
2
2
5
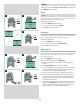
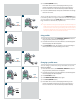
Exposure compensation
e exposure compensation facility, for both manual and automatic
modes can be set from -5 to +5 EV, in 1/3 EV increments. is
facility will adjust the exposures by the set amount until changed
and the setting is visible above the scale in the viewnder and as
a ± symbol on the grip LCD.
To make a xed exposure compensation setting, proceed as follows
with the camera in active mode:
1) Press the +/- button on the viewnder.
2) Turn either the front or rear control wheels to increase or decrease
the amount of compensation in 1/3 EV steps.
3) The amount is displayed in the viewnder as both an EV gure
complete with a ‘minus’ or ‘plus’ prex (A in illustration) , and
as a marker above a ‘minus’ to ‘plus’ scale with a central index
signifying zero compensation (B in illustration).
4) Press Save (DRIVE button) to retain the setting.
5) A ‘±’ symbol is then displayed between the aperture and shut-
ter speed setting as conrmation of the setting.
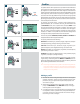
Alternatively, you can also pre-set the initial zone reading in order
to save time and eort where there is no freely available ‘zone 5’
subject for light measuring. For example, you might be on a sandy
beach where you know that sand is normally classied as zone 6.
You can pre-programme the zone placement by holding down
the AE-L button while choosing the new zone value and turning
the front control wheel until zone 6 appears. Pointing the camera
at other parts of the scene will now display their zone values (in
relation to the initial setting of sand at zone 6) to see whether they
still lie within the range of the lm and how they might appear
in the result (apart from lm development considerations). See
under Zone in the Appendix for further information about the
zone system.