ACCELERATOR 4in1 MULTI-GAME TABLE ASSEMBLY INSTRUCTIONS NG1016M
THANK YOU! Thank you for purchasing this product. We work around the clock and around the globe to ensure that our products maintain the highest possible quality. However, in the rare instance that your product is defective or missing parts, contact your retailer, or call 800-759-0977, to submit parts requests or warranty claims. Please read the warranty information at the back of these assembly instructions for further details.
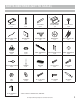
PARTS IDENTIFIER (NOT TO SCALE) P1 NGP6000 P2 NGP6001 P3 NGP6002 P4 NGP6003 P5 NGP6004 A B TABLE BODY 1 pc P6 NGP6005 BASKETBALL ARM 2 pcs P11 NGP6010 STRIKER 2 pcs P16 NGP6015 TABLE TENNIS PADDLE 2 pcs P21 NGP6018* NUT 4 pcs LEG 4 pcs LEG PANEL 2 pcs P8 NGP6007 P7 NGP6006 BACKBOARD 1 pc P12 NGP6011 PUCK 2 pcs P17 NGP6016 MARKER 2 pcs P22 NGP6018* WASHER 20 pcs BASKETBALL RIM 1 pc P13 NGP6012 TABLE TENNIS NET 1 pc P18 NGP6017 ERASER 1 pc P23 NGP6018* 1/4”x1-1/8” BOLT 16 pcs TABLE TENNIS
ASSEMBLY TIPS 1. Find a clean, level surface to begin the assembly of your game table. The table will be partially assembled upside down and then turned over onto its legs. This is a heavy game and turning it over will require at least two strong adults. 2. Remove all of the contents from box and verify that you have all of the parts shown on Note: Some parts may be pre-installed or pre-assembled. understand the text before beginning each assembly step. 4.
THANK ASSEMBLY YOU!INSTRUCTIONS 1. Attach one LEG P2 to each corner of the TABLE BODY P1 using BOLTS P23 and WASHERS P22. 2. Attach LEG PANELS P3 to inside of LEGS P2 on each end of table using SCREWS P24 in pre-drilled holes. 3. Install one LEG LEVELER P5 on bottom of each Leg. Carefully turn table over onto legs. 4. Attach BASKETBALL RIM P8 onto BACKBOARD P7 using SCREWS P24 in pre-drilled holes.
ASSEMBLY INSTRUCTIONS (CONT.) 5. Attach two BASKETBALL ARMS P6 onto end of TABLE BODY P1 using BOLTS P23 and WASHERS P22. 6. Attach BACKBOARD P7 onto BASKETBALL ARMS P6 using four BOLTS P20 and NUTS P21 as shown.
ASSEMBLY INSTRUCTIONS (CONT.) 7. Attach the BALL RETURN NET P10 to the two BASKETBALL ARMS P6 using the Velcro strips as shown. 6. Attach the black straps on the front sides of the BALL RETURN NET P10 to the sides of table using BOLTS P19 and WASHERS P22.
ASSEMBLY INSTRUCTIONS (CONT.) Simply remove the basketball assembly to play AIR HOCKEY. Place the dry erase board on top of the table to create a DESK or ART/CRAFT AREA. Flip the dry erase board over, insert the net posts and net, and you’re ready for TABLE TENNIS.
CONGRATULATIONS! You have now assembled your Game Table. Please note the Care and Use instructions below to ensure years of trouble free use of your game table. CARE AND USE 1. This product is intended for INDOOR use only. 2. Do NOT sit, climb or lean on the table. 3. Do NOT drag the table when moving it as this will damage the legs.
180-DAY LIMITED WARRANTY This product is warranted to the original purchaser to be free from defects in material or workmanship for a period of 180 days from the date of the original retail purchase. This warranty does not cover defects or damage due to improper installation, alteration, accident or any other event beyond the control of the manufacturer. Defects or damage resulting from misuse, abuse or negligence will void this warranty.