OUTLAW FREE STANDING DART CABINET ASSEMBLY INSTRUCTIONS NG1040
THANK YOU! Thank you for purchasing this product. We work around the clock and around the globe to ensure that our products maintain the highest possible quality. However, in the rare instance that your product is defective or missing parts, contact your retailer, or call 800-759-0977, to submit parts requests or warranty claims. Please read the warranty information at the back of these assembly instructions for further details.
PARTS IDENTIFIER (NOT TO SCALE) #1 #2 #3 A #5 #4 B A B SIDE PANEL 2 pcs #6 #7 #8 #11 #12 LEGS 2 pcs #16 1/2" SCREW 16 pcs #21 THREAD BOLT 35 pcs #13 DOOR HANDLE 2 pcs #23 1/4"x1" BOLT 6 pcs 1/4" WASHER 6 pcs #20 GEAR 35 pcs 3/4" FLAT SCREW 28 pcs #24 Allen Key 1pcs BOTTOM BACK BOARD 1 pc #15 #19 1" SCREW 4 pcs 1/2" FLAT SCREW 4 pcs #22 STORAGE BOARD 3 pcs #14 #18 TOP BACK BOARD 1 pc #10 HINGE 4 pcs DART HOLDER 2 pcs #17 #9 DOOR 2 pcs COVER PLATE 1 pc SIDE PANE
ASSEMBLY TIPS 1. Find a clean, level surface to begin the assembly of your game table. The table will be partially assembled upside down and then turned over onto its legs. This is a heavy game and turning it over will require at least two strong adults. 2. Remove all of the contents from box and verify that you have all of the parts shown on the Note: Some parts may be pre-installed or preassembled. stand the text before beginning each assembly step. - 4.
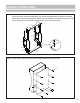
ASSEMBLY INSTRUCTIONS Step 1: Screw thread bolts #21 into the side panel #1A and #1B, and cross board #2A and #2B as shown below. Insert gears #20 into cover plate #3 and base plate #4. Attach cross board #2A to base plate #4 with gears #20. Attach cross board #2B to cover plate #3 with gears #20. Attach side panel #1A and #1B to plates #3 and #4 in the same manner. #21 #1A #21 #2B #20 #3 #21 #2A #4 #21 #20 #21 #1B Step 2: Attach the top back board #5 to the assembled cabinet with screw #19.
ASSEMBLY INSTRUCTIONS (CONT.) Step 3: Screw thread bolts #21 into cover plate #7 and side panel #6. Insert gears #20 into storage #9.BRACE Attach #5 cover plate #7 and storage to side panel #6 withFLAT gear #20 4. Attach shelves each LEG to LEGS as shown withshelves SMALL #9 BOLT #8 and SMALL Repeat for through other sidegasket, panel #6. WASHER as #9.shown. Feed wire leads and carefully turn table over.
ASSEMBLY INSTRUCTIONS (CONT.) Step 5: Attach the dart holder #12 using the pre-drilled holes on the door with screw #18. Attach the doors #8 to the bottom cabinet with hinges #13 and screw #16 and screw #17. 4. AttachAttach eachthe LEGlegs BRACE #5the to cabinet LEGS asbottom shownwith with SMALL BOLT FLAT #11 to washer #15 and #8 boltand #14.SMALL Note: see Step 7 attaching wall. Attach the door handles #22carefully to the doors. WASHERif #9. Feed to wire leads through gasket, and turn table over.
ASSEMBLY INSTRUCTIONS (CONT.) Step 7: Attach the electronic dartboard #25, using the threaded holes on backboard, with bolts #24. 4. Attach each LEG BRACE #5 to LEGS as shown with SMALL BOLT #8 and SMALL FLAT WASHER #9. Feed wire leads through gasket, and carefully turn table over. #25 #25 #24 #24 #24 #24 * Before turning the table over, carefully feed two wire leads through gasket hole in center of side panel. 5. Attach ELECTRONIC SCORER #11 with SCREW #16.
CONGRATULATIONS! You have now assembled your Game Table. Please note the Care and Use instructions below to ensure years of trouble free use of your game table. CARE AND USE 1. This product is intended for INDOOR use only. 2. Do NOT sit, climb or lean on the table. 3. Do NOT drag the table when moving it as this will damage the legs.
180-DAY LIMITED WARRANTY This product is warranted to the original purchaser to be free from defects in material or workmanship for a period of 180 days from the date of the original retail purchase. This warranty does not cover defects or damage due to improper installation, alteration, accident or any other event beyond the control of the manufacturer. Defects or damage resulting from misuse, abuse or negligence will void this warranty.
OUTLAW FREE STANDING DART CABINET- NG1040 Parts List 3 2 5 25 4 1 7 8 10 22 6 11 PARTS #1 NGP5914 #2 NGP5915 #3 NGP5916 #4 NGP5917 #5 NGP5918 #6 NGP919 #7 NGP5920 SIDE PANELBOTTOM COVER PLATEBOTTOM A B A B SIDE PANEL - TOP #8 NGP5921 DOOR CROSS BOARD COVER PLATE - TOP #9 NGP5922 STORAGE SHELF BASE PLATE TOP BACK BOARD #10 NGP5923 #11 NGP5924 #12 NGP5925 #13 NGP5926 BOTTOM BACK BOARD LEG DART HOLDER HINGE #22 NGP5927 DOOR HANDLE #25 NGP5929 ELECTRONIC DARTBOARD HARDWARE