REVOLVER 40" 4-in-1 MULTI GAME TABLE ASSEMBLY INSTRUCTIONS Please Do N ot Hesitate to Contact Our Consumer H otline at 800-759-0 9 77 with Any Qu estions That May Arise During Assembly or Use of This P roduct! Ver.
THANK YOU! Thank you for purchasing this product. We work around the clock and around the globe to ensure that our products maintain the highest possible quality. However, in the rare case of issues during assembly or use of this product, please contact our Consumer Hotline at 800-759-0977 for immediate assistance before contacting your retailer. Please read the warranty information at the back of these assembly instructions for further details.
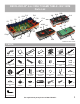
REVOLVER 40" 4-in-1 MULTI GAME TABLE - NG1143M Parts List P2 P7 P8 P1 P5A P11 A9 P13 P10 A10 P5B A11 P14 A2,A3 A4 A5 A8 A7 A6 A1 P4 P9 P12 P3 P6B P6A Illustrations Not to Scale PARTS P1 NGP21351 P2 NGP21352 X2 GOAL FRONT P8 NGP2138 X3 PLAYERS & ROD blue A1 NGP2141 X2 SOCCER BALL A8 NGP2146B X2 FINGER FOOTBALL blue H4 NGP2150* P3 NGP21353 X4 B B X1 PLAYFIELD foosball / hockey P11 NGP2233 P12 NGP2140 X6 X2 X12 X6 NGP2147 A3 NGP21471 ROD BUMPER A4 NGP2149 NG
THANK ASSEMBLY YOU!INSTRUCTIONS 1. Attach two End Panels, P4, to Side Panel, P3, using Screws, H1. P3 P4 P4 P3 2. Slide Playfield, P5, into End Panels, P4, and Side Panel, P3, as shown. P3 P4 P4 P5 3. Attach two Goal Sides, P2, to End Panel, P4, using Screws, H1. P4 P2 P2 4. Attach Slide Scorer, P10, to End Panel, P4, using Screws, H2. Attach Goal Front, P1, to Goal Sides, P2, using Screws, H1. Repeat Steps 3 and 4 on other End Panel.
THANK ASSEMBLY YOU!INSTRUCTIONS (CONT.) 5. Slide Rod Bumpers, P11, onto each end of Player Rod Assemblies, P7 and P8. P11 P7 P11 P8 6. Insert Rod Assemblies, P7 and P8, into holes on assembled Side Panel, P3, in order shown. Same colored players should all face opponents goal. P3 P7 P8 P7 P8 P7 P8 7. Slide Rod Assemblies, P7 and P8, into matching holes on remaining Side Panel, P3, and attach to End Panels, P4, using Screws, H1. Make sure Playfield, P5, is in Side Panel slot.
THANK ASSEMBLY YOU!INSTRUCTIONS (CONT.) 8. Attach Side Panels, P3, to Goal Front, P1, on both sides, using Screws, H1. P3 P1 P1 P3 9. Attach Handles, P9, and Rod End Caps, P12, onto ends of Rod Assemblies, P7 and P8, as shown. P12 P9 P7 & P8 P9 P12 10. Stick EVA Corner Protective Strips, P14, on top of four corners. Stick EVA Goal Protective Strips, P13, across goal lines on Playfield, P5, this will limit ball bounce back.
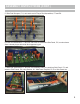
THANK ASSEMBLY YOU!INSTRUCTIONS (CONT.) 11. Turn table over and attach Hockey Goals, A11, using Screws, H3 (4 screws on each). Stick EVA Corner Protective Strips, P14, on top of four corners. P14 A10 A11 A11 P14 A11 A9 P14 P14 12. For Table Tennis, place other Playfield, P6, on top of table, insert Net Posts, A3, in table holes, and slip Net, A2, over Posts. A2,A3 P6 A4 A4 A5 13. For Finger Football, flip over Playfield, P6, on top of table, and stick Goal Posts, A4, by goal lines.
180-DAY LIMITED WARRANTY This product is warranted to the original purchaser to be free from defects in material or workmanship for a period of 180 days from the date of the original retail purchase. This warranty does not cover defects or damage due to improper installation, alteration, accident or any other event beyond the control of the manufacturer. Defects or damage resulting from misuse, abuse or negligence will void this warranty.
TABLE MULTI-JEUX 4-en-1 REVOLVER 1,02 m INSTRUCTIONS D’ASSEMBLAGE Contactez no tre service à la c lientèle au 800-75 9-0977 avec des que stions sur le montage ou l'utilisatio n de ce prod uit. Ver.
MERCI! Merci d’avoir acheté notre produit. Nous travaillons 24 heures sur 24, partout dans le monde, à garantir que nos produits sont de la meilleure qualité possible. Toutefois, dans les rares cas de problèmes lors du montage ou de l'utilisation de ce produit, se il vous plaît communiquer avec notre service à la clientèle au 800-759-0977 pour une aide immédiate avant de contacter votre revendeur.
TABLE MULTI-JEUX 4-en-1 REVOLVER 1,02 m - NG1143M liste des pièces P2 P8 P1 P7 P5A P11 A9 P13 P10 A10 P5B A11 P14 A2,A3 A4 A5 A8 A7 A6 A1 P4 P9 P12 P3 P6B P6A illustrations non à l'échelle PIÈCES P1 NGP21351 P2 NGP21352 X2 but avant P8 X4 P9 X3 tige 3 joueurs bleu A1 NGP2141 X2 doigt le football bleu H4 NGP2150* NGP2144 A A B B X1 surface de jeu football / hockey X1 surface de jeu tennis de table / football P7 NGP2137 X3 tige 3 joueurs orange P11 NGP2233 P12 NG
THANK INSTRUCTIONS YOU! D’ASSEMBLAGE 1. Attacher deux panneaux d'extrémité, P4, en panneau latéral, P3, à l'aide de vis, H1. P3 P4 P4 P3 2. Glisser surface de jeu, P5, dans panneaux d'extrémité, P4, et le panneau latéral, P3, comme le montre. P3 P4 P4 P5 3. Attacher deux poteau de but côtés, P2, pour panneau d'extrémité, P4, à l'aide des vis, H1. P4 P2 P2 4. Attacher marqueur manuel, P10, pour panneaux d’extrémité, P4, à l'aide des vis, H2.
INSTRUCTIONS D’ASSEMBLAGE (suite) 5. Glisser butoir de tige, P11, sur chaque extrémité du ensembles de tiges de joueur, P7 et P8. P11 P7 P11 P8 6. Insérez ensembles de tiges de joueur, P7 et P8, dans les trous sur le panneau latéral assemblé, P3, dans l'ordre indiqué. Identique joueurs de couleur devraient tous les adversaires du visage but. P3 P7 P8 P7 P8 P7 P8 7.
THANK INSTRUCTIONS YOU! D’ASSEMBLAGE (suite) 8. Attacher les panneaux latéraux, P3, à but avant, P1, des deux côtés, à l'aide de vis, H1. P3 P1 P1 P3 9. Attacher poignées, P9, et embout de tige, P12, sur des extrémité du ensembles de tiges de joueur, P7 et P8, comme indiqué. P12 P9 P7 & P8 P9 P12 10. Bâton coin bandes de protection ÉVA , P14, au-dessus des quatre coins. Bâton but bandes de protection ÉVA, P13, à travers les lignes de but sur surface de jeu, P5, ce qui limiter la balle rebondir.
THANK INSTRUCTIONS YOU! D’ASSEMBLAGE (suite) 11. Tournez la table sur et fixer des objectifs de hockey, A11, à l'aide des vis, H3 (4 vis de chaque). Bâton coin bandes de protection ÉVA, P14, au-dessus des quatre coins. P14 A10 A11 A11 P14 A11 A9 P14 P14 12. Pour tennis de table, lieu autre surface de jeu, P6, sur le dessus de la table, insérez poteaux, A3, dans des trous de table, et glisser filet, A2, sur les poteaux. A2,A3 P6 A4 A4 A5 13.
ASSEMBLY GARANTIETIPS LIMITÉE DE 180 JOURS La garantie du produit est valide pour l'acheteur original en ce qui a trait aux pièces défectueuses ou à la main-d’œuvre pour une période de 180 jours de la date d’achat. Cette garantie n’est couvre pas les dommages causés par accident, par modification, par une installation défectueuse ou tout autre événement hors du contrôle du fabricant. Tout défaut ou dommage résultant de la négligence ou d’une mauvaise utilisation annule cette garantie.