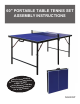
60" PORTABLE TABLE TENNIS SET ASSEMBLY INSTRUCTIONS ot Hesitate to Please Do N otline Consumer H r u O t c ta n o C 977 at 800-759-0 May estions That with Any Qu Assembly or Arise During roduct! Use of This P NG2305P
THANK YOU! Thank you for purchasing this product. We work around the clock and around the globe to ensure that our products maintain the highest possible quality. However, in the rare case of issues during assembly or use of this product, please contact our Consumer Hotline at 800-759-0977 for immediate assistance before contacting your retailer. Please read the warranty information at the back of these assembly instructions for further details.
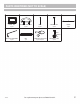
PARTS IDENTIFIER (NOT TO SCALE) #1 NGP5985 TABLE TOP 2 pcs #6 NGP5990 #2 NGP5986 HANDLE ASSEMBLY 2 pcs #7 NGP5991 #3 NGP5987 LEG 4 pcs #8 NGP5944 #5 NGP5989 #4 NGP5988 MIDDLE LEG 2 pcs HINGE 4 pcs #9 NGP5992 Bolt NET POST ASSEMBLY 2 pcs 11/14 NET 1 pc PADDLES & BALLS SET 2 pcs & 3 pcs Washer Nut M8x30 BOLT SET 4 pcs For replacement parts please call 800-759-0977.
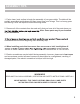
ASSEMBLY TIPS 1. Find a clean, level surface to begin the assembly of your game table. The table will be partially assembled upside down and then turned over onto its legs. This is a heavy game and turning it over will require at least two strong adults. 2. Remove all of the contents from box and verify that you have all of the parts shown on Note: Some parts may be pre-installed or pre-assembled. understand the text before beginning each assembly step. 4.
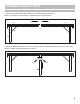
THANK ASSEMBLY YOU!INSTRUCTIONS 1. Place two pre-assembled TABLE TOPS #1 with inside ends facing each other. NOTE: this assembly may be easier to do while table tops are upside down. #1 #1 #5 #3 2. Attach two MIDDLE LEGS #4, one on each side, to TABLE TOPS #1 with BOLT SET #9 (2 on each side). Bolt from outside, and Nut and Washer on inside.
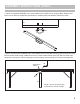
ASSEMBLY INSTRUCTIONS (CONT.) 3. Attach one HANDLE ASSEMBLY #2 to each outside end of TABLE TOP #1 using two Bolts, Washers and Nuts on each. Bolts are inserted through handle from outside of table with Washers and Nuts on inside. #1 #2 4. Attach one NET POST ASSEMBLY #6 to each MIDDLE LEG #4 using Nut and Spring (part of assembly). Insert bolt end of NET POST through middle LEG hole from outside of table and slip spring over bolt from inside, then thread nut on until secure.
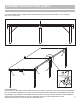
ASSEMBLY INSTRUCTIONS (CONT.) 5. Lock NET POSTS #6 in upright position (see directions below), slide ends of NET #7 over net posts, and you’re ready to play. #6 #4 #5 #2 #5 #5 2 1 TO CLOSE TABLE: Remove NET #7, then push out NET POST #6 using your finger on post nut end (1) until locking pin disengages from Leg, and then rotate Net Post down (2) until it lines up with bottom locking hole. Release Net Post and let it lock parallel to Leg. Collapse four HINGES #5 and fold each set of Legs inward.
CONGRATULATIONS! You have now assembled your Game Table. Please note the Care and Use instructions below to ensure years of trouble free use of your game table. CARE AND USE 1. This product is intended for INDOOR use only. 2. Do NOT sit, climb or lean on the table. 3. Do NOT drag the table when moving it as this will damage the legs.
180-DAY LIMITED WARRANTY This product is warranted to the original purchaser to be free from defects in material or workmanship for a period of 180 days from the date of the original retail purchase. This warranty does not cover defects or damage due to improper installation, alteration, accident or any other event beyond the control of the manufacturer. Defects or damage resulting from misuse, abuse or negligence will void this warranty.
ENSEMBLE PORTABLE DE TENNIS DE TABLE 1,52 m INSTRUCTIONS D’ASSEMBLAGE tre Contactez no lientèle au service à la c 800-759-0977 montage estions sur le .
MERCI! Merci d’avoir acheté notre produit. Nous travaillons 24 heures sur 24, partout dans le monde, à garantir que nos produits sont de la meilleure qualité possible. Toutefois, dans les rares cas de problèmes lors du montage ou de l'utilisation de ce produit, se il vous plaît communiquer avec notre service à la clientèle au 800-759-0977 pour une aide immédiate avant de contacter votre revendeur.
IDENTIFICATION DES PIÈCES (pas à l’échelle) #1 NGP5985 SURFACE DE JE 2 pièces #6 NGP5990 #2 NGP5986 ENSEMBLE DE POIGNÉE 2 pièces #7 NGP5991 #3 NGP5987 PIED 4 pièces #8 NGP5944 #5 NGP5989 #4 NGP5988 PIED CENTRAL 2 pièces PENTURE 4 pièces #9 NGP5992 Boulon ASSEMBLÉE DE POSTE NET 2 pièces 11/14 FILET 1 pièce ENSEMBLE RAQUETTE & BALLE 2 pièces & 3 pièces Rondelle Écrou ENSEMBLE BOULON 4 pièces Pour commander les pièces de remplacement, veuillez téléphoner au 800 759-0977 3
ASSEMBLY TIPS D’ASSEMBLAGE INSTRUCTIONS 1. Trouver une surface propre et plane, pour commencer le montage de votre table de jeu. La table s’assemble à l’envers pour être ensuite retournée sur ses pieds, une fois l’assemblage complété. Cette table est lourde et nécessite au moins deux adultes forts pour la soulever et la retourner. 2. Retirez le contenu de la boîte, avant de commencer l’assemblage, assurez-vous d’avoir toutes les pièces telles que listées et illustrées au tableau d’identification.
THANK INSTRUCTIONS YOU! D’ASSEMBLAGE 1. Placez les deux moitiés de la SURFACE DE JEU (no. 1) en face l’une de l’autre. AVIS : cet assemblage est plus facile quand les deux moitiés sont placées à l’envers. #1 #1 #5 #3 2. Fixez les deux PIEDS CENTRAUX (no. 4), un de chaque côté, à la SURFACE DE JEU (no. 1) avec ENSEMBLE BOULON (no. 9) (2 de chaque côté). Bolt de l'extérieur, et écrou et rondelle à l'intérieur.
ASSEMBLY INSTRUCTIONS (CONT.) 3. Fixez une POIGNÉE (no. 2) à chaque extrémité de la SURFACE DE JEU (no. 1) à l’aide deux boulons, rondelles et écrous sur chaque. Les boulons sont insérés à travers la poignée de l'extérieur de la table avec rondelles et des écrous à l'intérieur. #1 #2 4. Fixez une le SUPPORT À FILET (no. 6) sur chacun des PIEDS CENTRAUX (no. 4) à l’aide écrou et de printemps (une partie de l'assemblage).
ASSEMBLY INSTRUCTIONS (CONT.) 5. Verrouiller SUPPORTS À FILET (no. 6) en position verticale (voir les instructions ci-dessous), faites glisser les extrémités du FILET (no. 7) dans les SUPPORTS À FILET (no. 6) et vous êtes prêt à jouer. #6 #4 #5 #2 #5 #5 2 1 POUR PLIER LA TABLE : Retirez le FILET (no. 7), puis appuyez sur les SUPPORTS À FILET (no.
ASSEMBLY TIPS FÉLICITATIONS! VOUS AVEZ ASSEMBLÉ VOTRE TABLE DE JEU. VEUILLEZ CONSULTER LES INSTRUCTIONS D’ENTRETIEN ET D’UTILISATION, CI-DESSOUS, AFIN DE CONSERVER VOTRE TABLE DE JEU LONGTEMPS. ENTRETIEN ET UTILISATION 1. Ce produit doit être utilisé à l’INTÉRIEUR seulement. 2. NE PAS s’asseoir, grimper ou s’appuyer sur la table de jeu. 3. NE PAS tirer sur la table pour la déplacer, cela risque d’endommager les pieds de la table.
ASSEMBLY GARANTIETIPS LIMITÉE DE 180 JOURS La garantie du produit est valide pour l'acheteur original en ce qui a trait aux pièces défectueuses ou à la main-d’œuvre pour une période de 180 jours de la date d’achat. Cette garantie n’est couvre pas les dommages causés par accident, par modification, par une installation défectueuse ou tout autre événement hors du contrôle du fabricant. Tout défaut ou dommage résultant de la négligence ou d’une mauvaise utilisation annule cette garantie.