NEWPORT 7' POOL TABLE WITH TABLE TENNIS & BENCHES ASSEMBLY INSTRUCTIONS Please Do N ot Hesitate to Contact Our Consumer H otline at 800-759-0 977 with Any Qu estions That May Arise During Assembly or Use of This P roduct! 6 Ver.
THANK YOU! Thank you for purchasing this product. We work around the clock and around the globe to ensure that our products maintain the highest possible quality. However, in the rare case of issues during assembly or use of this product, please contact our Consumer Hotline at 800-759-0977 for immediate assistance before contacting your retailer. Please read the warranty information at the back of these assembly instructions for further details.
NEWPORT 7-FT POOL TABLE SET - BG2535P Parts List 18 9 10 9 10 15 16 3 17 All items are packaged in Carton A except 11, 13 & 15 are packaged in Carton B 13 8 12 14 11 TABLE BOTTOM Illustrations Not to Scale PARTS #3 NGP50785 #8 NGP6226 X4 #9 NGP6227 X1 #10 NGP6228 TABLE BODY TABLE TOP A #14 NGP6231 #15 NGP6232 #16 NGP5960 #12 NGP5956 TABLE TOP B LEG #17 NGP5961 #18 NGP51226 NGP5951 #13 NGP6230 X2 X8 X4 X1 X1 LEG LEVELER #11 NGP6229 CONNECTING PLATE #19 NGP5138 BENCH*
ASSEMBLY INSTRUCTIONS #3 #11 #12 Figure 1 #12 #11 #11 #2 #1 #11 Alternative Leg Attachment (Fig. 1) Attach the CONNECTING PLATES #12 to the LEGS #11 with BOLTS #1 & WASHERS #2 through only the two inside holes of plates as shown. Then slide this assembly down onto table corner and secure to table with four bolts and washers using outer holes. #8 #4 #5 #14 #4 #5 #15 #14 #4 #5 #13 #14 #15 #14 #15 WARNING: To prevent injury, exercise caution when opening and closing bench lid.
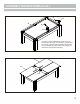
ASSEMBLY INSTRUCTIONS (Cont.) #6 #8 #16 #6 #17 TIP: Place a piece of stiff material under the corner pockets when attaching corner baskets. This will catch any screws, and keep them from falling into leg cavity, if you accidentally drop them. Make sure baskets are centered in opening before attaching.
ASSEMBLY INSTRUCTIONS (Cont.
180-DAY LIMITED WARRANTY This product is warranted to the original purchaser to be free from defects in material or workmanship for a period of 180 days from the date of the original retail purchase. This warranty does not cover defects or damage due to improper installation, alteration, accident or any other event beyond the control of the manufacturer. Defects or damage resulting from misuse, abuse or negligence will void this warranty.
TABLE DE BILLARD et TENNIS DE TABLE AVEC BANCS NEWPORT 2,13m INSTRUCTIONS D’ASSEMBLAGE Contactez no tre service à la c lientèle au 800-75 9-0977 avec des que stions sur le montage ou l'utilisatio n de ce prod uit. 6 Ver.
MERCI! Merci d’avoir acheté notre produit. Nous travaillons 24 heures sur 24, partout dans le monde, à garantir que nos produits sont de la meilleure qualité possible. Toutefois, dans les rares cas de problèmes lors du montage ou de l'utilisation de ce produit, se il vous plaît communiquer avec notre service à la clientèle au 800-759-0977 pour une aide immédiate avant de contacter votre revendeur.
TABLE DE BILLARD et TENNIS DE TABLE AVEC BANCS NEWPORT 2,13m - BG2535P Liste des pièces 18 9 10 9 10 15 16 3 17 Tous les articles sont emballés dans le Carton A, sauf que 11, 13 et 15 sont emballés dans Carton B 13 8 12 14 11 dessous de la table illustrations non à l'échelle PIÈCES #3 NGP50785 #8 NGP6226 X4 X1 STRUCTURE PRINCIPALE PIED NIVELEUR #14 NGP6231 #9 NGP6227 #10 NGP6228 #11 NGP6229 DESSUS DE TABLE (A) DESSUS DE TABLE (B) #15 NGP6232 #16 NGP5960 #17 NGP5961 #13 NGP6230 X
INSTRUCTIONS D’ASSEMBLAGE #3 #11 #12 Figure 1 #12 #11 #11 #2 #1 #11 #8 Procédé d'assemblage de la pied alternative : Fixez les PLAQUES DE RACCORDEMENT #12 sur les PIEDS #11 avec des BOULONS # 1 et RONDELLES #2 par seulement les deux trous à l'intérieur de plaques comme indiqué. Ensuite, faites glisser vers le bas sur tableau coin et attacher à tableau avec quatre boulons et rondelles en utilisant les trous extérieurs.
INSTRUCTIONS D’ASSEMBLAGE (suite) #6 #8 #16 #6 #17 CONSEIL : Placez un morceau de raide le matériau sous coin poches lors de la fixation des paniers de coin. Ce va attraper vis, et les empêcher de tomber dans la cavité de la jambe, si vous laissez tomber accidentellement une. Assurez-vous que les paniers sont centrées dans l'ouverture avant de fixer.
INSTRUCTIONS D’ASSEMBLAGE (suite) #18 6
GARANTIE LIMITÉE DE 180 JOURS La garantie du produit est valide pour l'acheteur original en ce qui a trait aux pièces défectueuses ou à la main-d’œuvre pour une période de 180 jours de la date d’achat. Cette garantie n’est couvre pas les dommages causés par accident, par modification, par une installation défectueuse ou tout autre événement hors du contrôle du fabricant. Tout défaut ou dommage résultant de la négligence ou d’une mauvaise utilisation annule cette garantie.