BRISTOL 7' POOL TABLE WITH TABLE TENNIS ASSEMBLY INSTRUCTIONS Please Do N ot Hesitate to Contact Our Consumer H otline at 800-759-0 9 77 with Any Qu estions That May Arise During Assembly or Use of This P roduct! Ver.
THANK YOU! Thank you for purchasing this product. We work around the clock and around the globe to ensure that our products maintain the highest possible quality. However, in the rare case of issues during assembly or use of this product, please contact our Consumer Hotline at 800-759-0977 for immediate assistance before contacting your retailer. Please read the warranty information at the back of these assembly instructions for further details.
BRISTOL 7’ POOL TABLE WITH TABLE TENNIS - NG4023 Parts List 19,20 17 5 18 9 7 6 15 8 PARTS #5 NGP2100 #6 NGP2101 X1 TABLE BODY #12 NGP5077 #7 NGP2102 X2 LEG END PANEL #13 NGP5191 #8 NGP2103 X2 X2 LEFT LEG RIGHT LEG #14 NGP5135 #15 NGP5121 X2 X2 x1 x4 CHALK CUE STICK TRIANGLE LEG LEVELER #20 NGP57821 #21 NGP5138 #9 NGP2104 #10 NGP5073 X2 LEG SIDE PANEL #17 NGP2105 X1 X1 BRUSH BILLIARD SET #18 NGP2106 #19 NGP51226 x1 x1 TABLE TENNIS TOP B TABLE TENNIS NET x1 TA
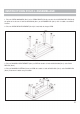
ASSEMBLY INSTRUCTIONS 1. Attach LEFT LEGS #7 and RIGHT LEGS #8 to the corners of the TABLE BODY #5 as shown below using 1-1/4" BOLT #1 and 5/16" FLAT WASHER #2. Note: The table is assembled upside down. 2. Thread one LEG LEVELER #15 onto each LEG. 3. Attach each LEG END PANEL #6 to LEGS with 1" BOLT #3 and 1/4" FLAT WASHER #4. 4. Attach each LEG SIDE PANEL #9 to LEGS with 1" BOLT #3 and 1/4" FLAT WASHER #4. Carefully turn table over.
ASSEMBLY INSTRUCTIONS (CONT.) 5. To assemble TABLE TENNIS TOP, place TABLE TENNIS TOP A #17 and TABLE TENNIS TOP B #18 on top of assembled pool table. Push halves together. 6. Clip each post of the TABLE TENNIS NET #19 to each side of the assembled TENNIS TABLE TOP at the center line. Attach the net to each post. Remove the cover on the foam pad and stick it inside the clips as shown.
-DAY LIMITED WARRANTY This product is warranted to the original purchaser to be free from defects in material or workmanship for a period of days from the date of the original retail purchase. This warranty does not cover defects or damage due to improper installation, alteration, accident or any other event beyond the control of the manufacturer. Defects or damage resulting from misuse, abuse or negligence will void this warranty.
TABLE DE BILLARD BRISTOL (2,13 M) ET JEU DE TENNIS DE TABLE INSTRUCTIONS D’ASSEMBLAGE Contactez no tre service à la c lientèle au 800-75 9-0977 avec des que stions sur le montage ou l'utilisatio n de ce prod uit. Ver.
MERCI! Merci d’avoir acheté notre produit. Nous travaillons 24 heures sur 24, partout dans le monde, à garantir que nos produits sont de la meilleure qualité possible. Toutefois, dans les rares cas de problèmes lors du montage ou de l'utilisation de ce produit, se il vous plaît communiquer avec notre service à la clientèle au 800-759-0977 pour une aide immédiate avant de contacter votre revendeur.
TABLE DE BILLARD BRISTOL ET JEU DE TENNIS DE TABLE NG4023 Liste des pièces 19,20 17 5 18 9 7 15 6 8 PIÈCES #5 NGP2100 #6 NGP2101 X1 SURFACE DE JEU #12 NGP5077 X2 BLOC DE CRAIE PANNEAU X2 D’EXTRÉMITÉ #13 NGP5191 #7 NGP2102 #8 NGP2103 X2 PIED GAUCHE #14 NGP5135 X2 x1 QUEUE DE BILLARD TRIANGLE #20 NGP57821 #21 NGP5138 #22 NGP5029 x2 TENNIS DE TABLE CLIPS DE POSTE x2 RAQUETTE DE TENNIS DE TABLE x2 BALLE DE TENNIS DE TABLE X2 PIED DROIT #15 NGP5121 x4 PATIN DE NIVELLEMENT #9 NGP210
INSTRUCTIONS POUR L’ASSEMBLAGE 1. Fixez les PIEDS GAUCHES (No 7) et les PIEDS DROITS (No 8) aux coins de la SURFACE DE JEU (No 5) tel qu’illustré ci-dessous à l’aide de BOULONS (No 1) et de RONDELLES (No 2). Avis: La table s’assemble à l’envers. 2. Fixez un PATIN DE NIVELLEMENT (No 15) à l’extrémité de chaque PIED. 3. Fixez le PANNEAU D’EXTRÉMITÉ (No 6) au PIED de la table à l’aide de BOULONS (No 1) et de RONDELLES (No 4). 4.
INSTRUCTIONS POUR L’ASSEMBLAGE 5. Pour installer la SURFACE DE TENNIS DE TABLE, installez la SURFACE DE TABLE DE TENNIS (A) (No 17) et la SURFACE DE TABLE DE TENNIS (B) (No 18) sur le dessus de la table de billard déjà montée. Assemblez la surface de jeu en poussant les deux sections vers le centre. 6. Installez, au centre et de chaque côté de la table assemblée, un poteau pour fixer le FILET DE TENNIS DE TABLE (No 19) et attachez-le à chaque poteau.
ASSEMBLY GARANTIETIPS LIMITÉE DE 180 JOURS La garantie du produit est valide pour l'acheteur original en ce qui a trait aux pièces défectueuses ou à la main-d’œuvre pour une période de 180 jours de la date d’achat. Cette garantie n’est couvre pas les dommages causés par accident, par modification, par une installation défectueuse ou tout autre événement hors du contrôle du fabricant. Tout défaut ou dommage résultant de la négligence ou d’une mauvaise utilisation annule cette garantie.