BREAKAWAY 41-IN. DOME HOCKEY TABLE ASSEMBLY INSTRUCTIONS Please Do N ot Hesitate to Contact Our Consumer H otline at 800-759-0 9 77 with Any Qu estions That May Arise During Assembly or Use of This P roduct! Ver.
THANK YOU! Thank you for purchasing this product. We work around the clock and around the globe to ensure that our products maintain the highest possible quality. However, in the rare case of issues during assembly or use of this product, please contact our Consumer Hotline at 800-759-0977 for immediate assistance before contacting your retailer. Please read the warranty information at the back of these assembly instructions for further details.
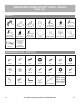
BREAKAWAY DOME HOCKEY TABLE - NG5003 Parts List 46 41 Illustrations Not to Scale PARTS #1 NGP7113 X2 #2 NGP7114 #3 NGP7115 X2 X2 TOP APRON A TOP APRON B BOTTOM APRON A #8 NGP7120 #9 NGP7122 #10 NGP7123 X2 X2 X1 CROSSBEAM B LEG PANEL A LEG PANEL B #19 NGP7127 #20 NGP7128 #21 NGP7129 X2 LONG ROD 9/18 X2 X2 MIDDLE ROD A MIDDLE ROD B #4 NGP7116 BOTTOM APRON B X2 #11 NGP7124 X4 CURVED LEG TRIM #22 NGP7130 X4 SHORT ROD #5 NGP7117 X4 TOP CONNECT BOARD #12 NGP7125 #6 NGP7118
BREAKAWAY DOME HOCKEY TABLE - NG5003 Parts List PARTS #37 NGP7134 X2 GOAL #44 NGP7141 X4 BLUE SHORT STICK PLAYER #52 NGP7103 #38 NGP7135 #39 NGP7136 X2 PLAYFIELD GOAL BUMPER X2 PLAYFIELD END BUMPER #45 NGP7142 #46 NGP7143 X1 BLUE GOALIE #40 NGP7102 X2 PUCK #47 NGP7144 X1 BLUE LONG STICK PLAYER TABLE - NG #41 NGP7138 X4 RED SHORT STICK PLAYER X1 RED GOALIE #43 NGP7140 X1 RED LONG STICK PLAYER #48 NGP7145 #50 NGP7146 #51 NGP7147 X1 X4 X2 SCORER L-BRACKET X1 DOME #42 NGP7139 DOME
ASSEMBLY INSTRUCTIONS STEP 1 NOTE: Top Aprons (1&2) are narrower than Bottom Aprons (3&4) STEP 2 NOTE: Bottom Aprons (3&4) are wider than Top Aprons (1&2) 5
ASSEMBLY INSTRUCTIONS (CONT.
ASSEMBLY INSTRUCTIONS (CONT.) STEP 5 NOTE: To attach the Leg Panels (9&10) insert panel bottom inside bottom apron, making sure it is centered in opening, and flex middle of panel in until top fits centered inside top apron. STEP 6 NOTE: Make sure Leg Panels (9&10) are pushed in enough to be covered by Leg Trim (11) while securing with Screws (25).
ASSEMBLY INSTRUCTIONS (CONT.
ASSEMBLY INSTRUCTIONS (CONT.) STEP 8 NOTE: Insert all player rods in correct location as indicated below and add springs as shown to right.
ASSEMBLY INSTRUCTIONS (CONT.
ASSEMBLY INSTRUCTIONS (CONT.
ASSEMBLY INSTRUCTIONS (CONT.
ASSEMBLY INSTRUCTIONS (CONT.) STEP 12 ! CAUTION: Keep the clear dome at 60 degrees and hold it when you open it! #34 #48 #26 #47 #49 ! CAUTION: Do not over-tighten screws as you can crack the dome ! WARNING: When the dome is open it must be supported by an adult at all times to avoid damage or injury #28 NOTE: Electrical Adapter (52) plugs into back of Scorer (36) OR optionally insert 4 AA batteries (not included) in scorer battery compartment. Remove any batteries when using adapter.
180-DAY LIMITED WARRANTY This product is warranted to the original purchaser to be free from defects in material or workmanship for a period of 180 days from the date of the original retail purchase. This warranty does not cover defects or damage due to improper installation, alteration, accident or any other event beyond the control of the manufacturer. Defects or damage resulting from misuse, abuse or negligence will void this warranty.
TABLE DE HOCKEY EN DÔME BREAKAWAY 104 cm INSTRUCTIONS D’ASSEMBLAGE Contactez no tre service à la c lientèle au 800-75 9-0977 avec des que stions sur le montage ou l'utilisatio n de ce prod uit. Ver.
MERCI! Merci d’avoir acheté notre produit. Nous travaillons 24 heures sur 24, partout dans le monde, à garantir que nos produits sont de la meilleure qualité possible. Toutefois, dans les rares cas de problèmes lors du montage ou de l'utilisation de ce produit, se il vous plaît communiquer avec notre service à la clientèle au 800-759-0977 pour une aide immédiate avant de contacter votre revendeur.
TABLE DE HOCKEY EN DÔME BREAKAWAY - NG5003 Liste des pièces 46 41 illustrations non à l'échelle PIÈCES #1 NGP7113 X2 #2 NGP7114 X2 #3 NGP7115 X2 TABLIER SUPÉRIEUR A TABLIER SUPÉRIEUR B #8 NGP7120 #9 NGP7122 #10 NGP7123 X2 PANNEAUX DE PIED A X2 PANNEAUX DE PIED B X1 TRAVERSE B #19 NGP7127 #20 NGP7128 TABLIER INFÉRIEUR A #21 NGP7129 X2 X2 X2 TIGE LONGUE TIGE MILIEU A TIGE MILIEU B 9/18 #4 NGP7116 X2 TABLIER INFÉRIEUR B #11 NGP7124 X4 BORDURE DE PIED #22 NGP7130 X4 TIGE COURT
TABLE DE HOCKEY EN DÔME BREAKAWAY - NG5003 Liste des pièces PIÈCES #37 NGP7134 X2 BUT #44 NGP7141 X4 JOUEUR DE BÂTON COURT BLEU #52 NGP7103 #38 NGP7135 #39 NGP7136 #40 NGP7102 X2 X2 X2 BUTOIR DE TERRAIN BUTOIR DE DE JEU DE BUT TERRAIN DE JEU #45 NGP7142 X1 GARDIEN DE BUT BLEU #46 NGP7143 PALET #47 NGP7144 X1 JOUEUR DE BÂTON LONGUE BLEU TABLE - NG #41 NGP7138 X4 JOUEUR DE BÂTON COURT ROUGE X1 GARDIEN DE BUT ROUGE #43 NGP7140 X1 JOUEUR DE BÂTON LONGUE ROUGE #48 NGP7145 #50 NGP7146 #51
INSTRUCTIONS D’ASSEMBLAGE étape 1 REMARQUE: les tabliers supérieurs (1 et 2) sont plus étroits que les tabliers inférieurs (3 et 4) étape 2 REMARQUE: les tabliers inférieurs (3 et 4) sont plus larges que les tabliers supérieurs (1 et 2) 5
INSTRUCTIONS D’ASSEMBLAGE (suite) étape 3 tabliers inférieurs étape 4 #16 #25 tabliers supérieurs #14 6
INSTRUCTIONS D’ASSEMBLAGE (suite) étape 5 MISE EN GARDE: Insérez le panneau de la jambe dans la fente du tablier inférieur, puis poussez le panneau de la pied dans les tabliers supérieurs. REMARQUE: Pour fixer les panneaux de pied (9 et 10), insérez le bas du panneau à l'intérieur du tablier inférieur, en vous assurant qu'il est centré dans l'ouverture et pliez le milieu du panneau jusqu'à ce que le dessus soit centré.
INSTRUCTIONS D’ASSEMBLAGE (suite) étape 7 #12 8
INSTRUCTIONS D’ASSEMBLAGE (suite) étape 8 REMARQUE: Insérer toutes les tiges du lecteur au bon endroit, comme indiqué ci-dessous, et ajoutez des ressorts comme indiqué ci-contre.
INSTRUCTIONS D’ASSEMBLAGE (suite) étape 9 REMARQUE: Fixer marqueur électronique (36) face à la table marqueur table 10
INSTRUCTIONS D’ASSEMBLAGE (suite) étape 10 ATTENTION: Ne pas trop serrer #13 #26 #28 REMARQUE: Fixer les marquer un but (37) avant de montage terrain de jeu (13).
INSTRUCTIONS D’ASSEMBLAGE (suite) étape 11 12
INSTRUCTIONS D’ASSEMBLAGE (suite) étape 12 ! AVERTISSEMENT: Gardez le dôme clair à 60 degrés et maintenez-le lorsque vous l'ouvrez! #34 #48 #26 #47 #49 ! AVERTISSEMENT: Ne serrez pas trop les vis car vous pourriez craquer le dôme ! AVERTISSEMENT: Lorsque le dôme est ouvert, il doit être soutenu en permanence par un adulte pour éviter tout dommage ou blessure.
GARANTIE LIMITÉE DE 180 JOURS La garantie du produit est valide pour l'acheteur original en ce qui a trait aux pièces défectueuses ou à la main-d’œuvre pour une période de 180 jours de la date d’achat. Cette garantie n’est couvre pas les dommages causés par accident, par modification, par une installation défectueuse ou tout autre événement hors du contrôle du fabricant. Tout défaut ou dommage résultant de la négligence ou d’une mauvaise utilisation annule cette garantie.