
Manual


24
IND100078-26
General Installation Recommendations
Installation
Rotary Bracket and Mounting Bracket (17-26 inch) combined assembling
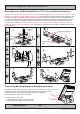
Illustration below shows “Mounting Bracket” and “Rotary Bracket JH MMDRO STD-A1 (17 to 26 inch)” combined. Both
brackets are available separately and are delivered as such. Both brackets contains several parts (as indicated). The
table below illustrates a complete mounting of these two and you have to disassemble the “Mounting Bracket” prior
to combining the two brackets together. Use the provided bolts included in the package to assemble them. You must
provide your own bolts to secure the completed unit (FIG 6) to a table / desktop. Recommended size is: M10 and
minimum 30mm in length. A stand-alone “Rotary Bracket” can not be mounted to a Display or Panel Computer unit
without the “Mounting Bracket” as base first. For more drawings and measurements of the two brackets, please refer
to User Manual.
3 pcs
4 pcs
Mounting
Bracket
Parts
Rotary
Bracket
Parts
1
4 pcs
2
Mounting Bracket Parts
Rotary Bracket
Parts
12 pcs
6 pcs
6 pcs
6 pcs
3
4 pcs
4 pcs
4
4 pcs
5
6
If mounting Mounting Bracket without Rotary Bracket
Note that the length of bolts should not exceed 12mm (ref: #1 and 5). Using any longer is
not possible due to mechanical design inside which are designed to protect the
electronics. Review also technical drawings chapter in the manual for
measurements and dimensions of brackets.
# 1: Mount bolts on each side.
Make adjustments before securing the bolts.
# 2: Adjust the tilting angle and secure the bolts.
1
2