
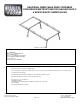
User Manual


7. Removable crossbar installation
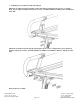
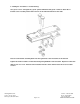
Insert the inner section of the rear crossbar between the ‘Y’ brackets. Align the holes drilled on the
crossbar with the square openings of the ‘Y’ bracket.
Open the clasp of the locking lynch pin and insert the rod end though the ‘Y’ bracket. Close the clasp to
retain the crossbar to the ‘Y’ bracket. Repeat for remaining holes.
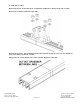
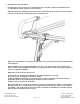
Align a hole of the HD brace to the bolt in the leg and loosely secure with 3/8” internal tooth washer and
3/8-16 wing nut.
Slide the HD brace up the leg and align with the 3/8”-16 X 1-1/2” hex bolt in the center channel of the
inner crossbar. Secure the HD brace with the 3/8” internal tooth washer and 3/8-16 wing nut. Repeat for
other side. Tighten all hardware.
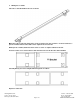
When inner crossbar needs to be removed:
1) Remove the 3/8”-16 wing nuts and washers that hold the HD braces to the legs.
2) Loosen the 3/8”-16 wing nuts on the inner crossbar.
3) Slide the HD braces towards the center of the inner crossbar so that they clear the bolt in the leg.
4) Open the clasps on the locking lynch pins and remove from ‘Y’ brackets.
5) Remove inner crossbar from ‘Y’ brackets.
When removable inner crossbar is not going to be used, it is recommended to replace the locking lynch
pins with (2) 3/8”-16 x 2” carriage bolts, (2) 3/8” split lock washers and (2) 3/8”-16 nuts on each side for
rack rigidity. The 3/8-16 wing nuts and 3/8” internal tooth washer on the HD braces should be replaced
with 3/8” split lock washers and 3/8”-16 nuts.
HAULER RACKS, INC. Toll Free: 1-800-843-5445
7109 31
st
Avenue North Phone: 763-546-5620
Minneapolis, MN 55427-2848 Fax: 763-546-0933
Page 7 of 8 WWW.HAULERRACKS.COM