Installing the WinTV driver and WinTV v7 application Install your WinTV products. Turn on your Windows XP, Vista or Windows 7 based PC, and boot into Windows. For Windows XP installations: After you install your WinTV device and boot Windows, a 'Found New Hardware' wizard will appear. Please cancel it and allow Windows to load fully before proceeding. With some WinTV products, you might see this message two or three times. Please click ‘Cancel’ each time you see the New Hardware Wizard.
A blue screen will open and begin installing the drivers for your WinTV. Once the drivers have installed, a message will appear saying ‘Drivers have been updated successfully’. Click on the bar to exit. You do not need to reboot your PC until after Step 2 ote: the latest driver updates are available at: www.hauppauge.com in the Support section.
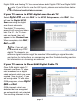
Digital QAM and Analog TV. You cannot chose both Digital ATSC and Digital QAM. ote: If you’d like to use the A/V inputs, please see instructions below in External audio/video sources. N If your TV source is ATSC digital over-the-air TV Select Digital ATSC and click Next. In the ATSC Setup menu, click Next. You will see the Digital ATSC Scan scanning for digital over-the-air channels. The digital TV scanning process will scan from channels 2 to 51.
list might be both standard and high definition channels. If your TV source is Analog cable TV Select your Country and your TV Source from the drop down list. To automatically scan for channels, click Next to continue. Click the Scan button and WinTV will automatically scan for analog channels. The scanning process takes about 10 minutes. External audio/video sources You can bring video into the WinTV from an external audio/video source such as a cable TV or satellite set top box.
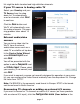
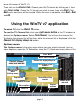
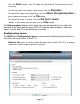
lower left corner of WinTV v7). Then click on the Devices tab. Choose your WinTV device by clicking on it, then click Tuner setup. Chose the TV format you want to scan, then click Next. Click Next and a new scan will be started. When the scan is complete, click Next / Next and OK. Using the WinTV v7 application To watch TV, click the Watch TV button. To see the TV Channel list, click your right mouse button in the TV window to display the Options menu. Select Find Channel. You will see the channel list.
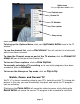
Options menu click your right mouse button to view Playback menu Channel list TV Scheduler Close captions Always on top most important TV control functions. To bring up the Options Menu, click your right mouse button once in the TV window . To see the channel list, click on Find channel. You will see the list of channels which have been scanned. To show the Channel menu as part of the TV window, click the Channel list always on icon at the top of the channel list.
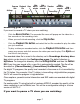
Program Playback Stop info file Settings Record Skip back 1 minute Skip back 10 seconds Skip ahead 30 Skip seconds ahead 1 minute Pause/Play Time bar Recording your TV shows If you want to record a TV show you are watching: - Click the Record button. The recorded file name will popup on the video for a few seconds as the recording starts. Stop button.
- Click the Pause button. Your TV video will stop and the Time counter will start counting. Play button - To start the video from where you paused, click the - To rewind the video to the beginning, click the your video was paused, click the Play button. - To rewind the video 1 minute, click the Skip back 1 minute button. If your video was paused, click the Play button. Skip to the beginning button. If The Delay counter displays how much time you are behind the live video.
Devices tab: allows is where you can re-scan for TV channels and set up the TV sources in WinTV v7. Parental control tab: is where you can set the Parental Control level. Advanced options: you can set options such as Convert TV recordings to .MPG file type and Game mode here.
your mouse button in the TV window to see the Options menu. Click Scheduler. To set up an event for timed watching or recording, click the Add button. The items that need to be set for each event are: - Name: you can add a name to the recording. If you do not enter a name, the name will be in the channel/date format. - Channel: chose one of your - Start time: set to the desired scanned channels. start time. Click on the hour to set the hour, the minute to set the minute.
WinTV v7 keyboard shortcuts Ctrl A Aspect ratio Ctrl P Play Ctrl D Display the video and audio format of the TV program Alt R Record Alt S Stop Ctrl F Freeze the video Alt T Start TV Ctrl Z Open TV Scheduler Ctrl C Catch up Ctrl O View program details (digital TV program, where provided in the broadcast) Ctrl > Skip ahead Ctrl < Skip back Ctrl S Display subtitles Ctrl W Full screen toggle Alt F Open File menu for playback Alt M Open the Task Menu Alt P Previous channel Ctrl
Troubleshooting Some notes on system compatibility Decoding high definition ATSC TV is very CPU intensive. A graphics card with at least 64MBytes of memory and the latest graphics driver from the manufacturer makes the decoding task easier. Typically a 2.2 GHz Pentium 4 processor or equivalent with a graphics card having 64MBytes of memory is required to properly decode ATSC digital TV on your PC. A 1.
does not work on all systems. If this setting does not help, or if you experience WinTV not responding after a channel change, then your graphics system cannot use hardware graphics acceleration. In this case go back to settings and uncheck “use hardware acceleration” and rerun WinTV. Only some channels are found during ATSC channel scan If you are only receiving some known TV channels when scanning, it means your TV antenna is not adequate to pick up the channel.
Uninstalling the WinTV driver and applications Run the hcwclear.exe from the installation CD. Select OK A black screen will briefly appear and once it has disappeared the software will be removed. If you now re-start the computer you will be at Step 4 of the installation. The Hauppauge Remote Control (optional on some models) The WinTV remote control software is installed automatically during the installation of the WinTV applications. You will see the WinTV Remote icon in the Device Tray.
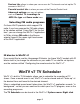
Play button: plays the last video recorded. Go button Back/Exit button: will close the current menu or exit full screen mode. TV button 0 - 9 buttons: When in “live” TV mode, is used to directly enter channel numbers. When playing back a recording, the “1” button will skip to 10%, the “2” button 20%, etc. of the length of the recording. Skip ahead button: skip ahead 30 seconds. Skip back button: skip back 30 seconds. Go button: Start WinTV. Menu button: opens channel list.
page 16
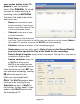
Configuring the WinTV-HVR-1850 and WinTV-HVR-2250 built-in IR blaster for use with WinTV v7 The IR Configuration Utility is used to configure the WinTV-HVR-2250 and WinTV-HVR-1850’s built-in remote control IR blaster for use with either WinTV v7 or Windows Media Center. ote: the remote control is initially configured for Windows Media Center. If you want to use the IR blaster with WinTV v7, you must run this utility.
ote: You will need the remote control from your set top box to complete the configuration in this section. N N ote: this proceedure is only necessary if you are using WinTV v7. If you are using Windows Media Center, it will configure the IR blaster automatically The WinTV-HVR’s IR blaster function consists of two components: 1. IR Blaster cable. This cable has an IR cable jack and an IR transmitter.
To set up the IR Blaster, see the guide IRRemoteBlaster Quick Installation Guide for WinTV v7. Learning remote control codes for your set top box Send button First make sure the WinTV IR transmitter is positioned over the remote sensor on your set top box. Remember, the WinTV IR transmitter has a very short transmission distance and needs to be positioned over the remote sensor on your set top box. Key numbers To access the learn function in BlastConfig.exe, click on Advanced Config and Learn.
the learning by clicking the Send button in the Blaster Configuration program. It will send the numbers 123 to your set top box. Your set top box should now be on channel 123. Close the Blaster Configuration program and your configuration will be saved.