
Instructions / Assembly


Vendor # FLXILLC-70T1 / 7’ Lexington Slim Fir Page 2
2. TREE SETUP:
2.1 Locate the Tree Stand and rotate the legs until the holes on the inner and
outer hub of the stand are aligned, and the stand forms an “X” shape
(See Fig. 2). There are three (3) tree screws with the stand. Insert each
of the tree screws into the holes, being sure that the screws do not
extend so far as to interfere with the installation of the tree pole. Place
Tree Stand in desired location.
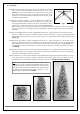
2.2 Locate Tree Bottom Section “A” which is tagged with the letter “A”.
Remove any green protective pole cap (looks like a top hat) that is
covering the bottom of the outer pole (it can be replaced when you re-
pack the tree). Insert Tree Section “A” into the tree stand (see Fig. 2A).
Make sure the pole is firmly inserted into the stand, and then turn all three screws until contact is made with
the pole. If Section “A” is not sitting straight, then simply loosen the screws, adjust the tree pole, and retighten
the screws.
2.3 Locate Tree Middle Section “B” which is tagged with the letter “B”. Insert Tree Section “B” into the top of Tree
Section “A”. Make sure section “B” is seated securely into the top of section “A”. Remove any packing strap that is
wrapped around this tree section, same as you did for section “A”. Allow the branches and leaves to fall into place
(see Fig. 2B).
2.4 Locate Tree Top Section “C” which is tagged with the letter “C”. Insert Tree Section “C” into the top of Tree
Section “B”. Make sure section “C” is seated securely into the top of section “B”. Remove any packing strap
that is wrapped around this tree section, same as you did for Section “B” and Section “A” (see Fig. 2C). It is
recommended to shape the Top Section “C” before placing it on the tree. For further information, see section
on SHAPING.
2.5 Connect the plug from each tree section into the section below securely. The light sets have colored tags which
state “Please plug in here”, so that you can find the corresponding connections easier. Further secure the plug
connection by screwing the outer cover into place.
2.6 In Tree Section “A”, there a power plug that is to be guided down through the tree section to the floor. Insert it
into a power outlet in your home or into a U.L. approved extension cord or power strip (not included). Your tree
should now be lit. If some bulbs do not light, please go to the section on TROUBLESHOOTING FOR LIGHTS.
Fig. 2
TIP: If the tree has been assembled and does not look as full as
the picture, you can increase the overall fullness of your tree by
shaping each branch. The branches have been condensed to fit
into the box and can be easily reshaped to their original fullness
by bending and separating each of the branches in a more
realistic manner. See section on SHAPING.
Fig. 2A
Fig. 2B
Fig. 2C