
Instructions / Assembly


Vendor # FLXILLC-70T1 / 7’ Lexington Slim Fir Page 3
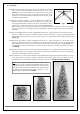
SHAPING
1. Plug in the lights as you are shaping the tree.
2. Remove any packing strap or other packing material that is around the tree section(s) and allow the branches to fall
into place. Some of the branches may catch on one another. If that occurs, slowly press down on each branch until it
falls into its place or gently pull up and out. Important: If the branches are connected to the tree’s pole by metal
brackets (hinges), be sure that all wires are free when adjusting the branches.
3. Shape by section and layer, starting at the bottom of the tree and working your way up to ensure all branches are
shaped.
4. Due to the height of the tree, it is recommended to shape the top section before placing it on the tree to avoid
shaping from a chair or ladder.
5. Consult the product photo of the tree during fluffing. On each branch, begin with the tips closest to the pole and
work your way to the end of the branch by fanning out the left and right tips from the center tips to resemble a
peacock’s fanned tail. Offset the tip from the tip before to hide the tree’s pole and fill spaces. Continue spreading the
tips until they resemble that of a real tree.
6. After shaping the whole tree, step back and take an overall look. Shift branches to fill any gaps. Your tree is now
ready to decorate and enjoy!
STORAGE
1. Remove any ornaments and decorations that were added by you and did not come with the tree.
2. Unplug the tree from the power source in your home and disconnect the plug connection between each tree section.
3. Starting with the top, separate each tree section and stand gently, being sure not to roughly handle as it could cause
damage to the parts and could loosen or break bulbs.
4. Compress each tree section by turning it upside down and squeezing the branches together so that it will fit more
easily into the storage box or container. You can also tie a ribbon or cord around the sections to secure the branches
closer together for storage.
5. Place all the parts gently back into the storage box. The box will help prevent the tree from being damaged should it
get bumped in your garage, basement, or other storage location. Tape the box shut to keep out any dust or insects.
When packing up the tree, please ensure that there is no undue strain or stress on the light sets to ensure they do not
get cut, frayed, or damaged.
6. Be sure to store the tree in a cool, dry area free of water and moisture to prevent mold and mildew from
accumulating and a musty odor developing. Exposing your tree to excessive heat or humidity may damage your tree.
DO NOT STORE TREE IN A DAMP AREA OR IN AN AREA WHERE THE TEMPERATURE EXCEEDS 100ºF. STORE THE
CARTON FLAT AND NOT UPRIGHT ON ITS SHORT END.
CLEANING & CARE
As you will be using the artificial Christmas tree every year, it is essential to keep it in good condition and properly
maintain. Following are some important tips:
• Handle the light sets gently. Do NOT pull or tug light sets as this may inadvertently loosen bulbs or wiring.
• Dust gently using a soft cloth or fabric duster. Do NOT use any chemicals or solvents to clean.
• Follow all Storage and Safety Instructions.
TROUBLESHOOTING FOR LIGHTS
If your lights are not working, following are some troubleshooting steps to try:
1. Check that the power plug is properly connected to your wall outlet or other power source.
2. Check that there is power to the wall outlet or power source.
3. Check that all the plugs within the tree are securely connected and positioned correctly.
NOTE: LED bulbs are permanent and cannot be removed for the light sets.