
User Manual


www.hawkeyeelectronics.com
MOUNTING THE TRANSDUCER
Tools & Supplies Required for Installation
• Power Drill
• 3/4”” (19 mm) drill bit, hole saw or spade bit
• 1/8” (3 mm) drill bit
• 9/64” (4 mm) drill bit
• Marine Sealant/Caulk
• 30 Grit Sandpaper
• “Phillips” Screwdriver
• Pencil
• Tie Wraps
• Water Based Antifouling Paint
• Masking Tape
Transom mounting is suitable for the following vessels:
• Outboard, inboard/outboard, single inboard, or jet-drive propulsion.
• Hull deadrise angle below 30°.
• Transom angle from 3-20°.
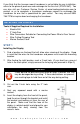
NOTICE:
To get a good “view” of the mounting location, while the
vessel is out of the water, position yourself at the transom
and look at the bottom of the hull towards the bow. Using
illustrations A thru I, note anything that could interrupt the clean flow
of water to the transducer mounting location.
NOTICE:
To achieve maximum performance try the following:
Have someone run the boat on plane for you in smooth
water. CAREFULLY look over the transom at the water
flowing from the bottom of the boat. Find the location which produces
the least amount of turbulence (air bubbles). This is the location you
will want to mount the transducer.
NOTICE:
To prevent drilling holes too deeply, wrap masking tape
around the bit 7/8" (22 mm) from the point. To minimize
surface cracking on fiberglass hulls use a chamfer or
countersink bit. If either is not available, start drilling with a
1/4" (6 mm) bit to a depth of 1/16" (1 mm), then finish the hole
with the 9/64" (4mm) bit.