
User Manual


www.hawkeyeelectronics.com
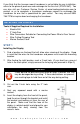
STEP 3
Connecting of the Power Cable
The display has no ON/OFF switch. Therefore, you will
need to connect the power harness to a power source that
will turn the unit on as power is applied. The key switch or
an ON/OFF power switch will be suitable for powering the
unit.
1. Connect the BLACK wire in the harness to a negative (-)
terminal or suitable ground.
2. Connect the RED wire in the harness to a positive (+) 12
Volt switchable power source (key switch, on/off switch,
terminal block, etc).
NOTICE:
Never use “Twist-On” or “Automotive” type
connectors. These connectors form a solid electrical
connection and are less likely to corrode.
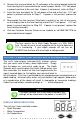
STEP 4
Testing the Display Installation
Before continuing with your installation, you
should test the unit to make sure the power wires
are properly attached.
1. Apply power to the unit by turning on the
power source that you’ve attached the red
and black wires to.
2. The buzzer should beep three times while the display
illuminates all the LCD graphics for 2 seconds. “---”
will then be shown on the LCD.
If the display operates as per #2 above, continue to the
“Basic Operation” section.
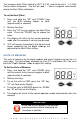
If the display does not turn ON:
1. Check the power source using a test light or DC volt
meter. Make sure there is 12 volt power where the
power harness connects to both the positive and
negative sources.
2. Check the fuse holder assembly with a test light or DC
volt meter. Connect the ground for the test meter or
light to the vessel’s negative power source.