
User Manual


► Glass Cleaner
► Clean rag
► Hard Squeegee
(3M PA1 or Equivilent)
This document contains the recommended procedures for applying a Hawkeye Industries Gauge Board Decal.
Tools Parts Required
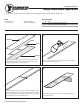
Decals supplied by Hawkeye have three parts: A backing material, the
decal itself and premask. These terms will be used throughout. Each
decal segment will be between 24” and 60” long.
If using gauge boards, ensure they are on a flat surface and in the order
as they will be placed on the tank. Decals segment lengths are not likely
match up to gauge board section lengths, so having all the gauge boards
aligned streamlines the decal application process.
Clean the mounting surface (i.e. gauge board or tank side) with glass
cleaner. Dry the surface completely.
Installation Instructions
Gauge Board Decal Application
QTY Part
► 1 Decal, cut & weeded with premask
► 1 Existing gauge board or flat surface
1.) 2.)
3.) 4.)
►
►
Gauge Board Decal Application, September 2013
1
►
Start with the top-most decal first. Peel the backing off of the top few
inches of the top decal.
PREMASK
BACKING
DECAL