
User's Manual Network Camera HNC300, HNC320G

59
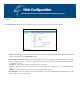
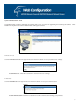
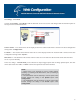
View Image - ActiveX Mode
To view video images from the web browser, click on “View Image – ActiveX Mode” on the welcome screen to access
the video images from Internet Explorer, as illustrated below:
Camera Name* - The Camera name will be display when the Camera Name field is entered in the Web Configuration
setting under “System”
Location**- The location of the Internet Camera will be displayed when the Location field is entered in the Web
Configuration settings under “System”.
Date/Time***- The date/time of the video server will show the date and time which come from time server or you set
manually.
Note:
Please refer to the appendix on how to install ActiveX.
1. Install to the Web Server
2. Install to your Local PC
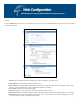
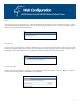
In the View Image – ActiveX Mode you are allowed two output trigger options and one image upload option. Just click
on the desired selection “ON” or “OFF” to utilize the options for each of the functions.
Note 1:
Administrator has the authority to set the email image functions through the setting in the “E-mail” of System
Administration menu bar.
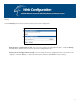
Note 2:
The Administrator has the authority to allow user’s to set the image upload functions through the setting in the “Upload”
of System Administration menu bar.
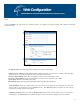
Location
Date/Time
Video Server Name