i
LIMITED WARRANTY Hawking Technology guarantees that every HWUN1A Wireless-N USB Adapter with Upgradable Antennas is free from physical defects in material and workmanship under normal use for one (1) year from the date of purchase. If the product proves defective during this two-year warranty period, call Hawking Customer Service in order to obtain a Return Authorization number. Warranty is for repair or replacement only. Hawking Technology does not issue any refunds. BE SURE TO HAVE YOUR PROOF OF PURCHASE.
CONTENTS I. INTRODUCTION ......................................................................... 1 Features .................................................................................................................... 1 Package Contents ..................................................................................................... 2 II. INSTALLATION PROCEDURES ............................................... 2 III. CONNECTING TO YOUR WIRELESS NETWORK ................. 6 IV.
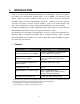
I. INTRODUCTION Thank you for purchasing the Hawking HWUN1A Wireless-N USB Adapter. Now you can enjoy the latest Wireless-N technology with excellent speeds, of up to 300Mbps*. The Wireless-N USB Adapter extends your wireless network coverage by up to 3 times and boosts transmission throughput 12 times more than a standard Wireless-NNetwork. It allows you to connect a notebook or desktop to any wireless network** using the USB port.
Package Contents Before you begin the installation, please check the items of your package. The package should include the following items: - One HWUN1A Wireless-N USB network Adapter - One USB cable (1.
IMPORTANT: • Please do not install the wireless adapter into your Mac desktop or notebook before installing the software program from the CD. • The following installation was operated under Apple OSX 10.3 Panther. (Installation Procedures are similar in other OS. However, the installation images and screens may not look the same as the ones in this manual) • If you have previously installed other Wireless Adapter Driver & Utility, please uninstall the older version first. 1.
iii. Click Continue to begin (Note: the setup wizard may look different depending on the version of Mac OS X you are using.) 2. Select the location on your computer where you wish to install the software and click “Continue.
3. The system will begin to install the software utility for the HWUN1A. You may be prompted to enter your administrator login information. If so please enter your user information and select “Continue.” 4. A window will appear that informs you of a necessary restart of your computer to complete the installation. Select continue installation. 5. When setup has completed. Click Restart to complete the driver installation.
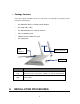
III. Connecting To Your Wireless Network 1. When your computer has successfully restarted. Insert the Hi-Gain Wireless-N USB Adapter into an available USB port on your desktop or notebook computer. - Insert the USB adapter firmly into the USB port to ensure a proper connection is made. - When the adapter is inserted carefully lift the antenna unit upright. Optional: To increase your wireless range and strength, replace one of the antennas with the Hawking Hi-Gain Indoor or Outdoor Antennas.
2. If You Have a Previously Installed Airport Card -Turning Airport OFF. You will need to turn it off to use the HWUN1A Wireless-N Adapter. To do this, select the Airport icon on the top right corner of your screen and select “TURN OFF AIRPORT.” 3. System Preferences and Network Settings a. Click the APPLE icon on the top left corner of your desktop and open the SYSTEM PREFERENCES menu. b.
d. Click “APPLY NOW” to confirm the selection. - If you plan on using a “Static” (Manually entered) IP address for your computer you may do so here by double clicking the “USB Wireless Adapter” selection and selecting TCP/IP. - If you are using an automatically assigned IP address (MOST NETWORKS) you do not have to worry about this. Simply close the window to proceed.
IV. Configuration Utility The Configuration Utility is a powerful application that helps you configure the HWUN1A and monitor the link status and statistics of your wireless connection. Each time you insert the Hawking Hi-Gain card the Hawking Wireless Utility should automatically load. In the case that it doesn’t you may manually load the Utility by using “FINDER” to view your “APPLICATIONS” folder and selecting the Hawking Wireless Utility Icon displayed on the left. 1.
networks on the list, double-click the item on the list, and the card will automatically connect to the selected network. Rescan Button Click “Rescan” button to collect the information of all the wireless networks nearby. Connect Button Click “Connect” to connect to the selected network. Add to Profile Button Add the selected network to Profiles list. 2. Profile The “Profiles List” is for you to manage the networks you connect to frequently. You are able to Add/Delete/Edit/Activate a profile.
2.1. Configure the Profile System Configuration Parameter Description Profile Name Define a recognizable profile name for you to identify the different networks. SSID The SSID (up to 32 printable ASCII characters) is the unique name identified in a WLAN. The ID prevents the unintentional merging of two co-located WLANs. You may specify a SSID for the card and then only the device with the same SSID can interconnect to the card.
Parameter Description Network Type Infrastructure – This operation mode requires the presence of an 802.11 Access Point. All communication is done via the Access Point or Router. Ad-Hoc – Select this mode if you want to connect to another wireless station in the Wireless LAN network without going through an Access Point or Router. Peer to Peer. Transmit Power If you wish to lower the transmit power of the card to save the power of your system, you can select the lower percentages from the list.
Authentication vs. Security Parameter Description Authentication Type This setting has to be consistent with the wireless networks that the card intends to connect to. All security keys within a network must match to allow successful communications. None – No authentication is needed among the wireless network. Shared – Only wireless stations using a shared key (WEP Key identified) are allowed to connecting each other.
Encryption Mode None – Disable the WEP Data Encryption. WEP – Enable the WEP Data Encryption. When the item is selected, you have to continue setting the WEP Encryption keys. TKIP – TKIP (Temporal Key Integrity Protocol) changes the temporal key every 10,000 packets (a packet is a kind of message transmitted over a network.) This insures much greater security than the standard WEP security.
3. Link Status From the “Link Status” option, you can view all the information of the network you are connecting to. You can use this tool as you reposition the Hi-Gain antenna to find the optimal location for antenna placement. Parameter Description Status Display the SSID and MAC ID of the network the card is connecting to. Current Channel Display the number of the radio channel and the frequency used for the networking.
Link Quality This bar indicates the quality of the link. The higher the percentage, the better the quality. dBm If you want to know the signal strength in units of dBm, select this check box. Signal Strength This bar shows the signal strength level. The higher percentage shown in the bar, the more radio signal is being received by the card. This indicator helps to find the proper position of the wireless device for quality network operation.
4. Statistics This option enables you to view the available statistical information concerning Tx counts (Tx success, Tx error, RTS Success and RTS Failed), and its Rx counts (Rx success, Rx error). You may reset the counters by clicking ”Reset Counter”.
5. Advanced This option enables you to configure more advanced settings, for example: wireless mode, protection mode and etc. Parameter Description Wireless Mode 802.11 B/G/N mix – If you have a mix of 802.11b, 802.11g and 802.11n wireless stations in your network, it is recommended to setting the adapter to this mode. This mode is also the default setting. 802.11 B/G only – This adapter can be compatible with both 802.11g and 802.11b wireless stations. If there are only 802.11b and 802.
Tx Rate There are several options including Auto/1/2/5.5/11/6/9/12/18/24/36/48/54Mbps for you to select. When the “Auto” is selected, the device will choose the most suitable transmission rate automatically. The higher data rate you designated in the network, the shorter distance is allowed between the adapter and the wireless stations. When the wireless mode is “802.11 B only”, the maximum data rate is 11Mbps (11b) so that there are only “Auto/1/2/5.5/11Mbps” options you can select.
V. APPENDIX A - SPECIFICATIONS Available transmit power Data Rates • 2.412~2.472G(IEEE802.11b) 18dBm @1~11Mbps 1, 2, 5.5, 6, 9, 11, 12, 18, 24, 36, 48, 54, 72, 84, 150 and 300Mbps (with 2-stream on both ends) Standards / Compliance • 2.412~2.472G(IEEE802.11g) 15 dBm @6Mbps 14 dBm @54Mbps IEEE802.3, IEEE802.3u, IEEE802.11b, IEEE802.11g, 802.11n 2.0 Regulation Certifications • 2.412~2.472G(IEEE802.11N) 15dBm FCC Part 15, ETSI 300/328/CE Operating Voltage Antenna Configuration 5 V ± 0.
VI. INDEX This chapter provides solutions to problems usually encountered during the installation and operation of the adapter. 1. What is the IEEE 802.11n standard? 802.11n is an IEEE 802.11 wireless network standard that increases transmission speeds from a traditional 11Mbps (802.11b) to over 100Mbps. Currently, the HWUN1 supports up to 300Mbps. 802.11n can handle legacy 11a, 11b and 11g transmission in a mixed mode or only 11n nodes for maximum performance. It supports the 2.
8. What is AES? AES (Advanced Encryption Standard), a chip-based security, has been developed to ensure the highest degree of security and authenticity for digital information, wherever and however communicated or stored, while making more efficient use of hardware and/or software than previous encryption standards. It is also included in IEEE 802.11i standard. Compare with AES, TKIP is a temporary protocol for replacing WEP security until manufacturers implement AES at the hardware level. 9.
encompasses a group of products and technologies used to help solve distance issues accompanied with WiFi products. A unit of measurement on antenna strength and power is dBi. The higher the dBi or gain level of an antenna the more powerful it is. 14. What is the difference between directional and omni-directional antennas? Directional and omni-directional antennas determine the wireless output pattern of antennas.
PRODUCT SUPPORT INFORMATION Thank you for choosing Hawking Technologies. Please do not hesitate to contact us if you have any questions regarding the installation of your product. We’re here to help you 24 hours a day, 7 days a week! PHONE SUPPORT • 888.202.3344 Toll-Free 24/7 Technical Support Line (US & Canada Only) WEBSITE SUPPORT • http://www.hawkingtech.