CE MARK WARNING This is a Class B product. In a domestic environment, this product may cause radio interference, in which case the user may be required to take adequate measures. LIMITED WARRANTY Hawking Technology guarantees that every HWUR54G Wireless-G Range Extender is free from physical defects in material and workmanship under normal use for two (2) years from the date of purchase.
Contents Chapter 1: Introduction ……………………………………. 3 1.1 Package Contents……………………………… 5 1.2 Features………………………………………... 5 1.3 Specifications…………………………………... 5 1.4 Physical Description…………………………… 7 Chapter 2: Plan Your Wireless Network…………………… 9 Chapter 3: Connecting the Range Extender……………….. 11 Chapter 4: Configuring the Range Extender ……………… 12 4.1 Setup Wizard……………………….……..... 12 4.2 Selecting the Device………….…………….. 13 4.3 Assign An IP Address……….…………….. 14 4.4 Details and Status…………….……………. 15 4.
Chapter 1: Introduction Thank you for purchasing the Hawking Technologies Wireless-G Range Extender. The HWUR54G is compliant with the IEEE 802.11g/b wireless standards. The Wireless-G Range Extender is an innovative addition to Hawking’s Hi-Speed Wireless-G 54Mbps line of wireless 802.11g products. It easily and effectively doubles the operating range of your wireless network.
1.1 Package Contents The HWUR54G includes the following items: z One HWUR54G Range Extender z One Power Adapter z One Quick Installation Guide z One Setup CD (Hawking WiFi Locator Software Included) z One Dipole Antenna 1.2 Features z Complies with the IEEE 802.11g/b wireless standards. z Extends the range of any wireless 802.11b or 802.11g network. z Universal Support Technology – Works with all 802.11b, 802.11g wireless networks. z 1 Minute installation using the included Setup Wizard.
z z z z z z z z Band) Antenna: External detachable dipole antenna (with RP-SMA connector) Connectors: 10/100Mbps RJ-45 x 1 Power: 12VDC, 0.
1.4 Physical Description Front Panel Located on the HWUR54G’s front panel are LED status lights that inform you of the unit’s current status. Below is an explanation of each LED.
Front LED Panel LED Power Color Green Status Lit Off Description Power is supplied. No Power. Wireless Activity Green Flash Antenna is transmitting or receiving data. Off Antenna is not transmitting or receiving data. On A valid link is established. Flash Off It is transmitting or receiving data. No link is established.
keeping your original configurations intact. 2) If problems continue to persist or you have forgotten your password, pressing the reset button for more than 5 seconds will reset the device back to its factory default settings. (Warning: your original configurations will be replaced with the factory default settings).
Chapter 2: Plan Your Wireless Network Before you begin configuring your HWUR54G Wireless Range Extender, it is important that you determine where it fits within your wireless network. A wireless network consists of computers (Desktops or Laptops) with wireless network adapters installed. Computers within a wireless network are connected with a local wireless access point that handles all wireless communications between the computers and the internet.
Chapter 3: Connecting the Range Extender 11
You may also connect the HWUR54G to an open LAN port on your network.
Chapter 4: Configuring the Range Extender 4-1 Ensure that your Range Extender is powered on and correctly connected to your PC. (Note: If you are a more advanced user or you are using a Macintosh computer and wish to skip the Setup Wizard you may do so and use the default IP of the Range Extender to access the Web Based User Interface. The Default IP Address and Login is (SKIP TO PG 15 AFTER YOU HAVE LOGGED IN) : http://192.168.1.235 User Name: admin Password: 1234 -Power On your PC.
-In the Setup Menu select SETUP WIZARD using your mouse. 4-2 Selecting the Device -In the empty field you should see the name of the Hawking Range Extender. If you do not, click the REFRESH button to rescan for the Extender. If your Range Extender is not detected, please check to ensure that your device is properly connected to the PC or network.
4-3 Assign an IP Address to the Range Extender This section allows you to define the specific IP address of your Wireless Range Extender. Please be sure to save the IP address you choose for your Range Extender for future use.
4-4 Details and Status This page will display the IP address information of your Wireless Range Extender. Write this information down and save it in a safe place. You will need it to make any adjustments to the configuration settings in the future. Click NEXT and the Wizard will load the Web Based Configuration panel.
4-5 SETUP MENU Before you use the Web Based Configuration Panel you must enter the default login information. User Name: admin Password: 1234 You can change the login information in the ADMIN menu of the Configuration Panel.
Parameter Description Original SSID You must enter the SSID of the wireless access point that you wish to repeater. SSID of Extender This is the name of the new extended wireless network. All computers that connect through the Range Extender must use this SSID. Mode 802.11b mode: allows for data transfer rates up to 11Mbps 802.
4-6 SECURITY SETTINGS Parameter Description WEP Length WEP-64: input 10-digit Hex values (in the “A-F”, “a-f” and “0-9” range) or 5-digit ASCII character as the encryption keys. WEP-128: input 26-digit Hex values (in the “A-F”, “a-f” and “0-9” range) or 13-digit ASCII characters as the encryption keys. Mode HEX: input Hex values (in the “A-F”, “a-f” and “0-9” range) ASCII: input alphanumeric format.
4-7 ADVANCED SETINGS Parameter Description Beacon Interval (20-1000) The period of time that this access point broadcast a beacon. Beacon is used to synchronize the wireless network. RTS Threshold (256-2432) When the packet size is smaller the RTS threshold, the access point will not use the RTS/CTS mechanism to send this packet. DTIM Period (1-255) This is the interval of the Delivery Traffic Indication Message (DTIM).
Auto select: It will auto switch to the more suitable method. Short: It is suitable for high traffic wireless network Long: It can provide more reliable communication Click Apply button at the bottom of the screen to save the above configurations. You can now configure other advance sections or start using the Access Point. 4-8 ACCESS FILTERING The HWUR54G allows you to provide a Filter List of MAC addresses that are allowed/denied access associated with this Extender.
Parameter Description MAC Filtering You can enable or disable the MAC Filtering function. Filter Mode If you select “Only deny PCs with MAC listed below to access this device”, then all the PCs in the list will be denied to access and all other PCs will be allowed to access. If you select “Only allow PCs with MAC listed below to access this device”, then all PCs in the list will be allowed to access but all other PCs will be denied to access.
Chapter 5: STATUS SCREEN The Status Screen displays the current Ethernet and Wireless settings of the Wireless Range Extender. Parameter Description Ethernet It shows the default IP address, Subnet Mask, Gateway and Link status information. Wireless It shows the current Wireless information.
Chapter 6: ADMIN SCREEN Parameter Description FW Version It shows current FW version. FW Upgrade This tool allows you to upgrade the Access Point’s system firmware. To upgrade the firmware of your Access Point, you need to download the firmware file to your local hard disk, and enter that file name and path in the appropriate field on this page. You can also use the Browse button to find the firmware file on your PC. Please reset the Access Point when the upgrade process is complete.
Chapter 7: LAN SCREEN Parameter Description Device Name It shows current name of the device. Automatic IP Selecting this option is not advised unless you have direct access to the device that provides the IP address. Fixed IP Specify IP: Designate the Access Point’s IP Address. This IP Address should be unique in your network. The default IP Address is 192.168.2.1. Subnet Mask: Specify a Subnet Mask for your LAN segment. Gateway: Specify the default gateway IP of this Access Point.
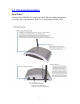
Chapter 8: FINDING THE RIGHT LOCATION – PLACING THE WIRELESS RANGE EXTENDER WITHIN YOUR NETWORK 1) After you have completely configured your Range Extender you can disconnect the Ethernet cable that connects the Extender to your network or PC for configuration. 2) Take the Range Extender and Power Adapter and place the Extender in a location half way between your original Access Point and the area that you are extending your wireless coverage to.
Chapter 9: TROUBLESHOOTING This chapter provides solutions to problems usually encountered during the installation and operation of the Access Point. 1. How do I manually find the PC’s IP and MAC Address? 1) In Windows, open the Command Prompt program 2) Type Ipconfig /all and Enter 1 Your PC’s IP address is the one entitled IP address 2 Your PC’s MAC Address is the one entitled Physical Address 2. What is BSS ID? A group of wireless stations and an Access Point compose a Basic Service Set (BSS).
5. What is WEP? WEP stands for Wired Equivalent Privacy, a data privacy mechanism based on a 64(40)-bit shared key algorithm. 6. What is a MAC Address? The Media Access Control (MAC) address is a unique number assigned by the manufacturer to any Ethernet networking device, such as a network adapter, that allows the network to identify it at the hardware level. For all practical purposes, this number is usually permanent.
Channel: 6 SSID of Range Extender: (any SSID other than HawkingAP) LAN IP: 192.168.1.x (any number other than 2) SUBNET: 255.255.255.0 GATEWAY: 192.168.1.2 After you have matched the settings check if you can connect to the internet through the Wireless Range Extender. If you still cannot access the internet please contact our technical support department using the number below.