INSTALLATION, OPERATION & MAINTENANCE INSTRUCTIONS 1455 Kleppe Lane Sparks, NV 89431-6467 (775) 359-4712 Fax (775) 359-7424 E-mail: haws@hawsco.com website: www.hawsco.com No. 0510000866 (5) Electric Water Cooler and Bottle Filling Stations MODELS 1201S / 1201SF / 1211S / 1211SF / 1202S / 1202SF / 1212S / 1212SF 1201SFH, 1202SFH, 1211SH, 1211SFH, 1212SH, 1212SFH NOTE TO INSTALLER: Please leave this information with the Maintenance Department.
REQUIRED TOOLS (OR EQUIVALENT): □ □ □ □ □ □ □ □ □ □ □ □ □ Adjustable Wrench 1/4” Bit-holding screwdriver (7-3/4” max length) 1/4” Bit-holding screwdriver (4” max length, required for installs at Child ADA height only) #2 Phillips bit and a Flat-blade bit T15, T20, T25 Torx bits (supplied when required) 5/16” Nut driver bit (not necessary but will make some steps easier) Trimming tool for ABS pipe (necessary for some retrofits) Small bubble level Tape measure and tools for properly marking and measuring wal
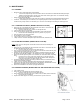
A. INSTALLATION OF ELECTRIC WATER COOLER 1. Verify that the electrical receptacle, water supply/valve, and drain locations are all in accordance with the installation drawing. a. NOTE: The installation drawing addresses new installations as well as retrofits. Consult the retrofit pages of the installation drawing if uncertain whether a retrofit will be possible in your case. 2. Remove the hanger bracket from the back of the cooler by removing (1) screw. 3.
C. INSTALLATION OF HIGH-SIDE (LEFT) WATER COOLER 23. Remove the hanger bracket from the back of the cooler by removing (1) screw. 24. With the cooler laying on its back, remove the (4) screws holding the skirt to the bottom of the frame. Then remove the skirt by sliding the skirt away from the cooler. 25. Mount the hanger bracket on the wall using (4) 1/4” structural screws, in accordance with the installation drawing. a.
Electric Water Cooler and Bottle Filler Programming Table Top-Level Menu Arrows (cycle through…) Select Default 100%, 75%, 50%, 25%, Cancel Percentage Value - programs brightness Cancel – returns to main menu 100% Sensor Range (rng) from 1 to 10, Cancel Range 1 to 10 - programs range Cancel – returns to main menu Rng 5 Errors No Errors – None or Cancel.
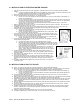
F. OPTIONAL DEACTIVATION OF THE BUBBLER(S) (BOTTLE FILLER MODELS ONLY) F.1. DEACTIVATION OF THE BUBBLER(S) 1. 2. 3. 4. Remove the clear plastic cover underneath the bowl on the right side or single unit by using a T20 torx bit. Locate the component on the circuit board that has eight numbered switches. It is adjacent to the blue button. Using a nonmetallic pointed object such as a mechanical pencil tip, change the position of switch 1 to the “ON” position by sliding it up.
G. MAINTENANCE G.1. CLEANING • • • Metal parts can be cleaned with either of the following: o A clean towel, dampened by warm water with or without a small amount of mild hand dishwashing detergent. o Stainless steel cleaning wipes. Buff off excess with a clean cloth or paper towel. Do not allow the cleaning fluid to touch the plastic parts or the bottle filler.
H. GENERAL OPERATION H.1. USING THE BUBBLER • Press the push-button or place hand in front of sensor (on sensor equipped models) on the front of the water cooler to activate the bubbler flow. H.2. USING THE BOTTLE FILLER • Insert a bottle below the nozzle to activate the water flow. • Remove the bottle from below the nozzle to stop the water flow. H.3. FILTER LIFE (Filtered units only) • The filter is designed to last for a maximum of 1 year or 3,000 gallons, whichever comes first.
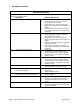
J. TROUBLESHOOTING TROUBLESHOOTING Note: If the suggested items in the checklist fail to solve the problem, contact Haws Technical Support at 1-800-766-5612. PROBLEM 1. No water flow from bubbler REPAIR CHECKLIST a. b. c. d. 2. No water flow from bottle filler a. b. c. d. e. 3. Low water flow from bubbler 4. Low water flow from bottle filler 5. Water leaking 6. Water from bubbler excessively splatters when contacting bowl 7. 8.
OPTIONAL BOTTLE FILLER – ERROR CODE TABLE TROUBLESHOOTING Note: If the suggested items in the checklist fail to solve the problem, contact Haws Technical Support at 1-800-766-5612. ERROR CODE 1. E009 – COMPCY Compressor is cycling too frequently REPAIR CHECKLIST a. b. c. d. 2. E012 – SENOB Bottle filler sensor is obstructed a. b. 3. E014 – RFID RFID board lost communication c. a. b.
K. FEDERAL COMMUNICATIONS COMMISIONS (FCC) and INDUSTRY CANADA (IC) COMPLIANCE STATEMENTS K.1. FCC Compliance Statement K.1.1. Part 15.19 This device complies with Part 15 of the FCC Rules. Operation is subject to the following two conditions: (1) this device may not cause harmful interference, and (2) this device must accept any interference received, including interference that may cause undesired operation. K.1.2. Part 15.
WATER COOLER WARRANTY AND LICENSE EXCEPT AS EXPRESSLY STATED HEREIN, MANUFACTURER HEREBY DISCLAIMS ALL WARRANTIES, WHETHER EXPRESS OR IMPLIED, ARISING BY LAW OR OTHERWISE, INCLUDING WITHOUT LIMITATION, ANY IMPLIED WARRANTIES OF MERCHANTABILITY AND FITNESS FOR A PARTICULAR PURPOSE. THIS WARRANTY MAY NOT BE MODIFIED OR EXTENDED WITHOUT THE WRITTEN CONSENT OF HAWS. REMEDIES AND REPLACEMENTS STATED HEREIN ARE EXCLUSIVE.
THIS DOCUMENT IS TRUE AND CORRECT AT TIME OF PUBLICATION. CONTINUED PRODUCT IMPROVEMENTS MAKE SPECIFICATIONS AND MEASUREMENTS SUBJECT TO CHANGE WITHOUT NOTICE.
THIS DOCUMENT IS TRUE AND CORRECT AT TIME OF PUBLICATION. CONTINUED PRODUCT IMPROVEMENTS MAKE SPECIFICATIONS AND MEASUREMENTS SUBJECT TO CHANGE WITHOUT NOTICE. PARTS BREAKDOWN VIEWS ARE REPRESENTATIVE ONLY. YOUR MODEL MAY VARY. SEE PREVIOUS SHEET FOR PART NUMBERS & ADDITIONAL PARTS. 18 6 12 12 21 19 20 15 13 11 14 COMPRESSOR 10 9 16 REV. ECN: ECN: BY: MODEL(S) 5595 5343 DHP 12XX ELECTRIC CHK'D.
PAGE 15 OF 21 THIS DOCUMENT IS TRUE AND CORRECT AT TIME OF PUBLICATION. CONTINUED PRODUCT IMPROVEMENTS MAKE SPECIFICATIONS AND MEASUREMENTS SUBJECT TO CHANGE WITHOUT NOTICE. NOTES: 1. HOLD PLUMBING & ELECTRICAL DIMENSIONS ±1/4" (6.4mm). HOLD MOUNTING DIMENSIONS ±1/8" [±3.2MM]. 2. ADHERING TO PROVIDED INSTALLATION HEIGHT DIMENSIONS WILL ALLOW A SINGLE WATER COOLER (OR THE LOW WATER COOLER IN A HI-LO INSTALLATION), AND THE BOTTLE FILLER (IF APPLICABLE) TO BE INSTALLED AT ADULT ADA HEIGHT.
PAGE 16 OF 21 THIS DOCUMENT IS TRUE AND CORRECT AT TIME OF PUBLICATION. CONTINUED PRODUCT IMPROVEMENTS MAKE SPECIFICATIONS AND MEASUREMENTS SUBJECT TO CHANGE WITHOUT NOTICE.
CIRCUIT BOARD PAGE 17 OF 21 THIS DOCUMENT IS TRUE AND CORRECT AT TIME OF PUBLICATION. CONTINUED PRODUCT IMPROVEMENTS MAKE SPECIFICATIONS AND MEASUREMENTS SUBJECT TO CHANGE WITHOUT NOTICE.
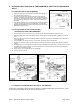
3/8" ELBOW (FIELD CONNECTION) HIGH EWC INSTALLATION DETAILS GREEN GROUND WIRE TO GROUNDING SCREW (FIELD CONNECTION) (SEE DETAIL VIEW BELOW) ROUTE HIGH COOLER DRAIN HOSE OUT THE SIDE & ABOVE THIS BRACKET HIGH COOLER DRAIN HOSE FOAM INSULATION TUBING & 3/8" TUBING (SUPPLIED) ROUTE TUBING THROUGH CIRCULAR HOLE IN SHEET METAL HIGH EWC TUBING CONNECTION (ON LOW COOLER) GROUND WIRE (RUN FROM LOW COOLER) WIRE CLIP SNAP THESE WIRES INTO WIRE CLIP 3/8" CONNECTOR (FIELD CONNECTION) HIGH UNIT WIRING HARNESS C
RETROFIT INSTALLATION DETAILS LOW COOLER BRACKET HEIGHT ADULT STANDING 33 7/8" ADULT ADA 28 3/8" 3 RETROFIT TABLE CHILD ADA 25 3/8" MANUFACTURER MODEL HAWS ALL MODELS STARTING WITH HWUACP - ALL MODELS STARTING WITH EB, EI, EMA, EN, EZ, HAC HVR, LI, LMA, LZ, TB, & TI ELKAY/HALSEY TAYLOR NOTE LOCATING NOTCH FOR DRAIN STUB-OUT CENTERLINE HAWS COOLER MOUNTING BRACKET 2 5/8"±1/4" 67mm±6 OASIS SUNROC MURDOCK 3" 76mm BRACKET HEIGHT (SEE TABLE ABOVE) 4 5/8" 117mm 6" 152mm 5 WALL FACE 8 3/4" 222mm
PAGE 20 OF 21 THIS DOCUMENT IS TRUE AND CORRECT AT TIME OF PUBLICATION. CONTINUED PRODUCT IMPROVEMENTS MAKE SPECIFICATIONS AND MEASUREMENTS SUBJECT TO CHANGE WITHOUT NOTICE. RETROFIT INSTALLATION DETAILS 6" 152mm WATER SUPPLY VALVE IS PERMISSIBLE IN THIS AREA FOR BOTH FILTER AND UNFILTERED MODELS. VALVE MAY PROTRUDE 2 3/4" MAXIMUM FOR WALL. LARGE ESCUTCHEONS MAY NOT BE FEASIBLE, DEPENDING ON VALVE LOCATION.
PAGE 21 OF 21 THIS DOCUMENT IS TRUE AND CORRECT AT TIME OF PUBLICATION. CONTINUED PRODUCT IMPROVEMENTS MAKE SPECIFICATIONS AND MEASUREMENTS SUBJECT TO CHANGE WITHOUT NOTICE. MAINTENANCE NOTE THE LEFT EDGE OF THE LABEL FACING OUT THE SIDE DURING INSERTION OF FILTER INTO FILTER HEAD FILTER REPLACEMENT 7/8" WRENCH FLATS PAGE 21 OF 21 1455 KLEPPE LANE SPARKS, NEVADA 89431 (775) 359-4712 FAX (775) 359-7424 E-MAIL: HAWS@HAWSCO.COM WEBSITE: WWW.HAWSCO.COM Y-STRAINER CLEANING REV.