
Installation Manual


09/19 1200 Series Electric Water Coolers Page 6 of 21
F. OPTIONAL DEACTIVATION OF THE BUBBLER(S) (BOTTLE FILLER MODELS
ONLY)
F.1. DEACTIVATION OF THE BUBBLER(S)
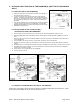
1. Remove the clear plastic cover underneath the bowl on the right side or
single unit by using a T20 torx bit.
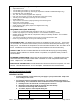
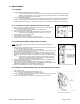
2. Locate the component on the circuit board that has eight numbered
switches. It is adjacent to the blue button. Using a nonmetallic pointed
object such as a mechanical pencil tip, change the position of switch 1 to
the “ON” position by sliding it up. Switch 1 is on the left, closest to the
blue button.
3. Verify that the bubbler(s) have been deactivated by pressing the pushbar
or putting a hand in front of the sensor (if applicable). The bottle filler
display should be displaying a “fountain off” message every ten seconds.
4. Reinstall the clear plastic cover.
F.2. INSTALLATION OF THE COVER PLATE(S) –
OPTIONAL BUT HIGHLY RECOMMENDED
5. Disconnect power to the unit via the breaker or by removing the skirt and unplugging the main power cord.
6. Remove the black plastic cover underneath the bowl by removing the (4) screws using either a phillips bit or 5/16” nut
driver.
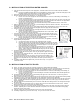
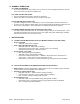
7. Remove the (3) T20 head screws attaching the bubbler to the bowl, then pull up on the bubbler to release the push-to-
connect fitting from it.
8. Store the bubbler and T20 head screws in a safe location so that they can be reinstalled later.
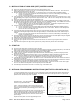
9. Install the cover plate by using the (3) Short length T-20 head screws, taking care that the rubber gasket is positioned
properly.
10. Install the push-to-connect fitting that previously connected to the bubbler to the stem which is attached to the cover plate.
11. Reinstall the lower bowl cover with the (4) screws, making sure it is slid to the frontmost position before installing the
screws using a low amount of torque.
12. Repeat steps 6-11 for the high (left) side unit if applicable.
13. Reconnect power to the unit.
Figure 6: Cover Plate Installation
F.3. REINSTALLATION AND REACTIVATION OF THE BUBBLER
Reverse the steps above, taking care that the power is off while working inside of the bowl area. Flush
water through the bubbler for at least five minutes prior to use.
Figure 4: Access to Switches
Figure 5: Bubbler Removal