
Installation Manual


09/19 1200 Series Electric Water Coolers Page 7 of 21
G. MAINTENANCE
G.1. CLEANING
• Metal parts can be cleaned with either of the following:
o A clean towel, dampened by warm water with or without a small amount of mild hand dishwashing detergent.
o Stainless steel cleaning wipes. Buff off excess with a clean cloth or paper towel. Do not allow the cleaning
fluid to touch the plastic parts or the bottle filler.
• Plastic parts (including bottle filler):
o A clean towel, dampened by warm water with or without a small amount of mild hand dishwashing detergent.
• Condenser: If dust builds up on the condenser, it can negatively impact the water cooler performance. Clean the
condenser using a shop vacuum or an air blower gun. Take care not to damage the fins during the cleaning process.
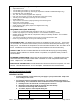
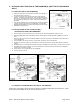
G.2. Y-STRAINER CLEANOUT (MODELS WITHOUT A FILTER)
1. Remove the (4) screws holding the skirt to the bottom of the frame. Then remove the
skirt by sliding the skirt away from the cooler.
a. NOTE: For dual units, the y-strainer is in the right-side unit.
2. Turn the supply valve to the off position.
3. Remove the cap from the strainer using two adjustable or open-ended wrenches.
a. NOTE: Some water will likely drip out of the y-strainer as you open it.
4. Clean the strainer screen using clean water.
5. Re-assemble the cap to the strainer.
6. Turn the supply valve to the on position and check for leaks.
7. Taking care not to scratch the black plastic parts behind the bowl, reinstall the skirt.
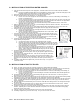
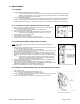
G.3. FILTER REPLACEMENT (MODELS WITH A FILTER)
Caution: Take care not to damage the circuit board located near the filter head during the
following steps.
1. Remove the (4) screws holding the skirt to the bottom of the frame. Then remove the skirt
by sliding the skirt away from the cooler.
a. NOTE: For dual units, the filter is in the right-side unit.
2. Place a towel or bucket below the cooler to collect the small amount of water that may drip
from the filter head or filter during the next steps.
3. Optional: Turn the water supply valve to the off position, and bleed pressure from the unit
by operating the bottle filler or bubbler. This will improve the ease of replacing the filter.
4. Remove the old filter by turning about ¼ turn clockwise (as viewed from above) and pulling
down.
a. NOTE: There is no need to shut off the supply valve, as the filter head has a
built-in valve. If you are planning to leave the unit without a filter cartridge for a
protracted period of time, shut off the supply valve.
5. Install the new filter by pushing up and turning counterclockwise (as viewed from above).
Note the label orientation in Figure 5.
6. Taking care not to scratch the black plastic parts behind the bowl, reinstall the skirt.
7. Using a cup to block the water flow, bleed air out of the bubbler(s) and bottle filler nozzle (if
applicable) by activating the water flow until the air is purged out.
8. Run one of the bubblers for 10 minutes to properly flush the filter.
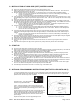
G.4. FUSE REPLACEMENT (MODELS WITH FILTER AND/OR BOTTLE FILLER)
1. Turn off power to unit
2. Remove the (4) screws holding the lower bowl support cover.
a. NOTE: For dual units, the fuse is in the right-side unit.
3. Remove blown fuse and replace with a 5mm x 20mm, 10A, Fast Blow, 250VAC rated fuse.
a. NOTE: Haws PN: 0210000754
4. Replace lower bowl support cover with (4) screws and turn on power to the unit.
Figure 7: Strainer cleanout
Figure 8: Filter Replacement
Figure 9: Fuse Replacement view
from underside of bowl