OWNER OPERATORS MANUAL 6" and 8" Chipper Models 74824 8" 24 HP Chipper with Hydraulic Feed 72620 6" 20 HP Chipper with Hydraulic Feed 71620 6" 20 HP Chipper Crary Company A Division of TerraMarc Industries 237 12th St. NW P.O. Box 849 West Fargo, ND 58078-0849 (701)282-5520 FAX: (701)282-9522 www.bearcatproducts.com www.terramarc.com Manual P/N 13987-00 Rev.
Before you Begin DEAR BEAR CAT CUSTOMER, Thank you for purchasing a Crary Bear Cat product. The Bear Cat line is designed, tested, and manufactured to give years of dependable performance. To keep your machine operating at peak efficiency, it is necessary to adjust it correctly and make regular inspections. The following pages will assist you in the operation and maintenance of your machine. Please read and understand this manual before operating.
Limited Warranty Crary Bear Cat chippers are warranted for 1 year from date of sale for consumers , commercial, or rental operations. Within the above stated period, Crary Co. will replace any part(s) found to be defective in material and/or workmanship, after the receipt of the part in our plant. Labor costs to replace these defective parts will be paid at a Crary established labor rate and time allowed (flat rate) for repair.
CONTENTS SAFETY .......................................................................................................................................................................... 1 1.1 THE SAFETY ALERT SYMBOL ................................................................................................................................ 1 1.2 BEFORE OPERATING ..............................................................................................................................................
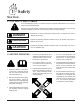
1 Safety Section 1.1 THE SAFETY ALERT SYMBOL This is the safety alert symbol. It is used in this Owner / Operators Manual and on your machine to alert you to potential hazards. Whenever you see this symbol, read and obey the safety message that follows it. Failure to obey the safety message could result in personal injury, death or property damage. DANGER Indicates an imminently hazardous situation that, if not avoided, will result in death or serious injury.
Safety 1.3 BEFORE OPERATING 10. Wear safety glasses at all times while operating this machine. 11. Use only in daylight or good artificial light. 12. Never use without proper guards in place. 13. Avoid wearing loose fitting clothing. Never operate this machine wearing clothing with drawstrings that could wrap around or get caught in the machine. 14. Check that all screws, nuts, bolts, and other fasteners are properly se- cured before starting the machine.
Safety 1.5 MAINTENANCE AND STORAGE SAFETY NOTE If equipped, see engine owners manual or contact the engine manufacturer for engine safety instructions and decals. 1.6 TOWING SAFETY 1. Rotate the discharge tube to face the opposite direction of the towing vehicle before towing. This prevents the discharge tube from projecting over the trailer wheels and striking foreign objects. 2. Connect hitch safety chains. Tighten and secure trailer hitch bolts.
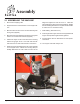
2 Assembly Section 2.1 ASSEMBLING THE MACHINE 1. Remove from shipping crate. flange and tighten the bolts to secure it. Install the second half of the clamp to the tube and flange. Rotate the tube 360 degrees and lock it in place with the handle to make sure it is mounted correctly. 2. Support the frame on wood blocks or other support device. 3. Mount the two tires and rims to the axle assembly with the lug nuts (supplied). 4.
Assembly 2.2 INSTALLING THE BATTERY 1. The machine may or may not have been shipped with a battery depending on your area. If you did not receive a battery with your machine, you will need to purchase one. 2. Use a battery that meets or exceeds the following specifications: Battery, Category, Lawn and Garden BCI Group Size U1 200-250 CCA 7-3/4 X 5-3/16 X 7-5/16 Suggested Source: Exide Cutting Edge, Type GT-H 3. If you received a battery with your machine, proceed to the next step.
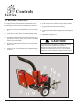
3 Controls Section 3.1 MACHINE CONTROLS For engine controls and maintenance please refer to the Honda engine owners manual included with the machine. 1. Engine Fuel Tank: Use unleaded fueldo not mix with oil. 2. Trailer Hitch: Always use 2 inch ball and safety chains. 3. Jack Stand: Always have in UP position and clear from ground when moving. When is use, place in DOWN position on a level surface. 4. Engine Drive Belts and Shield: Never remove shields when in use. 5.
4 Operation Section 4.1 STARTING THE MACHINE CAUTION Move machine to a clear, level area outdoors before starting. Do not operate machine on a paved, concrete, or gravel surface. Do not operate in the vicinity of bystanders. Make sure cutting chamber is empty before starting. CAUTION Obtain and wear safety glasses at all times when operating the machine. Do not wear loose fitting clothing. The operator should always wear heavy boots, gloves, pants, and shirt.
Operation 4.2 STOPPING THE ENGINE CAUTION Obtain and wear safety glasses at all times when operating the machine. Avoid wearing loose fitting clothing. Always wear heavy boots, gloves, pants, and shirt. Use common sense and practice safety to protect yourself from branches, sharp objects, and other harmful objects. 3. Refer to Honda owners manual for stopping procedures. 4. Allow machine to come to a complete stop.
Operation 4.5 HYDRAULIC FEED OPERATION MODELS 72620 & 74824 1. Start the chipper engine. Bring the chipper up to operating speed. See "Operation" section for starting, operation, and stopping instructions. 2. Engage the hydraulic feed by moving the control arm as shown below. The feed rate increases as the arm is moved. 3. If the chipper jams, reverse the feed by moving the control arm in the reverse direction. Remove the branch and rotate it before reinserting it into the chute again.
5 Service & Maintenance Section 5.1 SHARPENING CHIPPER BLADES When the Chipper Blades dull, chipping becomes difficult. It is recommended that the chipper blades are sharpened every 5-15 hours of chipper operation. The Chipper Blades are two edged. When the first edge dulls, flip the blade to use the sharp second edge. After both edges are dull, sharpen the chipper blades.
Service and Maintenance 5.3 SETTING CLEARANCE CHIPPER BLADE The four edged chipping blades should clear the chipping anvil located directly under the chipper chute by 1/16 inch to 1/8 inch. The chipping anvil is adjustable and reversible. 1. Lift rotor access cover and expose rotor (See Fig. #7). Loosen the three 1/2 inch bolts that hold the chipper anvil to the frame. 2. Measure the amount of clearance between chipping blade and chipping anvil from inside of housing. 3.
Service and Maintenance 5.4 REPLACING DRIVE BELTS 1. Remove large belt guard (three 5/16" bolts). 2. Loosen bolts on hydraulic pump and remove belt, if equipped. 3. Lift belt idler pulley off drive belt and remove drive belt from pulleys. 4. Install new belt on pulleys and lower belt idler. Check alignment of pulleys and adjust if needed. 5. Adjust the eyebolt that anchors the idler spring to adjust belt tension.
Service and Maintenance 5.6 REPAIRING OR REPLACING ROTOR BEARINGS 1. Remove the two 3/8 inch retaining bolts holding access cover to main frame assembly. Tilt access cover over to allow rotor access. 2. Remove large belt guard (three 5/16 inch bolts). 3. Lift belt idler pulley off drive belt and remove belt from pulleys. Using the push bolts from the bushing, remove the bushing and pulley from the rotor shaft. WARNING The rotor assembly has a lock mechanism.
Service and Maintenance 5.10 HYDRAULIC FLUID (MODELS 72620 & 74824) Handle pressurized hydraulic fluid carefully. Escaping pressurized hydraulic fluid can have sufficient force to penetrate your skin causing serious injury. This fluid may also be hot enough to burn. Serious infection or reactions can develop if proper medical treatment is not administered immediately. Premium hydraulic fluids containing high quality rust, oxidation, and foam inhibitors are required.
Service and Maintenance 5.13 HYDRAULIC FEED MAINTENANCE (72620 & 74824) CAUTION Before servicing or repairing any of the hydrostatic feed components (pump, motor, and/or relief valve), contact your dealer or factory service department. Warranty on these items may be void without prior authorization. CAUTION Hydraulic systems contain fluid under high pressure. Never check for leaks with your hands. Relieve pressure before disconnecting any hydraulic lines.
6 Troubleshooting Section 6.
Troubleshooting 6.2 HYDROSTATIC PUMP TROUBLESHOOTING MODELS 72620 & 74824 Symptom Will not attain normal feed rate Probable Cause Suggested Remedy Engine not operating at correct speed. Repair engine governor Control linkage damaged or binding. Repair control linkage. Bypass valve stuck partially Repair bypass valve. Remove open. (Problem in one direction foreign material from valve. only.
7 Specifications Section 7.1 SPECIFICATIONS Specifications Overall size (LxWxH) Max. Chipper Capacity Chipper Blade Qty. Rotor Speed Rotor Size Rotor Weight Rotor Shaft Diameter Discharge Size Drive Type Belt Size Model 71620 Model 72620 Model 72824 76x80x90" 93x80x90" 93x80x90" 6" 6" 8" 4 4 4 Reversible Reversible Reversible Tool Steel Tool Steel Tool Steel 1500 RPM 1500 RPM 1500 RPM 30" Dia. X 30" Dia.x 30" Dia. X 1.25" 1.25" 1.25" 275 lbs. 275 lbs. 275 lbs. 1.75 1.75 1.
Specifications 7.2 BOLT TORQUE CHECKING BOLT TORQUE: The tables shown below give correct torque values for various bolts and capscrews. Tighten all bolts to the torques specified in chart unless otherwise noted. Replace hardware with the same strength bolt. SAE - 2 SAE - 5 SAE - 8 A ENGLISH Bolt Diameter 1/4 5/16 3/8 7/16 1/2 9/16 5/8 3/4 7/8 1 1-1/8 1-1/4 TORQUE Bolt Torque* SAE 2 7.5 15 27 44 67 95 135 240 240 360 510 725 5.5 11 20 32 50 70 100 175 175 270 375 530 SAE 5 9.
Crary Company A Division of TerraMarc Industries 237 12th St. NW P.O. Box 849 West Fargo, ND 58078-0849 (701)282-5520 FAX: (701)282-9522 www.bearcatproducts.com Manufactured in the United States of America by Crary Company www.terramarc.
Gardening Supply Patio Barbecues Outdoor Barbecues Landmann Barbecues Gas Barbecues UK Charcoal Barbecues Brush Cutters Gas Barbecues Brushcutters Cheap Gas Barbecues Blower Vacs Masonry Barbecues Chain Saws Chainsaws Cultivators Cylinder Lawn Mowers Echo Chainsaws Echo Strimmers Electric Chainsaws Fertiliser Spreaders Garden Blowers Garden Rollers Lawn Rollers Garden Shredders Garden Tractors Garden Vacuums Hayter Lawn Mowers Hedge Cutters Hover Mowers Husqvarna chainsaws Kawasaki