
- TerraMarc Chipper Owner & Operators Manual
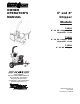


Page 56" & 8" Bear Cat Chipper Operators Manual
Assembly
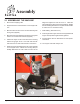
2.2 INSTALLING THE BATTERY
1. The machine may or may not have been shipped with a
battery depending on your area. If you did not receive a
battery with your machine, you will need to purchase
one.
2. Use a battery that meets or exceeds the following speci-
fications:
Battery, Category, Lawn and Garden
BCI Group Size U1
200-250 CCA
7-3/4 X 5-3/16 X 7-5/16
Suggested Source: Exide Cutting Edge, Type GT-H
3. If you received a battery with your machine, proceed to
the next step.
4. Remove or destroy any sealing device which may have
been used to close or restrict the vent openings.
º 5. Remove battery vent caps and fill cells until baffle
plate is covered with 1.25 of electrolyte at 80° F. Bat-
tery and electrolyte must be at a temperature above
60° F, but should not exceed 100° F.
6. After filling, battery should be charged to the specifica-
tions below and put into service immediately.
Temperature over 60° F
3 amperes for 4 Hours.
Temperature under 60° F
3 amperes for 6 Hours.
7. Place charged battery in battery box on chipper shred-
der.
8. Remove key from engine ignition.
9. Install the positive (+) battery cable to the positive (+)
battery terminal using a 5/16 X 1 hex head bolt and 5/
16 nylock nut. An insulating boot is loosely installed
on this cable. Slide the insulating boot over the termi-
nal, making sure that the terminal is completely cov-
ered.
10. Install the negative (-) cable on the negative (-) battery
terminal using a 5/16 X 1 hex head bolt and 5/16 nylock
nut. There is no insulating boot for this terminal.
11. Secure battery box cover.
IMPORTANT
DO NOT ATTEMPT TO START THE ENGINE AT THIS
TIME. Wait until you have read the complete starting
instructions in the Operation Section of this Manual.
WARNING
To avoid sparks and a possible explosion or fire due
to a short circuit:
1. Do not touch the positive (+) battery terminal and
any surrounding metal with tools, jewelry or other
metal objects.
2. When installing battery cables, connect positive
(+) cable first and negative (-) cable last.
NOTE
The battery that was shipped with the machine was
shipped dry. The battery will need to be serviced
before installation.