
Instructions / Assembly


USE ONLY HAYWARD GENUINE REPLACEMENT PARTS 11
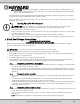
7.4. Seal Installation
8. Clean and lightly lubricate the motor shaft and seal recess in the seal plate (item #13) with a dilute solution of
non-granulated liquid-type soap. Gently wipe the polished surface of the ceramic seal with a clean, soft, cotton
cloth. Lubricate the rubber cup on the ceramic seat and press it firmly and evenly into the recess of the seal
plate (item #13) with the polished side of the ceramic facing out.
9. Assemble the motor to the seal plate (item #13) with the four (4) 3/8” bolts (item #14). Torque bolts to 100 in-lbs.
10. Gently wipe the black, polished surface of the spring seal assembly with a clean, soft, cotton cloth.
11. Press the spring seal assembly (item #12) onto the motor shaft – black polished surface facing toward the
polished surface of the ceramic seat. See Fig 7.4.1
MECHANICAL SEAL
CERAMIC SEAT
POSITION RUBBER
SURFACE DOWN
POSITION POLISHED
CERAMIC SURFACE UP
Fig 7.3.1
Fig 7.4.1