
User's Manual


Operating Instructions
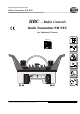
Radio Transmitter PM NTU
Page 8 / 16 BE-PM_NTU-US-L.DOC [ Word 97 ] FL
HBC-radiomatic, Inc. , Cincinnati , Ohio 45242 , USA
2000-08-16 Information and specifications subject to change without notice.
Radio Control System
3 Operating Instructions
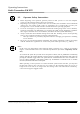
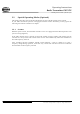
1. Before commissioning the transmitter or initial operation, insert a fully charged FuB 10 AA
battery into battery compartment (pos. À) on the back of the transmitter (inscription must be
visible). The battery supplies the necessary working voltage (6 V DC).
2. Turn STOP switch (pos. Á) to the right to unlock.
3. Switch ON transmitter and crane or machine with "ON/OFF" toggle switch (pos. Â).
The green LED (pos. Ã) begins to flash, i.e. the transmitter is operable.
Important information :
After switching ON the transmitter and before operating the crane or machine you must always :
– trigger the acoustic signal by pressing the "Horn" pushbutton (pos. Å). This warns all
colleagues that the crane or machine is about to move;
– test the operativeness of the STOP switch.
After switching ON the transmitter the
instrument indicates a successful radio link
to the receiver when the red LED
"RF/H.F./AF/RF" darkens and the green
LED "Si 1" lights up (confer control light
panel on receiver). The radio telecontrol
system is ready for use. The operator can
now issue control commands using the
transmitter control elements.
Whenever the battery is nearly empty, the
red LED (pos. Ä) lights up or an acoustic
signal sounds. Replace the drained battery
with a fully charged battery immediately
and insert into the battery charger for
recharging (confer chapter "Battery and
Battery Charger" for further details).
Note :
The transmitter will automatically switch
OFF within a few minutes if the operator
fails to replace the drained battery.
Should the operator – intentionally or unintentionally – switch off the transmitter with the STOP
switch, proceed as follows to re-start the transmitter :
1. Switch transmitter OFF with the "ON / OFF" toggle switch (pos. Â).
2. Turn STOP switch (pos. Á) to the right to unlock;
3. Switch transmitter ON again with the "ON / OFF" toggle switch.
Note :
Always use the "ON / OFF" switch to switch the transmitter ON or OFF. Do not use the STOP
switch !
File: PM-NTU-Inbetriebnahme [ CorelDRW 8.0 ] 11.08.2000 FL
rpm
rpm
I0
File: PM-NTU-Rueckseite.CDR [ CorelDRW 8.0 ] 23.06.2000 FL
HBC-electronic
Funktechnik GmbH
Tel.: +49(0)7951/393-0
Made in Germany
Prod.Code: SNTU 1.0
Transmitter Ser.No.: 735-
IP55 / Nema 4 U: 6V DC
Frequency Band (MHz): 902 918
W5 : FB1
FCC-ID: NO9 SNTU04
Batt.
–
Micron: 2977102872
Eco: 2977102873
Spec.: 2977102874
Orbit: 29771021314
SNTU: 29771021290
CAN
Micron: NO9M30004
Eco: NO9E10004
Spec.: NO9S10004
Orbit: NO9O10004
Patrol: NO9P10004
SNTU: NO9SNTU04
PMNTU: N09PMNTU4
USA
– 6V + + 6V –
Ni-Cd Cd
Å
Á
Â
ÄÃ
À