HCO Outdoor Products Infrared Digital Scouting Camera SG550 User’s Manual www.HCOoutdoors.com Thank you for choosing HCO digital scouting cameras. To experience the best results of these cameras, please read this user’s manual carefully before you use the camera and keep it as a handy reference. Phone: 1-803-223-9710 Fax: 1-803-334-4505 Email: info@hcooutdoors.com Web: http://www.HCOoutdoors.com HCO 6050 Peachtree Pkwy Suite 240-353 Norcross, GA, 30092 U.S.A.
Content General Information ............................................................................................................... 1 1.1 Features..................................................................................................................... 1 1.2 Application ................................................................................................................ 1 1.3 Standard Components ...................................................................................
Important Tips • The working voltage of the camera is 6 V. You can either use 4 or 8 AA batteries, or use an external 6 V DC power supply (inside + and outside -) • Please load the batteries according to the indicated polarity on the cover of the battery cabinet • Please disable the write-protect on the card before inserting SD card • The camera has no internal memory for images or videos. Please insert a SD card before testing the camera. Otherwise, the camera will not save images and videos.
1-General Information HCO SG550/SG530 General Information 1.1 Features The ScoutGuard SG550/SG530 digital scouting cameras are automatic working surveillance devices. The cameras can be trigged by any movement of human (or animals) in a certain region of interest (ROI) monitored by a highly sensitive Passive Infra-Red (PIR) motion sensor,even in the total darkness thanks to the build-in infrared LED flash.
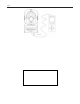
HCO 1-General Information Figure 1: Front view of the camera Figure 2: Buttons on the remote control and icons on the screen Page 2 SG550/SG530
HCO 1-General Information SG550/SG530 Figure 3: Connecting camera with remote control 1.4 Memory The camera uses a SD card to save images (in .jpg format) and videos (in .avi format). Before inserting the SD card into the card, please make sure that the write-protect on the card is disabled so that it is writable. The supported card capacity is between 8 MB and 2 GB. Some card may not be compatible with this camera. The camera doesn’t have an internal memory, so a SD card must be installed before use.
2-Quick Start HCO SG550/SG530 Quick Start If you are not familiar with the operation of this camera, the following instructions will help you get a quick overview. Before doing any operation, please make sure you have loaded batteries and plugged the SD card correctly. If the SD card is not inserted correctly or its write-protect is enabled, the device will give you a long beep and turn off automatically. 2.1 Loading Batteries The first thing to do is to load the batteries.
2-Quick Start HCO SG550/SG530 cover 4. Close the battery cover and lock it. The battery cover is designed to prevent wrong polarity installation of the batteries The following batteries can be used: • High-density alkaline batteries • Rechargeable alkaline batteries with 1.5 V output • Rechargeable Ni-MH batteries with 1.2 V output • AA sized Li-ion batteries with 1.5 V output 2.
2-Quick Start HCO SG550/SG530 2.5 Entering Live Mode After turning on the camera (Power switch at the ON position) while the remote control is not connected, the camera will enter the Live mode. The indicator LED (red) will blink for about 10 s. This period is for you to make the camera ready for the working condition: close the bottom cover and lock it, mount the camera on a tree and walk away.
2-Quick Start HCO SG550/SG530 2.8 Reviewing Picture or Video There are two ways to review captured picture or video: • TV monitor (or a SD-card viewer with a TV-in jack) Connect the camera to a TV monitor with the supplied cable. Then enter the TEST mode. The last picture will be shown on the TV monitor after pressing the OK key. Press the UP key to the previous picture and the DOWN key to the next one. The index of the picture and the total number are shown on the monitor.
3-Advanced Setting HCO SG550/SG530 Advanced Settings After you are familiar with the basic operations of the camera, you are now ready for advanced operations. The advanced operations in this section are very similar to the basic operations, only the options and parameters of the camera are explained in more details. 3.1 Parameter Settings In order to change the parameter settings, you must enter into the TEST mode at first. Setting a parameter can be done by pressing the MENU key in the TEST mode.
3-Advanced Setting HCO (b) SG550/SG530 (2) (c) (3) Figure 5: Setting Camera Mode 3.1.2 Formatting SD Card The system will delete all files stored in the SD card after formatting. You should make sure that you have made a backup of important data. 1 In MENU, press the UP or DOWN key until the system enters into the format menu, as shown in Fig. 6(a) and 6(1). 2 Press the OK key. The system will ask you to confirm, as shown in Fig. 6(b) and 6(2).
3-Advanced Setting HCO (d) SG550/SG530 (4) Figure 6: Formatting SD card 3.1.3 Image Resolution This parameter has two optional values: 5 mega pixels (5M Pixel or 5MP) and 3 mega pixels (3M Pixel or 3MP). The default value is 3 mega pixels. 1 2 3 In MENU, Press the UP or DOWN key until the parameter “Image Size” appears, as shown in Fig. 7(a) and 7(1). Press the RIGHT key, the value of the parameter will be changed between “5M Pixel” and “3M Pixel”, as shown in Fig. 7(b) and 7(2).
3-Advanced Setting HCO 2 3 SG550/SG530 Press the RIGHT key, the value of this parameter will be changed between “640x480” and “320x240”, as shown in Fig. 8(b) and 8(2). Press the OK key to save or press the MENU key to cancel and exit. After pressing the OK key, the selected value will no longer be highlighted, as shown in Fig. 8(c) and 8(3). (a) (1) (b) (2) (c) (3) Figure 8: Setting video size 3.1.
3-Advanced Setting HCO 8 9 10 11 12 13 SG550/SG530 and 9(7). Press the UP or DOWN key to the desired hour, as shown in Fig. 9(h) and 9(8). Press the RIGHT key to set the minute. The minute will be highlighted, as shown in Fig. 9(i) and 9(9). Press the UP or DOWN key to the desired minute, as shown in Fig. 9(j) and 9(10). Press the RIGHT key to set the second. The second will be highlighted, as shown in Fig. 9(k) and 9(11). Press the UP or DOWN key to the desired second, as shown in Fig. 9(l) and 9(12).
3-Advanced Setting HCO SG550/SG530 (g) (7) (h) (8) (i) (9) (j) (10) (k) (11) (l) (12) Figure 9: Setting date and time 3.1.6 Shooting Mode (1, 2, 3 Photos) You can let the camera take 1, 2 or 3 Photos after each trigger by setting the shooting mode. This setting is effective only in the “camera” mode (refer to 3.1.1) when the camera is in the LIVE mode. The default value is 1 Photo after each trigger. 1 2 In MENU, press the UP or DOWN key until “Capture Number” appears, as shown in Fig.
3-Advanced Setting HCO 3 SG550/SG530 Press the OK key to save or press the MENU key to cancel and exit. After pressing the OK key, the selected value will no longer be highlighted, as shown in Fig. 10(c) and 10(3). (a) (1) (b) (2) (c) (3) Figure 10: Setting shooting numbers 3.1.7 Video Length This parameter sets the video length that the camera will take after each trigger. This setting is only effective in the “video” mode when camera is in the LIVE mode.
3-Advanced Setting HCO (b) SG550/SG530 (2) (c) (3) Figure 11: Setting video length 3.1.8 Trigger Interval Time Between Two Triggering The trigger interval time means how long the PIR will be disabled after each trigger. When a trigger occurred, the triggering object, e.g., an animal might stay or move within the scope for a long time. This might lead to the next trigger within a short time again. The interval time is set to prevent this. This parameter is only valid for the LIVE mode.
3-Advanced Setting HCO (c) SG550/SG530 (3) Figure 12: Setting trigger interval time 3.1.9 PIR Sensitivity The PIR sensitivity has three degrees: High, Normal and Low. The default value is Normal. High means that the camera is easily to be triggered by motion, taking more pictures or recording more videos. It is recommended to use high sensitivity degree in room or environment with less interference.
3-Advanced Setting HCO SG550/SG530 parameter only two values: On and Off. The default value is On. 1 2 3 Press the UP or DOWN key until “Time Stamp” appears, as shown in Fig. 14(a) and 14(1). Press the RIGHT key to change the value to the desired value, as shown in Fig. 14(b) and 14(2). Press the OK key to save or MENU key to cancel and exit. After pressing the OK key, the selected value will no longer be highlighted, as shown in Fig. 14(c) and 14(3).
3-Advanced Setting HCO SG550/SG530 15(6). 7 Press the RIGHT key to set the hour of the Stop time. The hour of the Stop time will be highlighted, as shown in Fig. 15(g) and 15(7). 8 Press the UP or DOWN key until the desired hour of the Stop time appears, as shown in Fig. 15(h) and 15(8). 9 Press the RIGHT key to set the minute of the Stop time. The minute of the Stop time will be highlighted, as shown in Fig. 15(i) and 15(9).
3-Advanced Setting HCO SG550/SG530 (f) (6) (g) (7) (h) (8) (i) (9) (j) (10) (k) (11) Figure 15: Setting timer 3.1.12 Restoring Default Settings The camera can be restored to factory default setting by the following steps: 1 2 In MENU, press the UP or DOWN key until Default Set appears, as shown in Fig. 16(a) and 16(1). Press the OK key to restore default settings or press the MENU key to cancel and exit.
3-Advanced Setting HCO SG550/SG530 (b) Figure 16: Reset to the default settings 3.2 Playback and Editing There are two ways to playback or edit picture or video: • Computer You can take the SD card out of the camera and use a card reader to view or edit the picture and video. Or, you can connect the camera directly to your computer in which case the camera works as a card reader.
3-Advanced Setting HCO SG550/SG530 be highlighted. 4. Press the OK key to delete or press the MENU key to cancel and exit. 3.3 Live Monitor In the TEST mode, you can do all the settings, such as camera mode and trigger interval time. After you switch to the Live mode, the camera starts monitor automatically. After the camera enters into the Live mode, the motion indicator LED (red) on the front of the camera will blink for about 10s.
3-Advanced Setting HCO SG550/SG530 3.7 Installing Driver for the SD Card If your computer can not recognize the USB port of the camera (e.g. your system is Windows 98), please visit our website at www.huntingcamonline.com to download appropriate driver or ask the driver disc from your local distributor or service provider. 3.8 Firmware Upgrade This camera can be upgraded when improved firmware is available. To upgrade: 1. Make sure that the camera works properly, e.g.
4-Mounting Camera HCO SG550/SG530 Mounting Camera There are various ways to mount the camera. The camera is equipped with strap holes for strap mounting and cable slot for steel cable lock. To get the optimal picture quality, the camera should be mounted 16 Ft - 20 Ft away and 5 Ft - 6-1/2 Ft high from the desired monitor area. Using the strap You can use the strap to fix the camera to a tree as shown in Fig. 17.
HCO 5-Technical Specifications Technical Specifications Image Sensor Maximum Resolution Lens IR-Flash Remote Control Display Internal Memory External Memory Picture Resolution Video Resolution PIR Lens PIR sensitivity IR Bulbs Operation Trigger Time Delay Capture Mode Video Length Power Supply Stand-by Current Power Consumption Low Battery Alert User Interface Ports & Jacks Mounting Dimensions Weight Operation Temperature Storage Temperature Operation Humidity Security authentication 5MP(SG550) Color
HCO Infrared Digital Hunting Camera Limited Warranty The Camera purchased from our authorized dealer is warranted to be free from defects in material and workmanship for 1 year of the original purchase under normal use.