Photomatix Pro Version 5.0 User Manual HDR soft © 2013 HDRsoft. All rights reserved.
TOC link Table of Contents 1 2 3 4 5 Introduction �����������������������������������������������������������������������������������������������������������������������������������������������������������1 Taking Photos for HDR ������������������������������������������������������������������������������������������������������2 1.1 Setting up the Camera ��������������������������������������������������������������������������������������������������������������������������3 1.
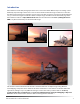
Introduction Cove Point Lighthouse photo © Ferrell McCollough Photomatix Pro works with photographs of the same scene taken under different exposure settings. These differently exposed images of the same scene are often called “bracketed” images in reference to the autobracketing exposure functions available on many camera models.
1 Taking Photos for HDR The shooting phase is essential for getting good results with Photomatix. To photograph a high contrast scene, you need to take several exposures in order to capture information in both the highlights and the shadows of the scene. The exposures taken must properly cover the dynamic range of the scene, especially the shadows. The number of photos you need depends on the scene. It also depends on the Exposure Value (EV) spacing separating the photos.
1.1 Setting up the Camera • Set your camera to Aperture priority (the "A" setting) so that only shutter speed will vary between the exposures. • Set a low ISO such as ISO 100, or lower if available. • Turn off the flash. The flash may try to balance the exposure of all the images, when the goal instead is a range of exposures. • Use a tripod whenever possible. Even though Photomatix Pro offers automatic alignment of hand-held photos, using a tripod is almost always better.
1.3 Using Film-Based Cameras • Follow the camera setup listed at the top of Section 1.1 and the tips on selecting exposures in Section 1.2. Keep in mind that you will not have the option of previewing the live histogram to determine your exposure range. • Scan film or slides, not prints. Photo labs attempt to make the best print from each of your source images, and you will not achieve good results scanning these for HDR generation. • Turn off your scanner’s auto-exposure options.
2 Loading and Pre-Processing Images This section describes how to load and merge bracketed image files of a scene taken under different exposure settings as well as how to load single images into Photomatix Pro. 2.1 Merging Bracketed Images Photomatix Pro merges bracketed images that are in 8 bit or 16 bits/channel mode, as well as Camera RAW files. Supported file types include JPEG, TIFF, PSD, DNG, and RAW files from many camera models.
Using the Workflow Area or the File Menu To load images using the Workflow Shortcuts panel or the File menu: 1. Click Load Bracketed Photos in the Workflow Shortcuts panel OR Select Load Bracketed Photos from the File menu. The Loading bracketed photos dialog displays. Note If you check the Show 32-bit unprocessed image box, you will be able to save the unprocessed merged imagein an HDR image file format such as Radiance or OpenEXR.
2.1.2 General Merge to HDR Options After the bracketed images are selected, you can customize the steps performed before merging the images, such as aligning the images or removing 'ghosts'. Refer to the following list for a description of the options when merging bracketed images: Alignment Options The Align source images option is checked by default. It corrects misalignment problems when the camera moves slightly between the bracketed frames.
Deghosting Options Deghosting addresses the problem of artifacts that appear when combining the bracketed images of a dynamic scene. For example, if the moving subjects are people walking, the people will appear multiple times in the combined image, once for each frame, faded and in a different position as if they were “ghosts”. This is why artifacts that arise from movement in a scene are commonly referred to as “ghosting” and the techniques to eliminate them are referred to as “deghosting”.
2.1.3 The Deghosting Options Window Select Show options to remove ghosts in the Preprocessing Options window, to subsequently access the Deghosting Options window. The Deghosting Options window The Deghosting Options window provides two deghosting methods: • A Selective Deghosting Tool • An adjustable Automatic Deghosting algorithm.
2.1.4 Using the Selective Deghosting Tool To use the Selective Deghosting tool, click and drag the mouse to draw a lasso around a region that requires deghosting. Ensure that the dashed line forms a fully closed loop. Right-click (Windows) or control-click (Mac) inside the selected region and select Mark selection as ghosted area from the pop-up menu. The line around the selected area changes from dashed to solid, to indicate that the area is now selected for deghosting.
result. To view a preview of the deghosted image, click Preview deghosting. To make more selections or modify existing regions selected for deghosting, click Return to selection mode. You may continue selecting regions of the image and previewing the results until you are satisfied with the results. In Quick Selection Mode, every completed selection lasso will automatically be converted into a deghosting selection, without the need to individually "Mark selection as ghosted area". 2.1.
2.1.6 Options for RAW Files Photomatix Pro offers additional options for RAW files. These options are automatically available when RAW files are loaded. The White Balance options let you change the white balance, if desired, and preview the effect of changing it. The default value is "As Shot", which reads the white balance setting from the EXIF metadata. To adjust the white balance, select a pre-defined value from the White Balance drop-down list or type a color temperature in Kelvin in the text box.
2.2 Working with Single Image Files Photomatix Pro supports Tone Mapping of single image files. To load a single image file: 1. Drag the image file to the Photomatix Pro application (Windows) or icon on your Dock (Mac). OR Select Open from the File menu. A file browser window displays. Navigate to the file and open it. OR Click Load Single Photo in the Workflow Shortcuts window. 2. To process the image using Tone Mapping, click Tone Mapping from the Workflow Shortcuts panel.
3 Adjusting Images Using Tone Mapping or Exposure Fusion Photomatix Pro provides access to HDR Tone Mapping and Exposure Fusion methods in one interface, with three main sections: Adjustments panel, Preview and thumbnail Presets. This section describes the workflow for adjusting, previewing and processing images, and describes each Tone Mapping and Exposure Fusion setting. 3.1 Note Exposure Fusion is normally only available when bracketed photos are loaded.
3.1.1 Undoing Adjustments and Reprocessing an Image After processing an image, you can return to Tone Mapping or Exposure Fusion to continue working with the same image set. There are two different ways to do this, both accessed from the Workflow Shortcuts panel; Redo With Other Settings or Double Tone Map. • Redo With Other Settings allows you to start fresh with the current image set, to apply entirely new presets and settings.
3.2 Image Adjustment Interface 3.2.1 Image Adjustment Interface Overview The image adjustment interface consists of three main sections; setting Adjustments, image Preview and Preset thumbnails. The features of these three main interface sections are described in detail below. Image adjustment Preview panel controls 3.2.2 Preview The image Preview displays the result of your current settings, for whichever Tone Mapping of Fusion method you are working in.
3.2.3 Preset Thumbnails Panel The Presets panel lists the available presets, showing a thumbnail preview of the effect of the preset on your image. When you click on a preset thumbnail, the Preview image is refreshed to show the result of applying the settings of the selected preset. By default, the panel displays one column of small thumbnails. Click on the “plus” icon on the top of the panel to display the thumbnails at a larger size.
Custom Presets Custom presets are presets that you saved while adjusting your images, or presets created by other Photomatix users that you have imported. To access custom presets, click on the My Presets tab located at bottom of the Preset Thumbnails panel. To create your own custom presets, refer to the Saving Custom Presets paragraph below. You can also import custom presets created by other Photomatix users that you downloaded to your computer as XMP files.
3.3 Tone Mapping Details Enhancer Settings General Settings • Strength: Affects the amount of enhancement given to contrast and detail in the image. A value of 100 gives the greatest enhancement. Moving the slider to the left gives a more natural effect. The default value is 70. • Saturation: Adjusts the color saturation of the image. The greater the saturation, the more intense the color. Setting the slider to its lowest value (0) produces a grayscale image. The default value is 46.
• Gamma: Adjusts the brightness of the midtones, which also has an impact on the overall contrast. Moving the slider to the right brightens the midtones and decreases the contrast. Moving to the left darkens the midtones and increases the contrast. The default value is 1.0. • Temperature: Adjusts the color temperature of the tone mapped image relative to the temperature of the HDR source image. Moving the slider to the right gives a 'warmer', more yellow-orange colored look.
3.4 Tone Mapping Contrast Optimizer Settings • Strength: Affects the amount of enhancement given to contrast and detail in the image. A value of 100 gives the greatest enhancement. Moving the slider to the left gives a more natural effect. The default value is 50. • Tone Compression: Alters the dynamic range of the tone mapped image. Moving the slider to the right decreases the dynamic range, brightening the shadows and darkening the highlights.
3.5 Tone Mapping Tone Compressor Settings • Brightness: Adjusts the overall brightness of the image. • Tonal Range Compression: Controls the compression of the tonal range. Moving the slider to the right has the effect of shifting both shadows and highlights toward the midtones. • Contrast Adaptation: Adjusts the contrast in relation to the average brightness. Moving the slider to the right tends to decrease contrast and give more 'pronounced' colors.
3.6 Fusion Settings 3.6.1 Fusion/Natural Settings • Strength: Sets by how much local contrast is accentuated. Moving the slider to the right tends to brighten the shadows and to show more details in the highlights. Moving to the left produces a more 'natural' effect. • Brightness: Controls the brightness of the fused image by adjusting the influence each of the input photos has on the final result.
3.6.2 Fusion/Real-Estate Settings • Highlights: Adjusts bright areas in the image. Moving the slider to the right brightens the highlights. Moving to the left darkens highlights and recovers more highlight details. • Shadows: Adjusts dark areas in the image. Moving the slider to the right brightens shadows and recovers more shadows details. Moving to the left darkens shadows. • Local Contrast: Increases the contrast and sharpness of details in the image.
3.6.3 Fusion/Intensive Settings Strength: Adjusts the strength of local contrast enhancements. • Color Saturation: Adjusts the color saturation of the image. The greater the saturation, the more intense the color. Setting the slider to its lowest value (-10) produces a grayscale image. • Radius: Controls the area used to calculate the weighting of the source images. A higher radius reduces halos, but increases processing times significantly. The default value is 70. 3.6.
3.7 Replace Selection with Source An HDR-processed image might look exactly the way you want, except for one area. For example, the sky might have more contrast or be darker than desired. The “Replace selection with source” feature lets you replace that area with the same area from any one of the source images, to bring the tonemapped or fused image closer to what you want. 3.7.1 Selecting the Area to be Replaced To enable this feature, click the Selection Mode checkbox.
3.7.2 Fitting the Selection to the Area’s Edges The area to be replaced usually has at least one irregular border (such as the mountains in this sample photograph). It’s difficult to draw irregular borders exactly, and you don’t have to. You can draw approximate borders, and Photomatix will fit them for you by "finding the edges". Finding the edges The borders of the area you want to replace are almost always at edges — large changes in brightness between adjacent pixels.
3.7.3 Replacing the Selected Area Right-click (Windows) or control-click (Macintosh) anywhere within the selection. A contextual menu appears. – If you loaded bracketed photos, the menu identifies them by their exposure difference, relative to the “normal” exposure. Click the photo at the EV you want. – If you loaded a single image, click "Replace with source". Replacing the selected area If you prefer not to see the lines marking your selection, uncheck the Selection Mode checkbox.
4 Automating with Batch Processing Use batch processing to automatically process image files. The batch processing tool saves time processing many images. Photomatix Pro offers two different batch modes: • Batch Bracketed Photos: Processes bracketed sets using HDR Tone Mapping and/or Exposure Fusion all in one step, which can save you a lot of time when you have many bracketed sets to process. • Batch Single Photos: Processes multiple single image files using Tone Mapping. 4.
3. Configure basic preprocessing options, to specify alignment, ghost removal, noise reduction, and whether to create and save an unprocessed 32-bit merged file. 4. Select the number of exposures to combine using the pulldown menu below the checkboxes. For example, select “3” if your bracketed sets consist of three exposures each. Note The More Preprocessing Options... button provides access to deeper preprocessing settings. 5.
For example, 30 Presets applied to 30 bracketed sets will output 900 processed images. Plan ahead for the processing time and the disk space required when combining large preset batches with large image set batches. To set up a batch of existing presets, follow these steps: 1. Select a Built-in preset, or one of your own saved presets, from the Preset menu and then click Add. This preset will appear in the list frame. 2. Repeat step 1 as many times as you like, to add additional presets to the list. 3.
4.1.5 Batch Processing Subfolders When your bracketed series are located in multiple folders, they Note can all be processed in one run, provided they are in subfolders of the same parent folder. To batch process multiple subfolders, All of the subfolders must be contained in the main parent folder for this option to work check the Process subfolders option at bottom of the Source properly. frame on the Batch Processing dialog and select sequentially.
• • Specify the total number of frames in each set using the drop-down list. Select the specific frames to process from the list. Select more than one file by holding down the Control key (Windows) or Command key (Mac) and clicking on the desired frames. 4.2 Batch Processing Single Images To process a batch of single image files: 1.
5 Tips and Techniques This section provides tips for working with images in Photomatix Pro. More tips and techniques, and regularly updated information, can be found on the Photomatix Pro FAQ on the HDRsoft website at http://www.hdrsoft.com/support/faq_photomatix.html. 5.1 Integrating Lightroom and Photomatix Pro You can export photos for processing in Photomatix Pro directly from Lightroom and reimport them back into the Lightroom library.
Dealing with Noise When you process your photos using Exposure Fusion, the fused image will tend to show less noise than the source images. This is because Exposure Fusion works by directly combining your bracketed photos, thus averaging out noise. However, when you create a 32-bit HDR image, your bracketed photos are assembled in linear space into an image that spans the full range of luminance values captured by the camera.
Glossary AEB Mode (Automatic Exposure Bracketing). DSLR cameras and some compact digital cameras offer this feature. It enables you to automatically take three or more exposures in a row: one at the proper exposure, one or more underexposed, and one or more overexposed. Aperture Priority In Aperture Priority mode, you select the aperture and the camera determines the correct shutter speed for the available light. The shutter speed also depends on ISO sensitivity.
HDR Image Strictly speaking, an HDR image is an intermediary image with 32 bits per color channel (96 bits per pixel). An HDR image is the result of merging photos of the same scene taken under different exposure settings and stored in special HDR image format. The 32-bit intermediary HDR image must be processed with tone mapping for proper display on standard monitors and prints. It has become very common to define "HDR image" as the result of processing the 32-bit HDR image with tone mapping, i.e.
Resources FAQ You can find more tips, techniques, and regularly updated information in the Photomatix FAQ on the HDRsoft website at http://www.hdrsoft.com/support/faq_photomatix.html. Learn More Additionally, the resources page at http://www.hdrsoft.com/resources/ lists Internet tutorials, books and DVDs on the subject of HDR photography that, along with your own experience, will help deepen your understanding of it. Photomatix Pro 5.
www.hdrsoft.com Photomatix Pro 5.