INSTRUCTIONS FOR USE Manufacturer: Headsafe MFG PTY LTD Suite 204, 61 Marlborough Street Surry Hills, NSW 2010 Australia
This page is intentionally blank. Instructions for Use QSL01-001-rev8.
Table of Contents Chapter 1: Introduction and Product Safety Information ...................................................................................... 5 About Nurochek ............................................................................................................................... 5 Intended Use.................................................................................................................................... 5 1.2.1 Environment for Use ...............................
Charging .................................................................................................................................. 31 3.12.1 Attaching Charger Blades................................................................................................... 31 3.12.2 Charging Process............................................................................................................... 31 3.12.3 Removing Charger Blades..............................................................
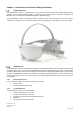
Chapter 1: Introduction and Product Safety Information About Nurochek The NUROCHEK-I System is a medical device that evokes and records steady-state visual-evoked potentials (SSVEP) via electroencephalography (EEG). It wirelessly communicates with an associated smartphone via Bluetooth and is controlled via a dedicated smartphone application (App). The NUROCHEK-I System records EEGs through 3 channels of the 10-20 system (O1, O2 and Oz).
Symbol Glossary Warnings or cautions. These indicate warnings that must be observed for safe operation of the device and/or system. Consult the instructions for use. Refer to the instructions for use for more information. Refer to instruction manual/instructions for use. Refer to the instructions for use for more information. Type BF applied part. This is a conductive part which contacts the body. Power switch. Manufacturer lot number. Manufacturer product code. Date of manufacture. Manufacturer details.
Safety This device should only be used by trained operators familiar with the device, its intended use and any additional instrumentation. Prior to use, read these instructions for use (IFU). Warning This device is to be used under direct medical supervision or by a medical professional. Wear medical examination gloves when cleaning, fitting and manipulating the Headset. Please read the contraindications (section 1.2.2, page 5) before use. Charging Use only the supplied charger to charge the Headset.
Potential Adverse Events Discomfort from prolonged use of the Headset. Discontinue use on subject and seek medical advice. Eyestrain from prolonged exposure to visual stimulus. Discontinue use on subject and seek medical advice. Seizures in subjects with photosensitive epilepsy. Discontinue use on subject and then perform first aid. Contact an ambulance. Flicker vertigo from prolonged exposure to visual stimulus. Discontinue use on subject and seek medical advice.
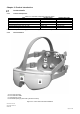
Chapter 2: Product Introduction Product Details 2.1.1 Product Components Table 2-1: Nurochek components and part names. Part Product Code Old Product Code Nurochek Headset HS01-001 CRY09-01 Nurochek Foam Cylinders (100-pack) HS01-092 CRY09-213 Nurochek Strap HS01-059 CRY09-161 Charger HS01-014 CRY09-46 Charger Blades (USA, AU, EU, UK) HS01-093 CRY09-214 Nurochek iOS Application HS01-053 CRY09-154 Disclaimer: Old product code apply to NUROCHEK-I system manufactured prior to 19-Oct-2020. 2.1.
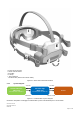
I E H G 7 J J F E: Rear sensor housing F: Rear indicator LEDs G: Buckles H: Straps I: Visual stimulus J: Power button (below rear indicator LEDs) Figure 2-2: Rear view of Nurochek Headset 2.1.
Packaging Part Table 2-2: Packaging Contents Product Code Old Product Code QTY Nurochek Headset Nurochek Foam Cylinders (100-pack) Nurochek Strap Charger Charger Blades Kit (includes USA, AU, EU, UK blades) HS01-001 HS01-092 HS01-059 HS01-014 HS01-093 CRY09-01 CRY09-213 CRY09-161 CRY09-46 CRY09-214 1 1 1 1 1 Instructions for Use Nurochek EVA pouch HS01-019 HS01-228 CRY09-71 CRY09-383 1 1 Disclaimer: Old product code apply to NUROCHEK-I system manufactured prior to 19-Oct-2020.
Chapter 3: Headset and Application Use Minimum System Requirements To operate the Nurochek App, the smartphone must meet the following requirements: • • • Model: iPhone 6s iOS version: iOS 13.6.0 and subsequent. The latest iOS version must be installed Do not install the Nurochek App on a “jailbroken” smartphone (i.e. factory restrictions on the device have been removed) Cybersecurity Internet connectivity (Wi-Fi and/or cellular data) is required to use this App.
e) Open the App and create a new account by selecting the ‘Sign Up’ link on the bottom right. This will redirect to the Nurochek online server to register a new account. Input your licensed healthcare professional information required on the ‘Registration’ screen.
The tabs allow navigation within the App. Select the respective icon to switch to the tab. The current tab is highlighted in black; all other tabs are in white. Device Association Prior to use, the Headset must be associated with your account. Headset: Turn on Headset by holding the power button (see Figure 2-2 J, page 10) for at least 2 seconds. The Headset lights will flash when powered on. If you cannot turn on the Headset, please charge the Headset for at least 1 hour (see Section 3.12, page 31).
a) Select the ‘Subjects’ tab on the bottom green bar. The ‘All Subjects’ list is displayed. (For new users, this list will be blank.) To add a new subject select the ‘ADD SUBJECT’ button below the search bar. Consult the subject to answer the screening questions. If the subject answers ‘Yes’ to any question, the subject is ineligible for testing. b) Once all questions have been answered, select ‘CONTINUE’ at the bottom of the screen. If a subect is ineligible, a pop-up message will be displayed.
d) If the subject is between 14 and 18 years old, consent forms are emailed to the holder of parental responsibility (HPR) to give consent for the minor to use Nurochek. The minor is also required to give assent. This process is managed through the Nurochek online server. After screening and age collection, enter the subject details. The minimum details required are: e) • Email address • First name • Last name • DOB (this auto-populates) Subject gender, contact and photograph are optional.
If the subject is over 18, the Nurochek Consent statements will be available for the subject to read and to give consent by ticking the two boxes as shown. The text size of the Consent statements can be altered by selecting either ‘A’ to enlarge, or ‘a’ to minimize, in the top right-hand corner of the screen. g) Hand the phone to the Subject to read, understand and agree to the Consent statements. Once the Subject has consented to all Consent statements, the ‘PENDING’ icon will change to ‘CONSENT’.
a) Select the ‘Subjects’ tab on the bottom green bar and then select the subject to edit from the ‘All Subjects’ list. b) Select ‘Edit’ near the top right. c) The ‘Edit Subject’ screen will appear. Edit the desired details. When all details are updated, select ‘UPDATE’. Cleaning The Headset must be cleaned according the following instructions before every use. The cleaning method is comprised of 4 main steps: Instructions for Use QSL01-001-rev8.
1. 2. 3. 4. 3.7.1 DISINFECT DRY RINSE & WIPE DRY Disinfect a) Ensure gloves are worn. b) Remove used foam cylinders from the Headset. c) Ensure charging port cover is closed (see Figure 2-1 C, page 9). With a disinfectant wipe (for example, Caviwipes), wipe all surfaces of the Headset to remove visible soil for a minimum of 1 minute.
e) 3.7.2 f) 3.7.3 g) Using additional disinfectant wipes as needed, ensure the Headset remains visibly wet for an additional 2 minutes after initial wiping. If needed, use additional cotton swabs wrapped in disinfectant wipes to ensure the seams, crevices, gaps and CRITICAL AREAS remain visibly wet for 2 minutes. Dry Dry the Headset with a clean lint-free cloth. To dry seams, crevices, gaps and critical areas, wrap a clean lint-free cloth around a cotton swab and use the techniques shown in step d).
Select the ‘Tests’ tab on the bottom green bar. The ‘Subjects to Test’ list will be displayed. a) Select the subject from the list on the ‘Subjects to Test’ screen by scrolling down the list to their name or by using the ‘Search’ function at the top of the list. Select the subject desired subject and the ‘Confirm Identity’ screen will be displayed. Note: subjects must be added prior to the test. To add a new subject, see ‘New Subject’ steps (Section 3.6.1, page 14).
Switching Headsets To connect to a different Headset, select ‘SWITCH’. A list of Headsets you have previously used will be displayed. To connect to a previously paired Headset, select the desired Headset by selecting the Headset’s serial number. To connect to a new Headset, select ‘Search for ANY headset’. When the desired Headset is connected, select ‘HEADSET READY’ to continue. Test Preparation Seat the subject in a quiet environment.
• • • will then sit flush above your finger. The power button should also be directly above your finger. The visor is over the subject’s eyes, with the nasion (top of nasal bridge, in-between the eyes) completely covered. The straps are secured above the subject’s ears, with the bottom strap being roughly parallel to the ground when the subject is seated upright. The Headset is symmetrical.
Correctly Fitted Headset Instructions for Use QSL01-001-rev8.
Impedance Test Headset: Good skin contact is indicated by green circles. Poor skin contact is indicated by amber squares. Adjust Headset by gently shifting the rear portion of the Headset until any amber squares are replaced by green circles. If any of the indicators remain amber squares, remove Headset from subject, re-dampen foam cylinders and re-fit the Headset on subject’s head as per Step f).
If the test is successful, a dialog box will appear notifying the user the test is complete. To continue to the ‘Second Test’ select ‘Continue’. To cancel the second test, select ‘CANCEL’ and no results will be recorded. j) On commencement of the second test, the progress bars will reset to 0% and progress as before. App: When both bars reach 100%, testing is complete.
The Test Results screen will appear when test is complete. The results will be automatically uploaded to the secure database. The results screen is scrollable and contains several features: • • • l) • • • • Results can be viewed and overlaid with baseline results via the ‘Baseline is ON/OFF’ toggle The current reading can be set as the subject’s baseline by selecting ‘SET AS BASELINE’. The circle below the graph (highlighted by the red circle on the right) corresponds to the stimulus frequency.
a) b) To access help screen for the displayed screen, select the ‘help’ icon in the top right-hand corner. The help screen for the corresponding function is displayed. To go back, select on ‘X’ at top right of the open help screen. Headset Management Headset details and pairing information can be accessed through the App. Headset management and details can be accessed under the ‘Headsets’ tab on the green bottom bar. This tab can be used to connect to the Headset. Instructions for Use QSL01-001-rev8.
Firmware Upgrade When a firmware upgrade is available, a notification will be displayed prompting an upgrade to occur. Prior to a firmware upgrade, the Headset should be fully charged. a) To begin the upgrade process, select ‘Upgrade Now’. b) To continue with the upgrade, select ‘upgrade now’. c) The Headset will then be disconnected from the smartphone. To reconnect the Headset and continue the upgrade process, select ‘Find Headset’. Instructions for Use QSL01-001-rev8.
d) To start the upgrade, select ‘start upgrade now’. e) When firmware upgrade is complete, reconnection to the Headset is required. Select ‘Find Headset’ to continue. f) Select ‘Dismiss’, then power the smartphone off, then back on again. After powering back on, launch the Nurochek App. Instructions for Use QSL01-001-rev8.
Charging The charger included in the packaging is the only charger approved for use with the Headset. See Section 5.2, page 37, for charger specifications. 3.12.1 Attaching Charger Blades WARNING: Do not place blades into mains electrical socket before it is attached to charger a) b) Select the appropriate region-specific blade. See Figure 3-1, page 31, for the correct blade to use for the regions: Australia, US, EU and UK.
d) Open charging port cover located on the rear of the Headset (see Figure 2-1 C, page 9). e) Carefully insert the charger into Headset charging port. f) When charging, the rear LED is orange. When the Headset is fully charged, a green LED will appear. See section 3.13.1, page 32, for more information. 3.12.3 Removing Charger Blades WARNING: Remove charger from mains before removing blades To remove the blade, press down on the slider below the charger port (highlighted in Figure 3-3, page 32).
Headset on, pairing mode. Headset low battery, pairing mode. Charge the Headset as soon as possible. Headset on, paired to phone. Headset low battery, paired to phone. Charge the Headset as soon as possible. 3.13.2 Front LEDs – feedback on the test progress LED Status Headset Status Standby (not in test) (intermittent flashing) Current test progress: 0-24% Current test progress: 25-49% Current test progress: 50-74% Current test progress: 75-99% Current test progress: 100%.
3.14.1 Logout To logout, select ‘Logout’ under ‘My Account’. To access your records, you will need to login again. Other Settings To view ‘Other settings’ select the ‘Other’ tab. Select ‘Help’, ‘Privacy Notice’, ‘About’, ‘Settings’, or ‘Terms’ to access the respective page. Selecting ‘Lock Session’ will take you back to the login screen where your password will need to be re-entered to gain access the App. 3.15.1 Help Additional help pages can be accessed through the App.
3.15.2 Privacy Notice The privacy notice can be accessed through the App. Select ‘Privacy Notice’ in ‘Other Settings’ to access the Privacy Notice. 3.15.3 About Information about Nurochek can be accessed through the App. Select ‘About’ in ‘Other Settings’ to view regulatory information about Nurochek. 3.15.4 Settings Additional settings can be changed to alter App behaviour. Select ‘Settings’ in ‘Other Settings’ to change additional App settings.
3.15.5 Terms The terms can be accessed through the App. Select ‘Terms’ in ‘Other Settings’ to access the terms. Chapter 4: Troubleshooting Cannot Turn On Headset If your Headset cannot be turned on after holding the power button, attempt the following steps in order: • • Disconnect charger from Headset. Attempt to charge Headset, and verify that an amber LED is displayed on the back of the Headset. o If not, return unit to manufacturer.
Headset Suddenly Off The Headset is designed to turn off after 5 minutes if no test has been performed. Please power on the device to continue use. Flashing Amber LEDs Upon Powering the Headset If the Headset flashes amber while it is turned on, this means the battery is insufficient for a test. Please power off the device and charge it with the provided charger for at least 30 minutes.
• 385 MHz 27 V/m Proximity Fields from RF equipment 62000-4-3 Consult the manufacturer for help. Portable and mobile RF communications equipment should be used no closer to any part of the device, including cables, than the recommended separation distance calculated from the equation applicable to the frequency of the transmitter.
—Connect the equipment into an outlet on a circuit different from that to which the receiver is connected. —Consult the dealer or an experienced radio/TV technician for help. Technical Specifications 5.3.
Supported OS Devices supported 5.3.5 Requirements Apple iOS 13.6.0 and above iPhone 6s Charger Specifications Table 5-5: Charger specifications Identification Product code HS01-014 OEM GlobTec, Inc OEM model no GTM96180-1507-2.0 Input Input voltage 100-240V AC Input frequency 50-60Hz Input connector Adjustable Output Output voltage 5V Output current Up to 3A Output connector USB type-C, 1.2m cable Safety Class II Insulation Double insulated Instructions for Use QSL01-001-rev8.
This page is intentionally blank. Instructions for Use QSL01-001-rev8.
This page is intentionally blank. Instructions for Use QSL01-001-rev8.