
Use Instructions
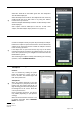

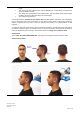


Table Of Contents
- Chapter 1: Introduction and Product Safety Information
- Chapter 2: Product Introduction
- Chapter 3: Headset and Application Use
- 3.1 Minimum System Requirements
- 3.2 Cybersecurity
- 3.3 First Time Setup
- 3.4 App Navigation
- 3.5 Device Association
- 3.6 Subject Information Management
- 3.7 Cleaning
- 3.8 Test
- 3.9 Help Screens
- 3.10 Headset Management
- 3.11 Firmware Upgrade
- 3.12 Charging
- 3.13 LED Indicators
- 3.14 Account Settings and Logout
- 3.15 Other Settings
- Chapter 4: Troubleshooting
- Chapter 1: NOTE: The Headset when powered off enters a sleep mode, in which the device will draw less power but still drain the battery overtime if not placed on charge. It is recommended that if the device is to be used within 2 weeks of powering off...
- Chapter 5: Legal

Instructions for Use
QSL01-001-rev8.0-A
HS01-019
Page 23 of 42
will then sit flush above your finger. The power button should also be directly above your
finger.
• The visor is over the subject’s eyes, with the nasion (top of nasal bridge, in-between the
eyes) completely covered.
• The straps are secured above the subject’s ears, with the bottom strap being roughly
parallel to the ground when the subject is seated upright.
• The Headset is symmetrical.
It is recommended to position the rear portion first, and then pull the visor down over the subject’s
eyes or ask them to fit the visor themselves (as they would a diving mask or ski goggles). While the
subject is adjusting the front visor, ensure you hold the rear portion in its correct position to limit
migration.
To adjust the tightness of the Headset, open the buckles and pull the strap through the buckle towards
the sensor housing to tighten or towards the visor to loosen. Ensure the straps remain symmetrical.
Close the buckles when the fit is right. The Headset should sit snugly on the subject’s head.
Smartphone:
Select ‘YES, ALL PRE-CONDITIONS MET’ after Step e) is completed and the headset is fitted.
Anatomical Locations
Headset Fitting