
User's Manual


Pg. 8 V12092021
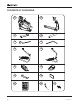
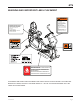
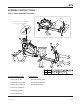
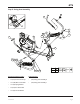
Installing Stabilizers (See Step 1 Figure)
A.) Carefully unpack contents of box.
B.) Do not throw away the large styrofoam support blocks from the packaging of the frame.
You will use these blocks for support later.
NOTE: Tip the unit over onto its side on the foam blocks, as shown in Step 1 Figure.
C.) In order to attach the Rear (87) and Front (85) sections of the ST3, you will need to slide the front
section onto the rear section of frame, and slide the two frame pieces together.
D.) At this point, be sure to Connect Cables (31) and (32) (shown in Step 1 Figure)
CAUTION: Make sure not to pinch the cables (31 and 32) when sliding the frame pieces together.
E.) Attach both sections of the frame as shown in Step 1 Figure with:
• 8x (34) M8x 20 Hex Bolt
• 8x (29) Spring Washer
• 8x (17) Flat Washer
F.) Attach the Front Stabilizer (5) to the frame as shown in Step 1 Figure with:
• 2x (26) Square Head Bolt
• 2x (23) Curved Washer
• 1x (21) Acorn Nut
• 1x (41) Child Safety Lock – ( LEFT )
G.) Attach the Rear Stabilizer (4) to the frame as shown in Step 1 Figure with:
• 2x (26) Square Head Bolt
• 2x (23) Curved Washer
• 2x (21) Acorn Nut