PRO PLUS® STRETCHER SCALE MODEL 2000KL OPERATION MANUAL AA0339-0
PRO PLUS® STRETCHER SCALE MODEL 2000KL Thank you for your purchase of this product. Please read this manual carefully and keep it handy for ready reference. TABLE OF CONTENTS CAUTION AND WARNING.................................................................................................... 2 SPECIFICATIONS.................................................................................................................3 ASSEMBLY INSTRUCTION................................................................
CAUTION AND WARNING To prevent injury and damage to your scale, please follow these instructions very carefully. • To ensure proper operation of the ProPlus® Stretcher Scale, this operation manual should be reviewed carefully before operation. Keep this manual available for future reference, and also for use in the orientation of new personnel. • If the scale becomes damaged, it should not be operated until properly serviced.
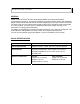
SPECIFICATIONS GENERAL Health o meter’s ProPlus® Stretcher Scale Model 2000KL uses highly sophisticated microprocessor technology. This scale is designed to provide accurate, reliable and repeatable weight measurements and features that make the weighing process simple, fast and convenient. The scale is set up to use motion-sensing weighing technology, to determine the actual weight of a moving patient.
ASSEMBLY INSTRUCTIONS Before Assembly The Model 2000KL ProPlus® Stretcher Scale is shipped disassembled in two (2) separate cartons. Carefully inspect all cartons for shipping damage before unpacking. If damage is found, contact your shipper or Healthometer Professional immediately. Claims must be filed with the shipper as soon as possible after receipt of the damaged package. Remove each assembly from the carton and unwrap packing material carefully to prevent scratching the unit’s parts.
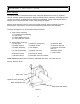
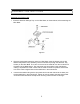
ASSEMBLY INSTRUCTIONS Assembling the Patient Lifter 1. Place the Stretcher Storage Tray on the Lifter Base, as shown below, before attaching the Lifter Mast. KNOB Figure 2 2. Remove black plastic protective caps from Lifter Mast. Insert the bottom of the Lifter Mast and Hydraulic Pump assembly into the mast sleeve (through the Stretcher Tray Holder) on the Lifter Base. The notch on the end of the mast fits over the round tube at the bottom of the Mast Sleeve.
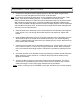
ASSEMBLY INSTRUCTIONS Attaching the Display and Scale to the Patient Lifter PHILLIPS PAN HEAD SCREW NC8-32x5/16 Figure 2 Figure 3 6
ASSEMBLY INSTRUCTIONS 4. Connect the Lifter Boom and the Display Support to the Lifter Mast using the NC⅜20x2½” hex screw and tighten the self lock nut on its other side. Note: This screw is the axis of the Lifter Boom, so it is imperative that the three parts – Lifter Boom, Lifter Mast and Display Support – be assembled in the proper order. Place the Plastic Washers on either side of the Lifter Boom screw hole to prevent friction.
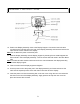
ASSEMBLY INSTRUCTIONS Figure 4 10. Position the Display Assembly close to the Display Support. Connect the load cell cable connector to the load cell port on the rear of the Display Assembly and insert and secure the cable into the center channel in the display. Note: Do not attach the power cord at this point. 11. Slide the display assembly onto the display support by inserting the two metal supports into the two slots in the rear display assembly. Tuck the excess load cell cable in the Lifter Boom tube.
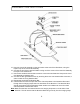
ASSEMBLY INSTRUCTIONS Figure 5 15. Hang the Load Cell Assembly on the two hooks at the end of the Lifter Boom, using the loops on top of the Load Cell Assembly. 16. Connect the end of the Load Cell Cable coming out of the center of the Load Cell Assembly to its port in the Lifter Boom. 17 Use the two washers and shoulder screws to connect the two Stretcher Hoops to the Load Cell Assembly and tighten well. 18.
SET UP Preparing the Scale for Use 1. 2. 3. 4. 5. 6. 7. 8. 9. 10. Remove protective plastic film from keypad and display. Place batteries in the battery holder (see “Replacing Batteries”). Plug the scale’s AC adapter into the power source. Press the ON/OFF button to turn the scale on. The display will show “Health o Meter Pro-Plus” and then ”000Lb00oz”.(a) If the Stretcher weight has previously been tared out, the display will show a negative weight equivalent to the weight of the Stretcher.
OPERATION INSTRUCTIONS Preweighing the Stretcher 1. Make sure the scale is free of load (nothing is hanging from it), including the stretcher. 2. Press the ON/OFF button to turn the scale on. 3. Wait until ”000Lb00oz” and “ZERO” on the left side of the display will appear. The scale will remember the last amount that was tared, so if the weight of the stretcher had previously been tared, the scale will display a negative weight when it is turned on again.
OPERATION INSTRUCTIONS 4. Release the hanging loops from the lifter. Note: The scale is programmed to save the last setting chosen as well as the weight of the stretcher as tare weight. This enables weighing a number of patients without having to reset the scale. If a weight was added or reduced from the stretcher scale it is required to reset the tare weight. Note: To zero the scale by using the ZERO key, take the stretcher off the lifter before pressing ZERO key. Replace the stretcher after zeroing. 5.
OPERATION INSTRUCTIONS Figure 7. Keypad ITEM DESCRIPTION FUNCTION POWER Turns scale ON and OFF. ZERO Zeros the scale prior to weighing. HOLD/RELEASE REWEIGH KG/LB button Holds the value of the weighed object on the display until the button is pressed again to clear the value. Also used to scroll down in the menu. Allows repeated weighing of the patient without stepping off the scale. Toggles between kilograms or pounds. Also used to scroll up in the menu. MENU Enters the menu of the scale.
OPERATION INSTRUCTIONS MENU In the menu screen the user can set preferences and/or instruct the scale how to handle stored data. The menu can be navigated using the up and down keys (cd) or by entering the associated menu position number with the keypad. The menu has a “roll-over” way of working: when the user scrolls to the bottom of the menu and presses the down button, it will return to the top of the menu. Figure 8.
OPERATION INSTRUCTIONS 02 TARE WEIGHT NOTE: Due to the scale’s sensitivity, we recommend using the REWEIGH function prior to setting the TARE weight, in order to eliminate any operator interference with the item to be tared out. There are two ways to manually enter a tare weight (such as the weight of a stretcher , shoes, etc): press MENU (1) and select option 02-Tare Weight or press TARE (9).
OPERATION INSTRUCTIONS 3. The scale will prompt you to enter the patient’s height. Use the keypad to enter the height in 1/4" (1=1/4, 2=1/2, 3=3/4) or 1 cm increments (use inches for weight in lb, cm for kg). Press ENTER. 4. Display will read the patient’s BMI. The scale offers you two options to manage your information: to transfer/download the values or to store them. The first option automatically downloads (transfers) the value to your PC. The second option stores the value in memory.
OPERATION INSTRUCTIONS 04 Transfer now All the values stored in memory are transferred to the PC and the scale memory is cleared of all values. If the transfer was unsuccessful, the values are kept in memory until successfully transferred or cleared. 05 Clear memory All the values stored in memory will be cleared. 04 SCALE SETTINGS 01 Auto Hold Time The user can determine how long to display the weight reading once it is determined, regardless of whether the patient remains on the platform.
OPERATION INSTRUCTIONS 03 Auto Off Time The user can determine how long the scale will operate before turning off automatically due to inactivity. Default time is 10 minutes. If the value is set to zero, the auto off function is disabled. 04 Tone Volume There is an option to adjust the beeping tone of the scale. This tone should sound when the scale has determined the weight on the platform, when a key is pressed, after the scale is turned on, at the end of self-test, or in the case of fault or warning.
OPERATION INSTRUCTIONS 06 Display Backlight The user can set the brightness of the backlight. 07 Display Contrast The user can set the brightness of the LCD. 08 Live Weight By selecting “Yes” the user can set the Live Weight mode to deactivate the motion-sensing mode. In the Live Weight mode the weight displayed will fluctuate with the patient’s movement; the scale will not lock on quickly to the weight as is the case in the motion-sensing mode.
OPERATION INSTRUCTIONS Set the date using the up and down keys cd and enter the values on the keypad. 02 About This screen displays the software version of the scale. 06 SYSTEM TEST 01 Battery Test The scale will display the estimated amount of battery life remaining until the batteries will have to be replaced. NOTE: In order to complete the battery test, the scale must be powered by batteries only. Unplug the scale from AC power source prior to battery test.
OPERATION INSTRUCTIONS 03 UI Test The scale has a diagnostic routine where it tests the User Interface (UI) hardware functionality (LCD, keypad). In order to do this the user has to press all the keys according to the messages displayed on the screen. If the requested command was not received or wrong button was pressed, the following message will be displayed. If after 10 seconds the requested command was not received, the following message will be displayed.
OPERATION INSTRUCTIONS 02 Disp Height & ID When the user selects to display the height and ID of the user, it will be displayed at the bottom of the screen. We recommend the use of this function to ensure that the patient’s correct ID and height have been entered. 03 Prompt For Height When this option is activated, the user will be asked to enter the patient’s height after every weighing.
MAINTENANCE GENERAL This section provides instructions for maintenance, cleaning, troubleshooting and operator replaceable parts for the ProPlus® Stretcher Scale Model 2000KL. Maintenance operations other than those described in this section should be performed by qualified service personnel. MAINTENANCE Before first use and after periods of non-use, check the scale for proper operation and function. If the scale does not operate correctly, refer to qualified service personnel. 1. 2.
TROUBLESHOOTING Refer to the following instructions to check and correct any failure before contacting service personnel. SYMPTOM Scale does not turn on Questionable weight or the scale does not zero POSSIBLE CAUSE CORRECTIVE ACTION 1. Dead Battery 1. Replace batteries 2. Faulty electrical outlet 2. Use a different outlet 3. Bad power supply 3. Replace adapter 1. External object interfering with the scale 1. Remove interfering object from the scale 2.
CALIBRATION PATH The calibration is performed in Kg or Lb, according to the units of measure used upon entering into the calibration path. 1. 2. 3. 4. 5. Operator Action Press ON/OFF button and immediately press and hold HOLD/RELEASE button for 3-4 seconds Press ENTER 8. 9. Please remove weight from the stretcher 7. Calibration Process Enter load weight 400.
EXPLODED VIEW OF SCALE (continue) 26
PARTS LIST Key No. 1 2 3 4 5 6 7 8 9 10 11 12 13 14 15 16 17 18 19 20 21 22 23 24 25 26 27 28 29 30 31 32 33 34 35 36 37 38 39 40 41 42 43 44 45 46 47 48 49 50 51 52 --- Part No. 1109403-0 2268101-0 3848401-0 401369 2268001-0 2034701-0 3809801-0 2138903-0 401304 3808401-0 401338 3835701-0 3833801-0 3808501-0 3816901-0 3816801-0 3828301-0 1304202-0 401337 400579 400066 3822701-0 400412 3817001-0 420988 411220 3245801-0 3822801-0 400152 2033801-0 63855 Description DISPLAY ASSEMBLY TILT MECH.
WARRANTY LIMITED WARRANTY What does the Warranty Cover? Pelstar LLC scales are warranted from date of purchase against defects of materials or in workmanship for a period of three (3) years. If product fails to function properly, return the product, freight prepaid and properly packed to Pelstar. See “To Get Warranty Service” below for instructions. If manufacturer determines that a defect of material or in workmanship exists, customers' sole remedy will be repair or replacement of scale at no charge.