¨ Model No. HRTL08980 Serial No. Serial Number Decal QUESTIONS? As a manufacturer, we are committed to providing complete customer satisfaction. If you have questions, or if there are missing or damaged parts, we will guarantee complete satisfaction through direct assistance from our factory. TO AVOID UNNECESSARY DELAYS, PLEASE CALL DIRECT TO OUR TOLL-FREE CUSTOMER HOT LINE. The trained technicians on our customer hot line will provide immediate assistance, free of charge.
¨ TABLE OF CONTENTS IMPORTANT PRECAUTIONS . . . . . . . . . . . . . . . . . . . . . . . . . . . . . . . . . . . . . . . . . . . . . . . . . . . . . . . . . . . . . . . . .3 BEFORE YOU BEGIN . . . . . . . . . . . . . . . . . . . . . . . . . . . . . . . . . . . . . . . . . . . . . . . . . . . . . . . . . . . . . . . . . . . . . . .5 SETTING UP THE TREADMILL . . . . . . . . . . . . . . . . . . . . . . . . . . . . . . . . . . . . . . . . . . . . . . . . . . . . . . . . . . . . . . .6 GROUNDING INSTRUCTIONS . .
IMPORTANT PRECAUTIONS WARNING: To reduce the risk of burns, fire, electric shock, or injury to persons, read the following important precautions and information before operating the treadmill. 1. It is the responsibility of the owner to ensure that all users of this treadmill are adequately informed of all warnings and precautions. 11. Use only a UL-listed surge protector, rated at 15 amps, with a 14-gauge cord of five feet or less in length. Do not use an extension cord. 2.
24. Always unplug the power cord before performing the maintenance and adjustment procedures described in this manual. Never remove the belly pan unless instructed to do so by an authorized service representative. Servicing other than the procedures in this manual should be performed by an authorized service representative only. 25. The treadmill is intended for in-home use only. Do not use the treadmill in any commercial, rental, or institutional setting.
BEFORE YOU BEGIN Congratulations for purchasing the SOFTSTRIDER S200ª treadmill by HealthRider. The SOFTSTRIDER S200 offers an impressive array of features that will help you to achieve your fitness goals in the convenience of your home. From the advanced console to the ultra-soft walking belt, the SOFTSTRIDER S200 is designed to make each workout more effective and enjoyable. And when youÕre not exercising, the SOFTSTRIDER S200 can be folded away, taking less than half the space of conventional treadmills.
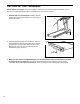
SETTING UP THE TREADMILL Set-up requires two people. Place the treadmill in a cleared area and remove all packing materials. Do not dispose of the packing materials until the treadmill is set up. No tools are required. 1. With the help of a second person, carefully raise the Uprights (82) until the Front Wheels (77) are resting on the floor as shown. 1 82 77 2. Remove the paper backing from the Wrench Clip (71). Press the Wrench Clip onto the Frame (92) in the indicated location.
GROUNDING INSTRUCTIONS THE PERFORMANT LUBETM WALKING BELT Your treadmill features a walking belt coated with PERFORMANT LUBETM, a high-performance lubricant. IMPORTANT: Never apply silicone spray or other substances to the walking belt or the walking platform. Such substances will deteriorate the walking belt and cause excessive wear. HOW TO PLUG IN THE POWER CORD DANGER: Improper connection of the equipment-grounding conductor can result in an increased risk of electric shock.
CONSOLE OPERATION I C K B L J M A D E F G N H O Note: If there is a thin sheet of clear plastic on the face of the console, remove it. FEATURES OF THE CONSOLE CAUTION: Before operating the console, read the following precautions. ¥ Do not stand on the walking belt when turning on the power or starting the walking belt. ¥ Always wear the clip (see H above) while operating the treadmill. If the key is pulled from the console, the walking belt will stop.
DIAGRAM OF THE CONSOLE Refer to the drawing at the top of page 8. A. Water Bottle HolderÑKeeps your water bottle handy during your workouts. M. Program ProfilesÑThese profiles show how the speed or incline of the treadmill will change during workout programs. During the Speed 1 program, for example, the speed will gradually increase during the first half of the program, and then gradually decrease during the last half. B. Accessory TrayÑHolds your personal items. N.
HOW TO USE THE MANUAL MODE 1 5 A moment after the button is pressed, the walking belt will begin to move at 1.0 mph. Hold the handrails and begin walking. As you exercise, change the speed of the walking belt as desired with the SPEED buttons. Each time a button is pressed, the speed will change by 0.1 mph. The speed range of the walking belt is 0.5 mph to 10.0 mph. Insert the key into the console. See HOW TO TURN ON THE POWER on page 9.
SPEED displayÑThis display shows the speed of the walking belt, in miles per hour or kilometers per hour. How to select miles per hour and kilometers per hour: Hold down the PAUSE/STOP button while inserting the key into the console. An ÒEÓ (for english miles) or an ÒMÓ (for metric kilometers) will appear in the SPEED display. Press the SPEED + button to change the unit of measurement. Remove and then reinsert the key.
4 SPEED buttons. To stop the program for a moment, press the PAUSE/STOP button. The displays will pause and the TIME display will begin to flash. To restart the program, press the START button or the SPEED + button. To end the program at any time, hold down the PAUSE/STOP button for two seconds. The console will then be in the same state as if the key had just been inserted. Enter your age if desired. See step 4 on page 10. 5 Adjust the maximum incline or speed setting.
THE INFORMATION MODE The console features an information mode that keeps track of the total time and distance accumulated on the treadmill. The information mode also allows you to switch the console from miles per hour to kilometers per hour. To select the information mode, hold down the PAUSE/STOP button while inserting the key into the console.
HOW TO FOLD AND MOVE THE TREADMILL HOW TO FOLD THE TREADMILL FOR STORAGE Before folding the treadmill, adjust the incline to the lowest position. If this is not done, the treadmill may be permanently damaged. Next, unplug the power cord. Caution: You must be able to safely lift 45 pounds (20 kg) in order to raise, lower, or move the treadmill. 1. Hold the treadmill in the locations shown at the right. To decrease the possibility of injury, bend your legs and keep your back straight.
HOW TO LOWER THE TREADMILL FOR USE 1. Hold the upper end of the treadmill with your right hand as shown. Using your left hand, push the storage latch to the left. Pivot the treadmill until the storage latch is past the catch. Storage Latch Catch 2. Hold the treadmill firmly with both hands, and lower the treadmill to the floor. To decrease the possibility of injury, bend your legs and keep your back straight.
TROUBLE-SHOOTING AND MAINTENANCE Most treadmill problems can be solved by following the instructions below. If further assistance is needed, please call our Customer Service Department toll-free at 1-800-999-3756, Monday through Friday, 6 a.m. until 6 p.m. Mountain Time (excluding holidays). PROBLEM SOLUTION 1. The power does not turn on a. Make sure that the power cord is plugged into a surge protector, and that the surge protector is plugged into a properly grounded outlet. (See page 7.
PROBLEM SOLUTION 4. The walking belt is off-center or slips when walked on a. If the walking belt has shifted to the a left, first remove the key and UNPLUG THE POWER CORD. Using the allen wrench, turn the left rear roller adjustment bolt clockwise, and the right bolt counterclockwise, 1/4 of a turn each. Be careful not to overtighten the walking belt. Plug in the power cord, insert the key and run the treadmill for a few minutes. Repeat until the walking belt is centered. b.
CONDITIONING GUIDELINES WARNING: Before beginning this or any exercise program, consult your physician. This is especially important for individuals over the age of 35 or individuals with pre-existing health problems. The following guidelines will help you to plan your exercise program. For more information about exercise, consult your physician or obtain a reputable book.
Cooling Down Exercise Frequency End each workout with five to ten minutes of stretching to cool down. This will develop muscle flexibility and will help to prevent post-exercise problems. To maintain or improve your condition, complete three workouts each week, with at least one day of rest between workouts. After a few months, you may complete up to five workouts each week if desired. The key to success is to make exercise a regular and enjoyable part of your everyday life.
PART LISTÑModel No. HRTL08980 Key No. Qty.
97 8 32 94 10 11 12 87 8 95 1 85 13 113 14 3 9 70 98 2 109 110 68 108 97 32 8 8 93 95 113 99 2 6 9 92 105 99 8 8 2 66 116 15 3 3 72 99 99 80 3 18 7 75 71 2 22 30 16 3 21 99 19 42 4 8 28 90 2 116 99 8 35 36 83 84 26 2 69 26 7 30 8 89 47 8 39 41 30 42 4 43 45 61 16 8 52 37 86 91 41 40 39 88 75 30 31 37 38 33 32 34 49* 51 50 44 4 8 23 30 30 24 29 107 25 27 96 8 EXPLODED DRAWINGÑModel No.
ORDERING REPLACEMENT PARTS To order replacement parts, call our Customer Service Department toll-free at 1-800-999-3756, Monday through Friday, 6 a.m. until 6 p.m. Mountain Time (excluding holidays). Before calling, please note the following information: ¥ The MODEL NUMBER of the product (HRTL08980). ¥ The NAME of the product (HealthRider¨ SOFTSTRIDER S200ª treadmill). ¥ The SERIAL NUMBER of the product (see the front cover of this manual).