
Installation Guide


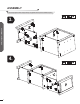


Table Of Contents

PREPARATION
IMPORTANT INFORMATION
1. Before you begin, locate the instructions and hardware. Be sure you have all of the parts and can identify
them.
2.
cardboard.
3. Assembly of this product may require more than one person.
WARNING
1. Do not let any sharp objects touch or rub the surface of the product.
2. When assembling, do not let children play around the working area.
3.
4. Do not tighten all bolts and screws completely until the entire unit has been assembled and set up.
5. DO NOT USE POWER TOOLS. Power tools can overtighten screws and strip therads.
Tools Required
Philips Screwdriver Hand Drill
Hex Key
5
ASSEMBLY INSTRUCTIONS
Number of spare hardware is indicated in ( ).
Use the Touch-up Pen to cover surface scratches.
WARNING: The included plastic wall anchors (OO) are intended for use with solid wall applications only (tile and
concrete). DO NOT USE WITH DRYWALL OR OTHER HOLLOW WALL APPLICATIONS.
GG x 1
KK x 2
BB x 40+(2)
OO x 2
CC x 26+(1) EE x 20
LL x 2 MM x 2 NN x 4
JJ x 3
II x 2
HH x 1
Touch-up Pen
RR x 2
AA x 8