
Installation Guide

HearthSense
15200549-06B
INSPECTING BURNERS
IMPORTANT: Owner's should check pilot ame pattern and burner ame pattern often.
Incorrect ame patterns indicate the need for cleaning.
WARNING: Only a qualied service person should service and
repair replace. This includes maintenance requiring replacement
or alteration of components.
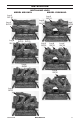
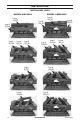
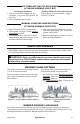
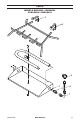
BURNER FLAME PATTERN
The burner ames should rise approximate-
ly 3" to 6" above the burner.
Figure 9 shows a correct burner ame pat-
tern. Figure 10 shows an incorrect burner
ame pattern
(actual logs will vary from those shown). If
burner ame pattern is incorrect then:
• turn replace o (see Gas Shut O Valve
Operation, page 13 or To Turn O Gas to
Appliance, page 15).
• see Troubleshooting pages 17 through 18
BURNER PRIMARY AIR HOLES
Air is drawn into the burner through the holes in the tting at the entrance to the burner.
These holes may become blocked with dust or lint. Periodically inspect these holes for any
blockage and clean as necessary. Blocked air holes will create soot.
Shutting O Appliance
1. Push in control knob slightly and turn
clockwise to the OFF position. Do
not force.
2. Close equipment shuto valve.
Shutting O Burner Only (pilot stays lit)
Push in and turn knob clockwise to
the PILOT position.
1. Open Fireplace Screen (If applicable).
2. Follow steps 1 through 7 under Lighting
Instructions, page 14.
3. With control knob in the PILOT position,
strike a match, and hold near pilot. Press
in control knob; pilot should light.
4. Keep control knob pressed in for 30 sec-
onds after lighting pilot. After 30 seconds,
release control knob.
5. Make sure the replace screen is in place
before operating replace.
TO TURN OFF GAS TO APPLIANCE
(
IF USING NVDWA2 PILOT KIT
)
MANUAL LIGHTING INSTRUCTIONS
(
IF USING NVDWA2 PILOT KIT
)
Figure 9 - Correct Burner Flame Pattern Figure 10 - Incorrect Burner Flame
Pattern