
Installation Guide


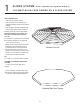


Door Spacer
DO NOT
REMOVE
Widest Bevel
on Ground
39-1/4"
Opening
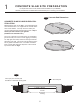
2
ASSEMBLING
WALL PANELS
❑ 7 pcs. Pre-assembled Wall Panels
❑ 1 pc. Pre-assembled Door Panels
2-A
Select desired Door location and position Wall
Panels on ground around foundation as shown
in Fig. 2-A.
If you are constructing the 12’ Gazebo, please
allow for two additional wall sections when lay-
ing out your walls.
NOTE: Wall Panels have beveled edges.
The widest bevel will face the ground and
is the outside of the Gazebo wall as shown
in Fig. 1.
2-A:
Flush at top
5-3" Screws
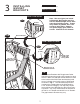
2-B
Fig.2
Stand up two adjoining Wall Panels and attach
them together using ve 3” screws as shown in il-
lustration 2-B. HINT: Start in middle and work
up and down. Make sure that the two Wall
Panels are ush at the top as shown in Fig. 2.
Connect all Wall Panels in this same manner,
making sure not to remove the Door spacer at
this time.
Note: Use wood glue (not included) between
Wall Panels for added strength and to meet
some local building codes.
2-B:
Fig.1
PARTS LIST 10’ GAZEBO
PARTS LIST 12’ GAZEBO
❑ 9 pcs. Pre-assembled Wall Panels
❑ 1 pc. Pre-assembled Door Panels
6