
User Guide


5
Assembly and Installation
To fully enjoy your new range, it is important that you read this booklet thoroughly.
shipping damage, inform your dealer immediately!
Caution when unpacking:
Lift the range by the bottom skirt, do not lift by nickel trim.
Unpacking:
Note: to avoid injury, please wear safety equipment, glasses and gloves, while you are unpacking your new range.
1) Unscrew the 20 screws that hold the crate onto the skid. There are 12 along the bottom and 8 along the top.
3) After the screws have been removed, carefully lift the crate over the stove and set it aside.
2) Next with a pair of snips cut the banding that holds the closet in place. Caution metal banding is under
tension!
4) Carefully lift the closet off the stove and set it aside.
5) You are now ready to remove the range from the skid.
For 30” units have one person at each end stand beside the skid and carefully lift the range by the bottom skirt, and a third
, bending your knees not your
back!
For 48” units have one person at each end and one person stand beside the skid and carefully lift the range by the bottom
, bending
your knees not your back!
6) Finish unpacking the range, removing packing tape around the doors and in the oven.
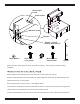
Both 30” and 48” Ranges consist of two main parts: The Range Body, and the Closet / Exhaust Hood
Tools required for assembly: Phillips/Robertson #2 Screwdriver & 5/16” ( 8 mm) wrench or crescent wrench
when range is equipped with a cord and plug.
Gliders:
Teflon Glider
1/8” - 1/4”
Figure 1
.