INSTALLATION MANUAL Packaged Terminal A/C & Heat Pumps Main Duct Kit: Part No. 7602-502 Duct Termination Kit: Part No. 7602-503 Duct Extension Kit: Part No. 7602-504 Heat Controller, Inc. • 1900 Wellworth Ave. • Jackson, MI 49203 • (517)787-2100 • www.heatcontroller.
NOTICE TO INSTALLER As an installation profeessional you are obligated to know the product better than the end‐user, includ ding but not limited to best insttallation practicees and all safety precautiions. Before insttalling the product, read and fu ully understand this Installation n Guide. Note an nd heed all safeety warnings. It is o safely and co orrectly install the t product wh hile being able to instruct the end‐user in itss safe use and maintenance ((if YOUR responsibility to applicaable).
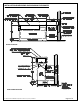
INSTALLATION DIMENSIONS AND MINIMUM CLEARANCES ALL MEASUREMENTS IN INCHES UNLESS OTHERWISE NOTED FRONT ELEVATION RIGHT HAND ELEVATION © 2002‐2011 M.S.CHOHAN. Duplication in whole or in part is prohibited.
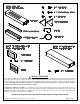
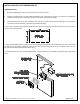
MAIN DUCT KIT K INSTALLATION GU UIDE WA ARNING | HIGH VO OLTAGE! | RISK OFF ELECTRIC SHOCK K! Disconnect ALL D A power be efore installlation or serrvice. Unit may m have mu ultiple powe er sources. Failure to o disconnectt all power can c cause prroperty dam mage, person nal injury or death PTA AC PREPAR RATION WA ALL SLEEVEE PREPARA ATION 1. EExamine PTA AC front cover. Cover mayy be secured by a s screw(s). If prresent, screw ws can be rem moved through the f front intake lo ouvers. 1.
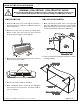
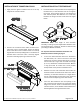
PRE‐ASSEMBLY OF MAIN DUCT INSTALLATION OF MAIN DUCT KIT 1. Determine if the duct is to be extended to the right of the unit or to the left. Install the end cap on the side opposing the extension. See figure below. If desired the end cap may be sealed with part of the foam tape provided with the kit. This is recommended to reduce possible leakage. 1. Place the Main Duct atop the Mounting Brackets as shown below (1). Install 4 No.8 screws to secure the duct to the Mounting Brackets (2).
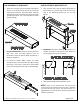
INSTALLATION OF TRANSITION COLLAR INSTALLATION OF DUCT EXTENSION KIT 1. Apply the foam gasket included in the kit to the top flange of the Transition Collar. 1. Install two No.8 screws provided into the top flange of the Main Duct, at the extension end. Do not tighten the screws. Leave enough space for one thickness of duct material (about the thickness of a credit card) between the flange and the screw head. See figure below. 2. Position the Transition Collar under the Main Duct.
INSTALLATION OF DUCT TERMINATION KIT IMPORTANT NOTES: • Any field supplied grille must have fixed louvers that cannot be closed. • Installer must determine if any field supplied hardware such as wall plugs or anchors are required to complete the installation based on wall construction. Survey the installation area before you begin.
02/2011 04/2009