
User Guide


©200
2
MA
PT
A
1.
E
s
f
2.
R
b
r
3.
D
c
4.
S
5.
A
r
l
2
‐2011M.S.CHO
H
INDUCT
K
A
CPREPA
R
E
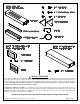
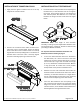
xamine PT
A
s
crew(s).Ifp
r
f
rontintakel
o
R
emove the
b
ottom of t
h
r
etainingclip
s
D
isassemble
c
overbyrem
S
etthecover
A
fter ensuri
n
r
emove chas
aterre‐insta
l
D
H
AN.Duplicationi
n
K
ITINSTAL
R
ATION
A
C front cove
r
esent,scre
w
o
uvers.
cover from
h
e cover aw
s
disengage(
the existing
ovingthescr
e
asideforlat
e
n
g ALL powe
sis from wal
l
lation.
W
A
D
isconnect
A
Failuret
o
n
wholeorinpart
LATIONG
U
r. Cover ma
y
w
scanbere
m
the chassis
ay from the
1).Thenlift
u
d
ischarge gri
e
ws.
e
rre‐installa
t
r sources ar
e
l sleeve. Set
A
RNING|
A
LLpowerb
e
o
disconnec
t
isprohibited.
U
IDE
y
be secured
m
ovedthroug
by pulling o
n
chassis unt
i
u
p(2)
lle from the
t
ion.
e
off, unplu
g
chassis asi
d
HIGHV
O
e
foreinstal
l
t
allpower
c
by a
hthe
n
the
i
l the
front
g
and
d
e for
W
A
1.
M
l
e
(
R
a
2. In
in
O
LTAGE!
l
ationorse
r
c
ancausep
r
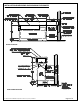
A
LLSLEEV
E
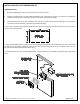
M
ark and dri
l
e
ft of the W
a
R
ighthands
h
nddrillhole
s
stallthetwo
thefigureb
e
| RISKO
F
r
vice.Unit
m
r
opertyda
m
E
PREPAR
A
l
l two (2) 9/
3
a
ll Sleeve in
h
own).Ifclea
s
fromthein
s
MountingB
r
e
low.
F
ELECTR
m
ayhavem
u
m
age,perso
n
P
a
A
TION
3
2” holes on
locations as
rancesdon
o
s
ideoftheW
a
r
acketsprovi
ICSHOC
K
u
ltiplepow
e
n
alinjuryor
a
ge3of6
the right a
n
shown belo
w
o
tallow,layo
u
a
llSleeve.
dedasshow
n
K
!
e
rsources.
death
n
d
w
.
u
t
n