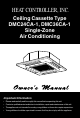
HEAT CONTROLLER, INC. Ceiling Cassette Type DMC24CA-1, DMC36CA-1 Single-Zone Air Conditioning Important Information • Please read carefully and thoroughly this manual before operating this unit. • Contact a qualified sevice technician for installation, repair and maintenance of this unit. • The appliance is not intended for use by young children or those who require supervision. • Young children should be supervised to ensure that they do not play with the appliance.
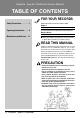
Cassette- Type Air Conditioner Owner’s Manual TABLE OF CONTENTS FOR YOUR RECORDS Safety Precautions.................3 Write the model and serial numbers here: Model # Serial # Operating Instructions...........8 You can find them on a label on the side of each unit. Dealer's Name Date Purchased Maintenance and Service ....23 ■ Staple your receipt to this page in the event you need it to prove date of purchase or for warranty issues.
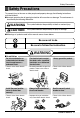
Safety Precautions Safety Precautions To prevent injury to the user or other people and property damage, the following instructions must be followed. ■ Incorrect operation due to ignoring instruction will cause harm or damage. The seriousness is classified by the following indications. WARNING This symbol indicates the possibility of death or serious injury. CAUTION This symbol indicates the possibility of injury or damage. ■ Meanings of symbols used in this manual are as shown below.
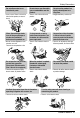
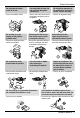
Safety Precautions Do not modify or extend the power cable. • There is risk of fire or electric shock. For installation, always contact the dealer or an Authorized Service Center. • There is risk of fire, electric shock, explosion, or injury. Do not install, remove, or reinstall the unit by yourself (customer). • There is risk of fire, electric shock, explosion, or injury. Do not install the product on a defective installation stand. • It may cause injury, accident, or damage to the product.
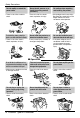
Safety Precautions Do not allow water to run into electric parts. • It may cause There is risk of fire, failure of the product, or electric shock. Do not store or use flammable gas or combustibles near the product. • There is risk of fire or failure of product. Do not use the product in a tightly closed space for a long time. • Oxygen deficiency could occur. Gasolin When flammable gas leaks, turn off the gas and open a window for ventilation before turn the product on.
Safety Precautions When the product is not be used for a long time, disconnect the power supply plug or turn off the breaker. • There is risk of product damage or failure, or unintended operation. Take care to ensure that nobody could step on or fall onto the outdoor unit. • This could result in personal injury and product damage. CAUTION ■ Installation Always check for gas (refrigerant) leakage after installation or repair of product. • Low refrigerant levels may cause failure of product.
Safety Precautions Do not block the inlet or outlet of air flow. Use a soft cloth to clean. Do not use harsh detergents, solvents, etc. • It may cause product failure. • There is risk of fire, electric shock, or damage to the plastic parts of the product. Do not touch the metal parts of the product when removing the air filter. They are very sharp! • There is risk of personal injury. x Wa Thinner Do not step on or put anyting on the product. (outdoor units) Always insert the filter securely.
Operating Instructions Operating Instructions Indoor Unit Signal Receiver Receives the signals from the remote control. (Signal receiving sound: two short beeps or one long beep.) Cassette Type Indoor Unit On/Off : Lights up during the system operation. Filter Sign : Lights up after 2400 hours from the time of first operating unit. Timer : Lights up during Timer operation. Forced Operation : Operation procedures when the remote control can't be used.
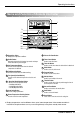
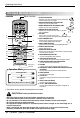
Operating Instructions Name and Function of Remote Controller AUTO SWING OPERATION SET TEMP Room Temp 2ndF Timer FAN SPEED SUB FUNCTION HI MED LO AUTO Heater Preheat JET Defrost Humidify SLo Filter Out door ZONE 1 2 3 4 Time 1 Operation unit No Func Program set On Off Set no.
Operating Instructions Wireless Remote Controller Controls Signal transmitter 5 1 6 3 4 2 7 11 8 13 10 CANCEL ON OFF 9 12 SET AUTO CLEAN 17 18 14 16 15 Flip-up door (opened) Operation Mode Cooling Operation Auto Operation Healthy Dehumidification Operation 1. START/STOP BUTTON Operation starts when this button is pressed and stops when the button is pressed again. 2. OPERATION MODE SELECTION BUTTON Used to select the operation mode. 3.
Operating Instructions Set the Current Time and day of the Week Unless you press any button about 5 (sometimes 10) seconds while setting function, the setting mode returns to initial mode. 1 Press the ' ' button. Hour Each time the button is pressed, the number is changed from 00 to 23. This number indicates current hour.
Operating Instructions Weekly Programming 1 Press the Program button. The remote controller is displayed like a picture. Then ' Program Program set AUTO SWING ', ' OPERATION ' and '01' is blinked. SET TEMP Room Temp 2 Week Press the ' Press Week 03 AUTO Heater Preheat JET Defrost Humidify Filter Out door ZONE 1 2 3 4 Program set 05 07 09 ' button. button repeatedly until desired mode appears. Week Week For example, if you want Thu, press 3 button 4 times. Select the time you want.
Operating Instructions Holiday Setting If Tuesday is a holiday in this week, you may set a holiday. AUTO SWING OPERATION SET TEMP Room Temp Program 1 AUTO Heater Preheat JET Defrost Humidify Filter Out door ZONE 1 2 3 4 Time Operation unit SUB FUNCTION HI MED LO Press the Program button. Timer FAN SPEED Program set On Off Set no. Time 01 03 AUTO SWING OPERATION 05 07 09 11 13 15 17 19 21 23 Week 2 Press the Week button. Select the Tuesday.
Operating Instructions Operation Mode Cooling Mode Soft Dry Mode Auto Mode Operation Procedure 1st On/Off Button AUTO SWING OPERATION SET TEMP Room Temp 2ndF Timer Operation Mode Selection Button SUB FUNCTION HI MED LO AUTO Heater Preheat JET Defrost Humidify SLo Filter Out door ZONE 1 2 3 4 Time Operation unit No Func Program set On Off Set no.
Operating Instructions Cooling Operation Mode 1 Press the On/Off Button. Cooling Operation. 2 Select Press the Operation Mode Selection Button. Each time the button is pressed, the operation mode is shifted in the arrow direction. Operation Display AUTO SWING OPERATION SET TEMP FAN SPEED Room Temp 03 AUTO SWING 07 09 13 15 17 19 21 FAN SPEED Operation unit On Off Set no.
Operating Instructions Soft Dry Operation Mode This mode dehumidifies without overcooling. 1 Press the On/Off Button. 2 Select Soft Dry Operation. Press the operation Mode Selection Button. Each time the button is pressed, the operation mode is shifted in the arrow direction. Operation Display AUTO SWING OPERATION SET TEMP Room Temp Operation unit 03 SUB FUNCTION 07 09 11 OPERATION 15 17 19 21 23 Cooling Operation Operation unit On Off Set no.
Operating Instructions Auto Operation Mode 1 Press the On/Off Button. Auto Operation, press the Operation Mode Selection button. 2 ToEachselect time the button is pressed, the operation mode is shifted in the direction of the arrow. Operation Display AUTO SWING OPERATION SET TEMP FAN SPEED Room Temp Operation unit 03 AUTO SWING 07 09 11 15 17 19 21 FAN SPEED Operation unit On Off Set no. Time 01 23 03 SUB FUNCTION AUTO SWING 07 09 11 15 17 19 21 Operation unit On Off Set no.
Operating Instructions FAN Operation Mode 1 Press the On/Off Button. 2 Press FAN Operation Button. AUTO SWING OPERATION SET TEMP Room Temp 03 SUB FUNCTION AUTO Heater Preheat JET Defrost Humidify Filter Out door ZONE 1 2 3 4 HI MED LO Time Operation unit Timer On Off Set no. Time 01 FAN SPEED Program set 05 07 09 11 13 15 17 19 21 23 time Fan Speed button is pressed, the fan speed mode is shifted in the arrow 3 Each direction.
Operating Instructions Comfort Operation with Swirl • It is the function for comfort cooling/heating operation. • The diagonal two louvers are opened the more larger than the other louvers. After one minute, it is opposite.
Operating Instructions Vane Control You can change the open angle to the install situation. 1 Press the On/Off Button. 2 Press the right arrow and auto swing button simultaneously for three seconds. Then the display will be toggled like before. Detach your finger from buttons at the moment that it is displayed "P0" in the operation display.
Operating Instructions Auto Swing Mode Ca nc el Pr og ram Ho ur Min 3 19 4 or 21 2n 23 dF We ek Ho lid ay Se t/C lr Pla sm a RE SE T the On/Off 1 Press button. the Auto Swing 2 Press button then the (Confirm the unit on operation.) Press again the Auto 3 Swing button to horizontal louvers swing up and down automatically. cancel the Auto Swing mode. Child Lock Function AUTO SWING This is the Function that any children cannot used to the air-conditioner.
Operating Instructions Forced Operation Operation procedures when the remote control can't be used. Press the tact switch (Forced operation) for 2 seconds. If you want to stop operation, press again the tact switch. In case the power comes on again after power failure on the Forced Operation mode, the operating conditions are automatically set as follows: During Forced Operation, the initial mode continues.
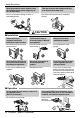
Maintenance and Service Maintenance and Service Indoor Unit Grille, Case and Remote Control ❐ Turn the system off before cleanining, To clean, wipe with a soft, dry cloth. Do not use bleach or abrasives. NOTICE Supply power must be disconnected before cleaning the indoor unit. Air Filters The air filters behind the front grille should be checked and cleaned once every 2 weeks or more often if neccessary. Air Outlet 1 Antibacteria filter Air Intake Remote Controller Remove the Air filters.
Maintenance and Service Purifying filter Cleaning The PLASMA filter behind the air filters should be checked and cleaned once every 3 months or more often if necessary. 1 After removing the air filters, pull slightly forward to remove the PLASMA filter. 2 Dip the PLASMA filter into the water mixed with neutral detergent, for 20~30 minutes. 3 Dry the PLASMA filter in the shade for a day (Especially, the humidity must be removed perfectly on this parts). 4 Note the cuts of electric discharge lines.
Maintenance and Service When the air conditioner is not GOING to be used for a long time. When it is not going to be used for a long time. When the air conditioner is to be used again. 1 Operate the air conditioner at the following settings for 2 to 3 hours. • Type of operation: Fan operation mode.(Refer to page 18.) • This will dry out the internal mechanisms. 2 Turn off the breaker. CAUTION: Turn off the breaker when the air conditioner is not going to be used for a long time.
Maintenance and Service Troubleshooting Check the following points before requesting repairs or service.... If the malfunction persist, please contact your dealer. Case The air conditioner does not operate. The room has a peculiar odor. It seems that condensation is leaking from the air conditioner. Air conditioner does not operate for about 3 minutes when restart. Does not cool or heat effectively. The air conditioner operation is noisy. Crack sound is heard.
Specifications and performance data subject to change without notice. HEAT CONTROLLER, INC. 1900 WELLWORTH AVENUE • JACKSON, MICHIGAN 49203 THE QUALITY LEADER IN CONDITIONING AIR P/No.