INSTALLATION MANUAL VMH 09/12/18/27/36 Version C InverterFlex Ductless Mini-Split Heat Pump Heat Controller, Inc. • 1900 Wellworth Ave. • Jackson, MI 49203 • (517)787-2100 • www.heatcontroller.
VMH InverterFlex Mini-Split INSTALLATION MANUAL Heat Controller, Inc. Table of Contents Safety Precautions Warnings and Cautions............................................................................2 Installation Instructions Selecting an installation location...............................................................3 Accessories..............................................................................................4 System installation....................................................
Heat Controller, Inc. INSTALLATION MANUAL VMH InverterFlex Mini-Split • Read the follow SAFETY PRECAUTIONS carefully before installation. • Electrical work must be performed by a licensed electrician. Be sure to use the correct rating of the power cord and main circuit for the model to be installed. • Incorrect installation due to ignoring the instruction will cause harm or damage. n The seriousness is classified by the following indications.
VMH InverterFlex Mini-Split INSTALLATION MANUAL Heat Controller, Inc. 1. Wall-mounted type Selecting installation place Read completely, then follow step by step. Indoor unit • Do not expose the indoor unit to heat or steam. • Select a place where there are no obstacles in front or around the unit. • Make sure that condensation drainage can be conveniently routed away. • Do not install near a doorway. • Ensure that the space on the left and right of the unit is more than 5in.(12cm).
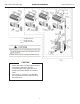
INSTALLATION INSTRUCTIONS Heat Controller, Inc. INSTALLATION MANUAL VMH InverterFlex Mini-Split Tools needed for installation: Level Levelgauge gauge Screwdriver Screwdriver Electricdrill, drill,Hole core drill drill (o ( .25in.(65mm)) 26in.(65mm)) Electric Hole core Flaringtool toolset set Flaring Specified torque wrenches: 1.8kgf.m, 4.2kgf.m, Torque wrench 5.5kgf.m, 6.6kgf.m(different depending on model No.) Spanner Spanner(half (halfunion) union) Hexagonal Hexagonalwrench wrench (1.5in.(4mm)) (1.5in.
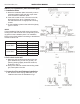
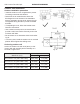
VMH InverterFlex Mini-Split INSTALLATION MANUAL Single-Dual Zone Single-Tri Zone Single-Quad Zone CAUTION • Use a stud finder to locate studs to prevent unnecessary damage to the wall. • A minimum pipe run of 9.8 ft (3m) is required to minimize vibration & excessive noise. • Two of the “A,” “B” and “C” air flow directions should be free from obstructions for the outdoor unit. 5 Heat Controller, Inc.
Heat Controller, Inc. INSTALLATION MANUAL Indoor unit installation (wall-mounted type) 1. Installation Plate A. Mount the installation plate horizontally on structural parts (studs) of the wall with proper clearance around the installation plate. B. If the wall is made of brick, concrete or the like, drill eight (8) 5mm (0.2in.) diameter holes in the wall.Insert anchor for appropriate mounting screws. C. Fit the installation plate on the wall with eight (8) type “A” screws.
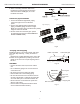
VMH InverterFlex Mini-Split INSTALLATION INSTALLATION MANUAL Heat Controller, Inc. INSTRUCTIONS 2. When connecting extension drain hose, insulate the connecting part of extension drain hose with a shield pipe, do not let the drain hose slack. Wall Cap Connective pipe installation 1. For the left-hand and right-hand piping, remove the pipe cover from the side panel. 2. For the rear-right-hand and rear-left-hand piping, install the piping as shown in Fig.9. Bend the connective pipe to be laid at 4in.
Heat Controller, Inc. INSTALLATION MANUAL VMH InverterFlex Mini-Split 4. Indoor unit installation 1. Pass the piping through the hole in the wall. 2. Put the upper claw at the back of the indoor unit on the upper hook of the installation plate, move the indoor unit from side to side to see that it is securely fastened (see Fig.12). Spacer 3. Separate the bottom of the indoor unit from the wall by inserting spacer, etc., between the indoor unit and the wall. Remove spacer after piping is complete. 4.
VMH InverterFlex Mini-Split Heat Controller, Inc. INSTALLATION MANUAL Outdoor Unit Installation Outdoor installation precaution • Install the outdoor unit on a rigid base to prevent increasing noise level and vibration. • Determine the air outlet direction where the discharged air is not blocked. If the installation place is exposed to strong winds, ensure the unit is lengthwise along the wall or provide a suitable air baffle. • If suspending the unit, follow the bracket manufacturer’s instructions.
Heat Controller, Inc. VMH InverterFlex Mini-Split INSTALLATION MANUAL REFRIGERANT PIPE CONNECTION Drain joint installation Fit the seal into the drain elbow, then insert the drain joint into the base pan hole of outdoor unit, rotate 90 to securely assemble them. Connecting the drain joint with an extension drain hose (Locally (locally purchased) purchased), is in recommended. case of the water draining off the outdoor unit during the heating mode.
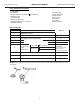
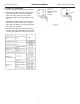
VMH InverterFlex Mini-Split INSTALLATION MANUAL Refrigerant Pipe Connection D: Flaring work Firmly hold copper pipe in a die in the dimension shown in the table below. Outer diameter in. (mm) o 1/4" (6.35) o 3/8" (9.35) o 1/2" (12.7) A in. (mm) Max. 0.5 (1.3) 0.63 (1.6) 0.709 (1.8) Min. 0.276 (0.7) 0.394 (1.0) 0.394 (1.0) Tightening Connection • Align the center of the pipes. • Sufficiently tighten the flare nut with fingers, and then tighten it with a spanner and torque wrench as shown in Fig.
Heat Controller, Inc. INSTALLATION MANUAL VMH InverterFlex Mini-Split Electrical Work Electric safety regulations for the initial Installation 1. Power voltage should be in the range of 90%~110%of rated voltage. 2. The creepage protector and main power switch with a 1.5 times capacity of Max. Current of the unit should be installed in power circuit. 3. Ensure the air conditioner is grounded well. 4. Connect wiring to the unit according to the electrical diagram located on the panel of the outdoor unit.
VMH InverterFlex Mini-Split INSTALLATION MANUAL Electrical Work • Do not touch the capacitor even if you have disconnected the power or electric shock hazard may occur. For your safety, you should start repairing at least 5 minutes after the power is disconnected. • The power is supplied from the Outdoor Unit. Up to four indoor units are connected with signal wires or power cords. Connect the cable to the outdoor unit 1.
Heat Controller, Inc. INSTALLATION MANUAL VMH InverterFlex Mini-Split Air Purging Air and moisture in the refrigerant system have undesirable effects as indicated below: • Pressure in the system rises. • Operating current rises. • Cooling or heating efficiency drops. • Moisture in the refrigerant circuit may freeze and block capillary tubing. • Water may lead to corrosion of parts in the refrigeration system.
VMH InverterFlex Mini-Split Heat Controller, Inc. INSTALLATION MANUAL Air Purging • When relocating the unit to another place, perform evacuation using vacuum pump. • Make sure the refrigerant added into the air conditioner is liquid form. Caution in handling the packed valve • Open the valve stem until it hits against the stop. Do not try to open it further. • Securely tighten the valve stem cap with a spanner or the like. • Valve stem cap tightening torque (see tightening torque table).
Heat Controller, Inc. VMH InverterFlex Mini-Split INSTALLATION MANUAL AirAIR Purging PURGING Safety Leak Checkcheck Safetyand and leakage Electrical safety check Perform the electric safe check after completing installation: 1. Insulated resistance The insulated resistance must be more than 2M . 2. Grounding work After finishing grounding work, measure the grounding resistance by visual detection and grounding resistance tester. Make sure the grounding resistance is less than 4 . 3.
VMH InverterFlex Mini-Split Heat Controller, Inc. TEST RUNNING INSTALLATION MANUAL TestingTest therunning System Perform test operation after completing gas leak check at the flare nut connections and electrical safety check. Check that all tubing and wiring have been properly connected. Check that the gas and liquid side service valves are fully open. 1. Connect the power, press the ON/OFF button on the remote controller to turn the unit on. 2.
09/2010 04/2009