
Installation Guide


Technical Bulletin
www.heat-fab.com eng@heatfab.com
2 of 6 413.863.2242 800.772.0739 fax 413.863.4803
R1207 130 Industrial Boulevard Turners Falls MA 01376
2. Read & Follow Selkirk’s Instructions.
• Installation and Maintenance Instructions for Saf-T Vent systems are packaged with critical
components (elbows, tees, and terminations), as are other supplemental instruction sheets for the
critical component itself.
• Accessories (roof jacks, vertical supports, and wall penetrations) come with detailed instructions
specific to their proper installation.
• If you have questions on correct installation methods, call us. Our engineering technicians would love
to hear from you.
• Installation information is also available at our web site www.heatfab.com.
•
BEFORE YOU TRY IT YOUR WAY, PLEASE TRY OUR WAY FIRST!
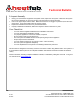
3. When RTV Sealant is Required, Apply It Correctly.
• Sealant MUST be used on diameters larger than 16 inches! Diameters 5” – 16” have an integral
gasket built right in. RTV Sealant is NOT required for these diameters.
• Use only GE RTV 106 or Dow Corning 732.
• GE RTV 106 will cover all Heat-fab installations with flue gas temperatures up to 550°F.
• Dow Corning 732 may be used on low temperature applications with flue gas temperatures up to
300°F.
• Clean the joint area before applying sealant. Alcohol pads are included with each part and should be
used to remove dirt and trace oils.
• A 1/8” bead of sealant is enough.
• Apply the sealant on the outside of the male end (end without tabs), about 1/4” – 3/8” up from the end
of the part, in a straight and continuous bead. A straight and continuous bead works just fine – a
zigzag or wavy line usually applies too much sealant and could leave gaps. Gaps in the bead will
cause leaks.
• Inspect the joint after it has been put in place. Apply extra sealant to any voids or crevices. Smooth it
out with your finger if you want – but wipe the excess on a paper towel or work rag, not on your
clothes. RTV will stain and is difficult to remove.
• Be sure to apply extra sealant when called for. Some joints, such as adjustable sections and flue
collar connections, require additional sealant.
• GIVE IT A REST! Dow Corning and GE both recommend sealant be allowed to cure for 24 hours
before operating the appliance.
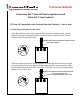
4. Secure the Joint
• Insert the tapered male end into the flared female end using enough pressure to completely seat the
connection.
• DO NOT attempt to make up inches by joining the sections partially.
• For parts with the Ring-and-Tab connection, slide the Ring over all Tabs, bringing it down as far as
possible. Now bend the Tabs over completely. A flat head screwdriver can be helpful to start bending
the Tabs.
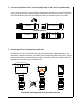
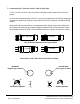
• For CI Plus parts:
Insert the male end into the female end, lining up the Locking Tabs at the same time. If needed,
use pliers to squeeze the Tabs so they will accept the slots in the Mechanical Locking Strap.
Spraying the gasket with water or a mixture of water and liquid soap will lubricate it for and easier
assembly.