
Installation Guide


15
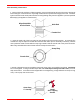
SC Rain Cap
Exhaust Termination
Install the vertical termination adapter into the last vent section and secure with the 3 self-tapping
screws provided. Attach a rain cap or other appropriate Saf-T Vent exhaust termination to the end of
the vertical termination adapter. If the exhaust termination needs to be extended, a section of EZ Seal
vent can be connected directly to the vertical termination adapter. Seal weather exposed joints of
the outer jacket with foil tape or an exterior grade silicone sealant. To allow for inspection of the
system, do not seal the exhaust termination.
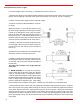
Vertical Terminations, (SC_ _VT):
Termination Adapter
Directly On Roof or Curb:
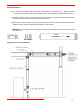
Tall Cones are available for flat (SC_ _TCF), 2/12 pitch - 6/12 pitch (SC_ _TCFA), and
6/12 -12/12 pitch roofs (SC_ _TCFB). Prepare a square or round opening at least 1/4"
larger than the outer jacket (5 1/4" for 3" vent or 7 1/4" for 4" vent). Remove any insulation
from the opening. Apply weather-stripping or outdoor caulk to the bottom of the cone
plate and attach the plate to the roof using common construction methods. Flash over
the cone plate and seal the fastener heads using normal roofing requirements. When
the vent pipe is in place through the Tall Cone, attach a storm collar (sold separately)
around the pipe. Apply high temperature silicone sealant around the pipe where it passes
through the top of the storm collar. Continue to install vent sections as needed to meet
the height requirements by code. Seal weather exposed joints of the outer jacket
with foil tape or an exterior grade silicone sealant.
Tall Cone Flashing:
Storm Collar
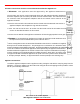
Tall Cone Flashing
Exterior Joint
Tall Cone Flashing
Sealant